Hello everyone, this is DIY Renova.
The older the Japanese wooden houses, the more damage to the pillars becomes apparent.In particular, old Japanese houses, depending on the construction period and the materials used, the pillars are prone to termites and decay.In this article, we will focus on "pillar reinforcement" and "pillar replacement (replacement)" that are easy for anyone who likes DIY or is interested in reviving old Japanese houses.We expect to see a maximum of two-story wooden houses in Japan.We will explain in detail with safety first, as well as an engineering quantitative perspective, so if you read this article you will know what tools you need and what steps to work on.
The following topics will be introduced step-by-step, divided into three typical methods: "mountain pillar (additional pillar) construction," "pillar root jointing," and "pillar replacement method," so that beginners don't get confused.We have also compiled information on how to choose a jack, safety measures, and criteria for determining if it is difficult to deal with using DIY, so please take a look.
So, here you go.
Basic knowledge of wooden house pillars that you should know first
In houses made of traditional wooden construction methods, the pillars are large and divided into "through columns" and "tube columns."
- Through-post: A pillar that penetrates from the base on the first floor to the eaves and roof on the second floor
- Pipe columns: Parts divided into 1st and 2nd floors, and are fixed to the base, beams and girder on each floor.
In older homes, through pillars are often located in important locations such as the "four corners" that support the buildings significantly.The standard cross-section of the through column is approximately 12cm square (4 inch square) and the standard cross-section of the tube column is approximately 10.5cm square (3.5 inch square).Of course, the dimensions vary depending on the home, but understanding the dimensions and the condition of the pillars makes it easier to choose the replacement and reinforcement method, which will be described later.
The pillars are characterized by having a large load (weight of the roof and second floor) in the vertical direction.Therefore, when reinforcing or replacing a pillar, you must carefully consider how to temporarily release the load (such as jacking up) and safety when cutting or adding a pillar.This is because if you handle structural materials incorrectly, it may lead to distortion and sinking of the entire house.
For detailed information on the types of pillars, please see separate items.This articleThis is a summary, so if you're interested, please take a look!
Tools and safety precautions for DIY pole handling
Before you begin the work process, check the tools you need to prepare and safety precautions.
Main tools and materials
- Hydraulic jack or mechanical journal jack
- Hydraulic jack: Relatively easy to obtain, also known as a bottle jack.Compact and easy to operate.However, there is concern about the long-term load retention due to oil bleeds and the like.
- Journal Jack: A mechanical jack that moves a screw or gear up and down.Since it does not automatically lower, the load can be supported stably for a long period of time.If it's difficult to get DIY, it's worth considering renting.
For jacks, please note thatThis articleI've written a summary of ideas on how to choose one!
- Wood, twill, and pads that serve as temporary pillars
- A component that supports loads while removing and reinforcing the pillar.Use it upright between the floor, beams and girder.We recommend square timbers that are sufficiently thick (e.g. 90 x 90 mm or 105 x 105 mm) and have little warping.
- New wood
- Column material used for replacement and reinforcement.Prepare square timber with the same dimensions as the existing columns or larger in cross-section.A structural drying material is desirable.
- Tools
- Saw, electric circular saw, reciprocating saw (for dismantling), hammers, chisels, drill drivers, long woodworking drill bits, etc.
- Hardware: Corner fittings and plate hardware for joining pillars, foundations and beams, coach screws, all screw bolts + nuts + washers, etc.
- Measuring tools and auxiliary tools
- Measures, deposits, laser levelers and lowered swings (to measure the verticality of the pillar), clamps.
- Safety protection equipment
- Helmets, protective glasses, work gloves, masks, etc.Be especially careful of falling or wood chips scattering while jacking up.
Safety pre-work
- Make the overall picture clearer about which pillars and how far they will be reinforced and replaced.
- Whether to handle through pillars, pipe columns, and how far is the degree of decay?
- Consider the balance between budget, construction period, and overall renovation policy.
- Remove floors and walls to the required area, allowing pillars to be visible.
- Remove the inner walls, earthen walls, etc. to expose the joints with the columns, foundations, and beams.
- A temporary support is set up to temporarily release the load applied to the pillar.
- This is the most important task.The underfloor where the jack is installed can be layed with reinforcement boards to prevent it from sinking.
- While raising the jack, fine adjustments are made so that the temporary column hits the beams and girders perfectly.Don't lift it up suddenly, but just raise it little by little to just float the pillar slightly.
- During work, always consider what happens if the jack or support comes off, and make double and triple backups.
After completing the above preparations, start the actual reinforcement and replacement work.Now, let me introduce three typical techniques.
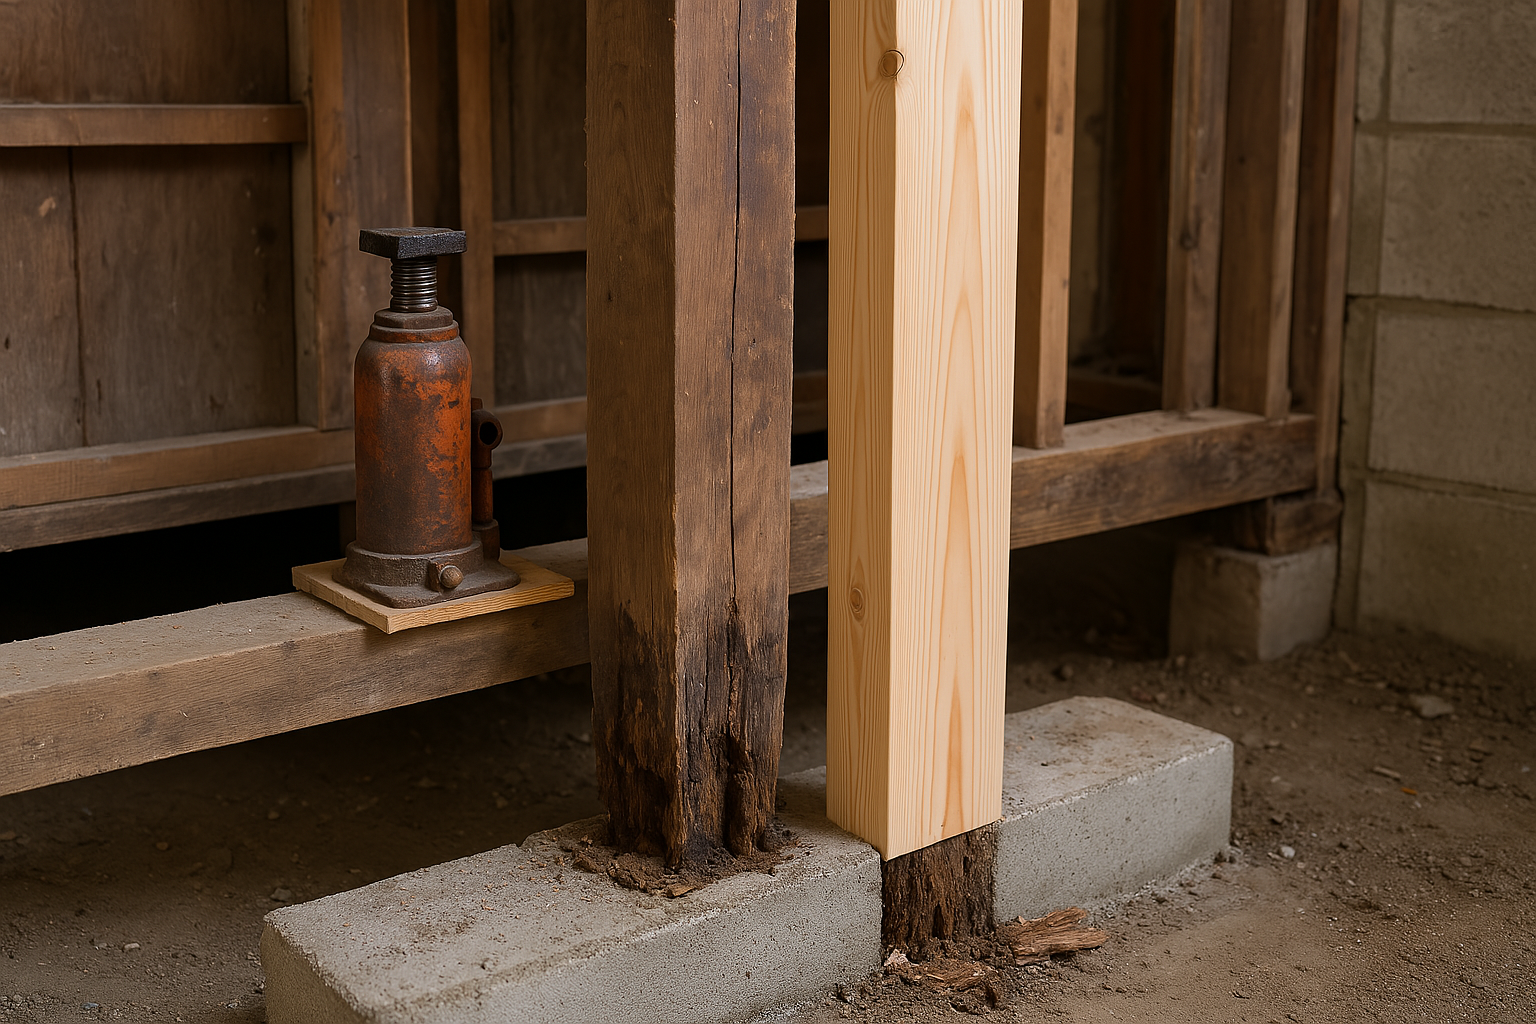
1. Construction method for carrying a pole (supporting pole)
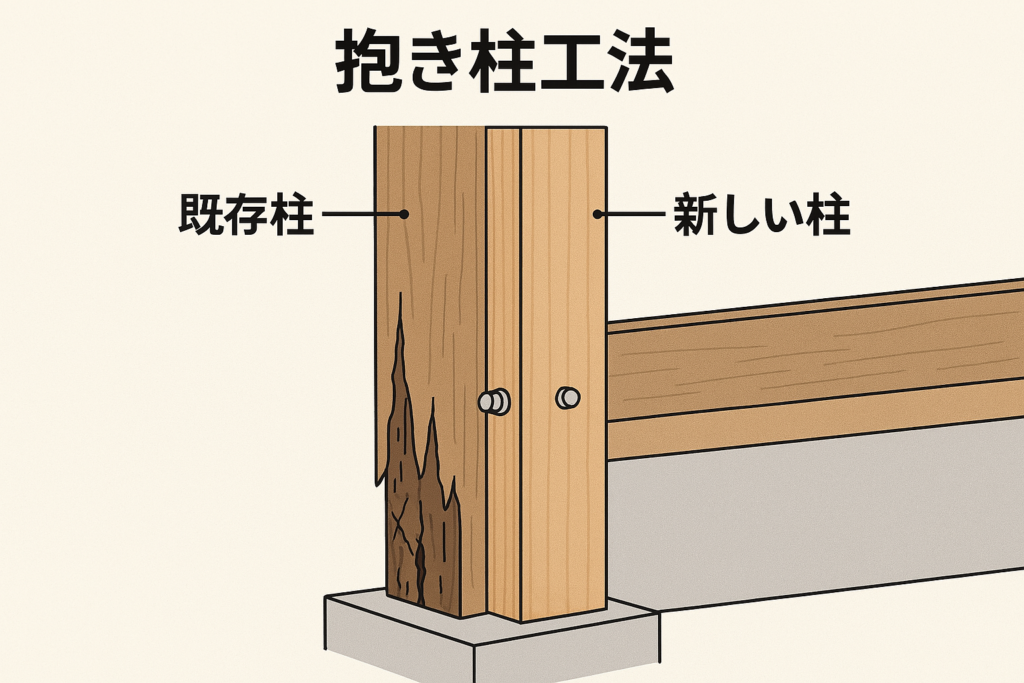
The "Hand-up Pole Construction" is a method in which the existing pillars are not removed, but instead new pillars are attached side by side in parallel, and the two are fastened with bolts or other means to integrate them.
Features
- It is effective when the pillars are partially corroded or cracks cause uncertainty in strength.
- Since all the pillars are not removed, the impact on the building is relatively small.
- It's easy for DIY beginners to try it out and has a low safety risk.
Work Steps
- Exposing and cleaning the column surface
- Remove wall materials and finishing materials and leave the sides of existing pillars exposed.
- Strain any chips or splinters with chisels or file, and adjust the surface to make it easier for the attached pillar to adhere to the surface.
- Processing of new pillars
- Measure the height and installation position of existing pillars, and cut new square timber to the required dimensions.
- In some cases, there may be some slight gaps in the area where the beams and girders are contended.
- Temporary attachment and alignment
- With the load released with a jack, the new pillars are brought into contact with the existing pillars in parallel.
- Temporarily secure it with a clamp or something similar, and check if the vertical is exposed using a lowering swing or a horizontal device.
- Consolidation for integration
- When penetrating the pillars together with bolts, drill two or three holes at the top and bottom using a drill.
- Place the washer and nut on the bolt and tighten it firmly.
- There is also a way to tighten the coach screw or lug bolts diagonally.
- Fixing the upper and lower ends
- The top end of the attached pillar is joined to the beams and girder, and the bottom end is joined to the foundation or foundation.Securely fasten with hardware plates or corner hardware.
- Finally, slowly loosen the jack so that the load can be applied and the pillars can be supported.
Points to note
- If the existing pillars are too brittle, there are cases where the tension alone cannot be achieved sufficient strength.
- If the dryness of the old and new wood differs, it is desirable to periodically tighten it so that there will be no gaps later.
- The estimated cost is around tens of thousands of yen if it only requires new pillars and hardware.
2. Root jointing method
"Root joints" are a method of cutting off the damaged part and adding new material when only the bottom part of the pillar (the root) is damaged due to rot or other damage.This is often done when the pillar base is worn out due to termite damage.
Features
- Only the bottom edge is switched, so there is no need to replace the entire pillar in a large size.
- However, it requires shiguchi processing and hardware reinforcement, making it a little more DIY difficult.
Work Steps
- Determining the cutting line
- Determine how far the corrosion has progressed.For example, if 30cm of the root is damaged, set the cutting line at a height of 50cm or 60cm, including the healthy part at the top.
- Separate
- With the load removed with a jack, cut the pillars to the level using a saw or reciprocating saw.
- Remove the lower end and smooth the cut surface of the pillar with chisels and file.
- Preparation of new materials and joining them with fittings or hardware
- The new pillar material was cut to the same size as the cut off, or slightly longer than that.
- Traditionally, joint processing is done, but for DIY purposes, it is practical to reinforce it with butts and hardware plates and adorned plates.
- Thick splints and metal fittings are applied from both sides and all sides, and secured with bolts or coach screws.
- Releasing and finishing the jack
- Make sure the old and new pillars are integrated, then slowly lower the jack and return the load to its original state.
- Preservatives and termite-proofing treatments are applied as necessary to restore floors and walls.
Points to note
- It is effective if the problem is only the bottom of the pillar, but if the entire pillar is damaged, root joints cannot be dealt with.
- If the fitting is weak, there is a risk that it will break through the seams due to vibrations in the building.Be careful when reinforcing.
- Working posture is difficult (working near the floor), so it is important to try to avoid excessive posture.
3. Replacing the pillar (overall replacement)

"Port replacement" is a method of removing an entire existing pillar and installing a new one.DIY is the most difficult and the work risks are high, so you need to make a careful judgment.
Features
- This is considered when the pillars have severe decay or break over the entire length, or when the pillars are completely removed in order to change the floor plan during renovation.
- Expert advice is strongly recommended when working with through-posts or important pillars in the four corners of the building.
Work Steps
- Removing existing pillars
- After sufficient temporary support, the joints with the beams and foundation are cut.
- Divide the pillars up and down and then remove them little by little to make them safer.
- Processing of new pillars
- Materials are prepared with the same length and cross-sectional dimensions as the original column.It would be ideal if the fittings could be reproduced, but in DIY, most of the joints are made using hardware.
- When using pillar holder hardware, the top and bottom edges of the pillars may be shaved to match the metal fittings.
- Building and fixing pillars
- Jack up the beams and girders to float several millimeters, and set up new poles in the gaps.
- Securely joins beams and foundations with corner hardware, plates, bolts, etc.
- The jack was slowly lowered and confirmed that the new pole was bearing the load.
- Reinforcement and strength check of the surrounding area
- If the load bearing walls are not sufficient due to the removal of the pillar, consider structural reinforcement such as establishing new braces.
Points to note
- Easily removing corner or through-posts can cause the load balance of the entire building to be ineffective.
- When structural changes occur, such as by providing large openings, there are cases where building approval applications and earthquake resistance diagnosis are required.
- It is very important to determine whether DIY is possible or not, and in some cases it may be safer and in the end cost-effective to hire a specialist.
[Special Case] Response when there is a tube column above only half of the horizontal material
Among the pillars that are to be reinforced or replaced, "the horizontal layer material (base, beam, etc.) that should be directly under the pillar are cut off midway."Structurally unstable casesThere are also.For example, in areas such as bathrooms where renovations have been repeatedly made,A tube column is directly mounted on a horizontal material that only exists half of it.You can see scenes like this.
In such a case, if you try to jack up the pillar,Loads can lose escape, causing structure to break, or columns to not liftIt's more risky.
That's why it worksNew temporary horizontal support material is installed and jacked up the horizontal material."The method is ".
■ Work steps (work required for two or more people)
- Installing "receiving material"
- Under only half of the existing cross-layer material,Structural square materials of 120 x 45 mm or 90 x 90 mmpass it sideways.
- To ensure that both ends are fully supported,Support is secured with foundation stones and polesI will.
- Two-point jack up
- One is directly below the tube column (main favourite)
- The other is installed under the newly threaded "side support material" andBe prepared to receive loads as a setI'll do it.
- *The golden rule is to apply a load in the "vertical direction" of jacks.It is not recommended to support it diagonally from the side.
- Installation of temporary support
- After jacking up,A temporary column of 90 x 90 mm or more is installed between the column and the beamand ensure safety.
- To ensure that the jack is not a problem,The temporary pillars are reinforced with structural plywood or diagonal material.I'll do it.
- For replacement and reinforcement work
- The column material is processed and replaced while the tube column is slightly raised.
- The legs of the new pillar areChemical Anchor + Hole Down HardwareThis ensures a firm connection with the foundation.
- Carefully unlock the jack
- Slowly return the load,Ensure that the entire pillar is safely supported by the loadI will.
■ Things to note
- While working,Beams and girders deform and deflect more than expectedAlways because there is a possibilityPay attention to sounds and movementsLet's proceed with the work.
- Temporary posts and support materialsIn the end, there is also a decision to leave it as a reinforcement material..
- Avoid supporting it from an angle (jacking up from the side) as it is dangerous.
Such a special case isThere are more structural risks than it looksThere are many cases, so if you don't know what to thinkWe recommend having experienced professionals take a look at it once.I will.In DIY, safety measures are the top priority,Three-piece set of support, lifting and reinforcementLet's take this into consideration.
Comparison of hydraulic jacks and journal jacks
"Jack-up" is an essential part of reinforcing and replacing pillars.Jacks are essential tools for temporarily supporting loads and switching and adding columns, but can be broadly divided into "hydraulic" and "mechanical (journal type)."
- Hydraulic type: A typical bottle jack is used for car tire replacements.It's small, powerful and relatively easy to get.It is important to hold it for a long time with oil bleeds, etc., to support it with a horse or a temporary pillar after lifting it.
- Journal type: A mechanical jack that is raised and lowered with gears or screws.Since it does not automatically descend, it is suitable for use in the field where it is fixed for a long period of time.It's not often available for DIY purposes, but there are cases where you can rent from a rental company.While it takes time to operate, it is also highly safe.
Use different things according to your work period and purpose.For example, if you lift it with a hydraulic jack and then quickly secure it with a temporary pole, that is often enough to handle it.If you need to keep your work jacked up for a few days, it's a good idea to consider a journal jack.
The scope of DIY and cases to ask a specialist
Reinforcement and replacement of pillars in wooden houses is a major task that directly involves the structure.If an amateur tries it out casually, it may become irreversible.Therefore, be sure to understand the range of things you can do with DIY and the cases that you should leave it to the professionals.
The extent possible for DIY
- Reinforcement of pillars, such as pipe columns on the first floor, are considered to be of a little less structural importance.
- If the rot is mild or medium, and the harboring pole construction method is sufficient.
- Small scale corrosion can be solved by simply combining the pillar base.
- The interior has already been dismantled by DIY, and the beams and foundation are exposed, making it easy to jack.
- If the operator is accustomed to handling saws, power tools, bolt fastening, etc. and has a good understanding of safety measures.
Cases to be requested by a professional
- Through pillars, corner pillars, and main pillars that form the center of the building must be removed and replaced.
- The entire house will be reinforced with earthquake resistance and major changes to the layout of the walls and braces will be greatly changed.
- Termites are damaged and decayed at the foundation and foundation level, and it is not just a problem with pillars.
- There are complex problems, such as the building being tilted, and a large-scale jack-up is required.
- I was very worried about the work itself, or I started working on it but it was difficult to continue.
To ensure safety and save time, if you have enough budget, there is a great benefit to leave it to a professional.If you're doing it DIY, at least remember to "understand correctly how jack up and load transfer mechanisms" and "consult with a professional if you have any problems with your own work."
Tips for preventing accidents
- Make sure to make sure you set up the steps before you start work.Write down on paper "How to reinforce the pillars" and "where to cut" and imagine the steps.
- Jack up little by little, and do not lift it up very much at once.If there is a creak or deformation, stop working immediately and check the cause.
- The moment when you separate a pillar is the most dangerous, so not just one person but multiple people will talk to each other.
- In case of an emergency, we have established an evacuation route so that it will not get caught even if the support comes out.Be especially careful of any falling objects from above.
- Always wear safety equipment (helmets, protective glasses, gloves, masks, etc.).
- If your judgment is reduced due to fatigue, the risk of accidents increases, so take regular breaks.
Reinforcement and replacement of pillars in wooden houses is packed with wisdom and techniques that have been built up in the world of carpenters since ancient times.While it is important to tackle DIY, risk management is just as important.
Summary
Deteriorating pillars is an inevitable challenge for wooden houses, especially those that have been built for aged years, especially those in old Japanese houses.Just knowing the three construction methods: "adding pillar (mountain pillar)," "root joints," and "replacement" before doing a major renovation will allow you to take quite a flexibly.Even DIYers can adequately reinforce the pillars if they take proper steps and safety measures into consideration, and as a result, they can make the house last longer.
However, since the pillars are the skeleton of the building, the golden rule is to proceed carefully when replacing and reinforcing.We strongly recommend that you seek expert advice, especially when dealing with key components of a structure, such as through poles and corner poles.Ultimately, safety is your number one priority, and if you have any questions, don't push yourself too hard and consult with a professional to proceed with the renovation.
We hope this guide will help you bring your home to a better state.
If you're wondering "How much renovation or remodeling can I actually do on my own home?" or "Where should I even start?", please visit this page. If you're looking to learn more about specific renovation processes or construction details, don't miss this page as well!
References
[1] Carpenter Manual (2021) "Replacing pillars and foundations in renovations [Carpenter work explanation] Procedures and precautions", YouTube
[2] daiku-manual (2021) "Example of replacing a passing pillar in an old house", YouTube
[3] "A case of removing and reinforcing a tokonoma column in a DIY renovation," Blog "Detached house renovation DIY style", 2020
[4] "Manual for reinforcement of wooden housing structures for earthquake-resistant renovations," administrative publications
[5] Building Standards Act Enforcement Ordinance (Reiwa Edition) "Regulations and cross-sectional dimensions regarding through columns and pipe columns in wooden houses"
Leave a Reply
You must be logged in to post a comment.