Hello, this is DIY Renova.
Nice to meet you, everyone interested in self-renovation.
Here, we will explain how even amateurs can try to "demolate mortar exterior walls" for Japanese wooden houses (up to two stories).Once you understand the steps and key points you'll be able to take action just by reading this article.We have compiled it step-by-step in an easy-to-understand manner, including an engineering perspective and quantitative information.It's a long time, but once you read it all, we've made efforts to avoid getting confused about how to do it, so please be sure to read it to the end.
Introduction
モルタル外壁は、戦後から昭和後期(あるいは平成初期)まで広く日本で普及した外装工法の一つです。The finish is finished by plastering mortar (a mixture of sand, cement, and water) on a base material called "kizuri," so the thickness is generally around 15 to 25 mm.In recent years, dry construction methods such as siding (plate-shaped exterior materials) and ALC panels have become the mainstream, but in many wooden houses that have been built for decades, mortar exterior walls still remain.リノベーションの際に新しい外装に変えるなら、既存のモルタルを解体して撤去する必要があるでしょう。
However, you may be worried about whether it is dangerous to dismantle the product without having to hire a specialist company or whether it is okay.In fact, in many cases, even amateurs can work with mortar walls in wooden houses as long as they are worthy of the key points.Of course, it is not necessary to overdo it, and proceed carefully while checking whether the area is related to the building's load-bearing walls and whether you can comply with safety measures and legal rules.
In this article,
- Things you need to know before dismantling
- Necessary tools and preparation
- Safety and structural precautions (including engineering perspectives)
- Types of disassembly methods and selection criteria
- Step-by-step disassembly procedure
- Disposal of waste materials and recycling after dismantling
- We will summarize in detail the process, including introducing other tips and examples.We will also introduce references and useful videos at the end, so please try using them in your actual activities.
Things you need to know before dismantling
Building Standards Act and local government rules
In Japan, there are rules set for demolition and renovation of buildings as defined by the Building Standards Act and the ordinances of each local government.When removing walls related to the structure (especially load-bearing walls), it may be necessary to report them to an architect or an administrative agency.Even if the demolition is done on a small scale, be careful as if not taking measures against noise and dust to the neighborhood could lead to complaints and administrative guidance.
Check if it is a load-bearing wall
Even if it is a mortar exterior wall, the most important thing is whether the wall is structurally supporting the building (strength wall).In Japanese wooden houses, building walls resist the forces of earthquakes and wind due to braces (slanted material about 3.0 cm thick) and structural plywood.If you accidentally remove the load-bearing wall, there is a greater risk of the building collapse in the event of an earthquake.Be sure to check the blueprint and expert opinions to see whether the wall you are planning to demolish is a "strength wall."
Possible asbestos and hazardous substances
If the property is older, the exterior mortar wall may contain asbestos-based material.In Japan, a complete ban on asbestos has been enacted since 2006, but buildings built before that may contain it.It is difficult for an amateur to judge whether or not the product contains asbestos, and it is recommended to test it with a specialized testing agency to contain asbestos.If you suspect that it is asbestos, please refrain from dismantling it by DIY and entrust it to a specialist.
Asbestos may be used in some cases for painting the exterior mortar walls in older buildings.Do a preliminary investigation.Articles belowI think this will be helpful.
Structural calculation (simple) and acceptable range
Removing the mortar may reduce the load on the exterior walls slightly.The mass of mortar per 1 m² is generally around 25 kg (approximately 20 mm thick and moisture content included).This calculation roughly weighs around 180 kg on a whole wall (for example, 2.4m high x 3.0m wide).Reducing these factors reduces the load on the superstructure somewhat, but it could also contribute to the seismic resistance of the wall itself.Earthquake resistance of wooden houses is mainly determined by the amount of walls (total wall length and strength), so the risk changes depending on whether "even if only the mortar is peeled off, it is not a problem if the structure remains, such as braces," or "whether the braces and structural plywood are removed at the same time."With this in mind, carefully decide the area of the demolition.
Necessary tools and preparation
Here are some useful tools to find when dismantling mortar exterior walls.Please add it if necessary.
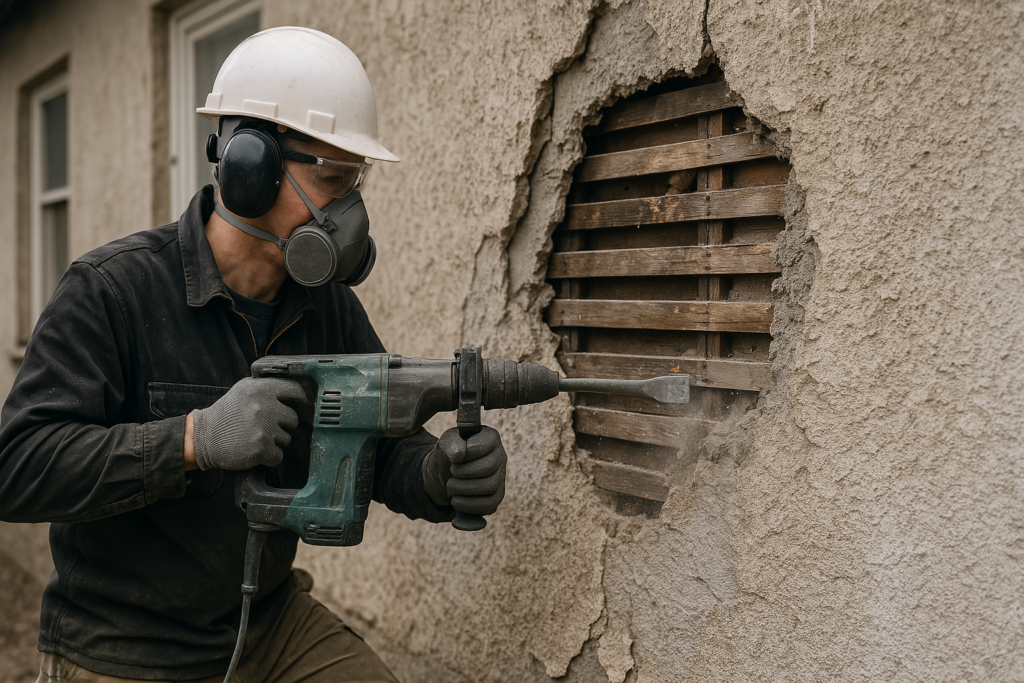
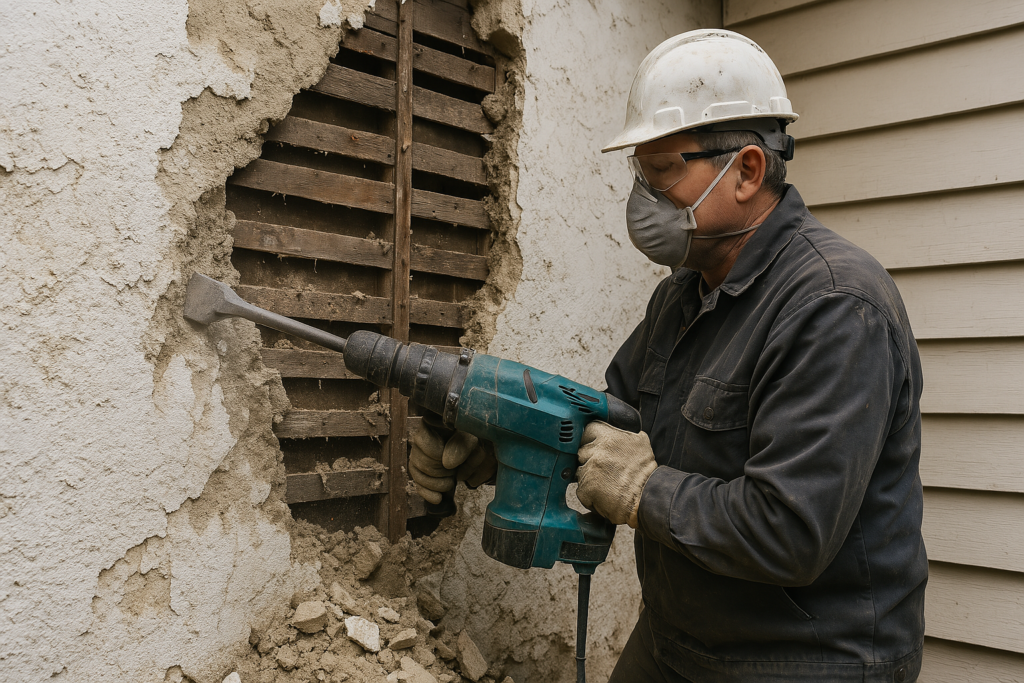
- "Dustproof mask": Essential to prevent dust from being sucked in.Passed national certification (DS2 or higher recommended).
- "Protective glasses" and "goggles": to protect your eyes from scattered debris.
- "Gloves": Thick ones.If possible, it is cut-resistant.
- "Helmet": Essential to protect your head from debris and tools falling from above.
- "Earplugs" or "earmuffs": for noise prevention.
- "Scaffolding boards" and "ladders": For working at high altitudes.We will also consider measures to prevent falls.
- "Bar": Convenient for prying open gaps in mortar and peeling off base material.
- "Hammer (large and small)": Used for all demolition work.
- "Chisel (twill)": Used to finely scrub mortar.
- "Saver saw" or "electric circular saw" (used to cut wood scrapings).
- "Electric Hammer Drill (commonly known as SDS Hammer)": Useful when you want to efficiently peel off mortar over a wide area.
- "Grinder": If you want to cut in the boundary between the mortar and the wooden part.
- "Blue tarp" and "Protection sheet": Protects the surrounding area and prevents waste materials from shattering.
- "Canner Bag for Waste": Convenient for collecting dismantled mortar.
"Duty prevention" is especially important.Mortar debris and cement powder are very fine and can have a negative effect on the respiratory system if inhaled for a long time.The longer the demolition work, the higher the health risks, so use a "dustproof mask", frequent ventilation, and watering (lightly water to reduce dust).
Safety and structural precautions (including engineering perspectives)
Dust exposure and health risks
As mentioned above, inhaling mortar debris and dust can lead to risk of respiratory illness.Especially if you inhaled in large quantities for a long period of time, it may cause damage to your lungs in the future, so make sure to mask and ventilate thoroughly, even if it's a hassle.Also, after work, we recommend gargling, washing your face, and taking a shower thoroughly to remove any dust from your clothes.
Checking the balance between the strength wall and the brace
Under the exterior mortar walls there are usually "wooden scrapings" or "lass net."The base of the mesh may have braces.Bristles are important in ensuring the strength of wooden houses, so be careful not to cut them unnecessarily once the bristles are exposed.If removal is absolutely necessary, engineering measures (calculating the amount of wall) such as reinforcing with a different wall of stress (balancing the wall).Under the Building Standards Act, the "wall volume regulations" must be met for two-story wooden houses (calculated based on floor area, earthquake area coefficient, and wall type).Even amateurs should simply use the "Strength Wall Capacity Calculation Tool" and check with an expert.
Building height and scaffolding
When peeling off the mortar from the second floor, work will be required at high altitudes.Working at high altitudes in DIY is very dangerous, and there is a possibility that a fall accident may occur due to inadequate scaffolding.Professionals use "single pipe scaffolds" and "bike scaffolds" to firmly utilize safety belts and nets, but amateurs often do not do such extensive temporary work.If you are working with only a ladder or stepladder, be sure to take great care to prevent falls.If you swing the hammer down in an unreasonable position, you will likely lose your balance, so make sure you have as flat a foothold as possible and have people support you in perfect condition.
Noise and vibration
The noise when dismantling mortar is likely to become louder.In particular, when using an electric hammer drill or grinder, the noise level can be over 90dB (travel sound level).To consider your neighborhood, follow manners such as "work hours are limited to 8am to 5pm" and "greet the neighborhood in advance to gain understanding."
Types of disassembly methods and selection criteria
There are several ways to demolish the exterior mortar wall.Here we will introduce three typical construction methods, and list the characteristics and selection criteria for each.
1. Hand-made hammer and chisel (tear) hanging method
It is suitable for those who are physically stamina but don't have power tools or those who want to carefully remove the smallest details.Because it is done by hand, there is less noise and vibration than power tools, but it takes time and effort.
- 【merit】
- Easy to work carefully so as not to break the structure
Low equipment costs
・Easy to reduce dust slightly - [Disadvantages]
・Long work time
・Deconstructing a wide area will put a lot of physical strain on your body
2. A method of hanging using an electric hammer drill (SDS hammer)
It can greatly improve the efficiency of mortar dismantling.Recommended for those who want to quickly complete a wide range of demolition.However, there is a lot of noise and vibration, so be careful.Also, if you are not used to handling it, there is a risk of damage to the base material and braces.
- 【merit】
・Fast demolition speed
・Reducing labor - [Disadvantages]
-Large noise and vibration
・Dust scattering to the surrounding area increases
・There are some tricks to getting used to the equipment
3. Cutting method using a grinder or saber saw
This is a method of cutting the mortar wall into large panels and peeling it off all at once.First, use a grinder to cut the wall, then strip it off with a crowbar or something to allow for relatively quick and orderly work.However, dust and noise during cutting are extremely loud, so environmental measures must be taken in perfect condition.
- 【merit】
・It can be removed all at once, so work efficiency is high
Easy to disassemble neatly - [Disadvantages]
・An expensive cutting blade may be required
・The noise and dust are very large
・Danger if handled incorrectly (such as kickback)
Selection criteria
- If you have small demolition area and have plenty of time, choose "Handwork (hammer & chisel)"
- If you have a large disassembly area and want to finish it in a short time, use the "electric hammer drill"
- If you want to remove the surface while cutting it large and cleanly, use a "grinder or saber saw" to remove it.
In reality, these methods are often combined.First, cut the cut using a grinder and then use an electric hammer drill to cling to the brim.Make fine adjustments to the details with chisel, and proceed flexibly according to the situation on the site.
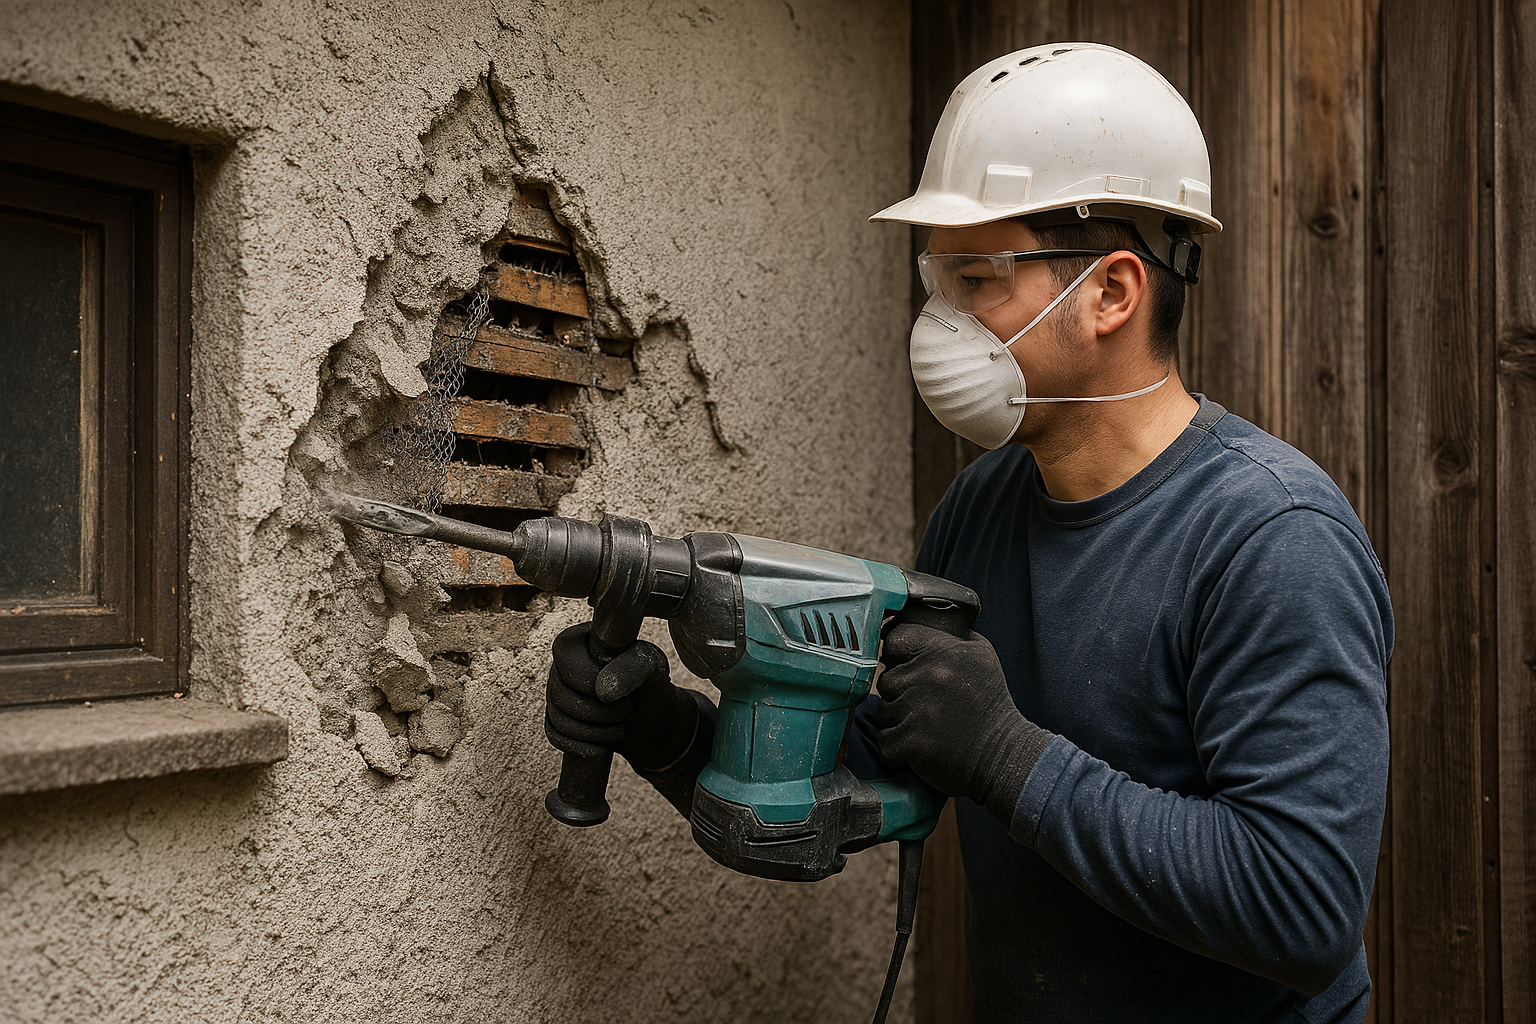
Step-by-step disassembly procedure
From here, we will introduce the process of dismantling step-by-step using the typical combination of an electric hammer drill (SDS hammer) + manual work.Of course, the basic steps are similar for other construction methods, so please read them accordingly.
- "Preparation and maintenance"
- Cover the area around the demolition area with a blue tarp or protective sheet.
- If you have windows or doors, use plastic sheets or protective tape to prevent dust from entering the house.
- If you have a nearby home or car, consider placing a net or seat to prevent flying debris.
- "Survey on the wall"
- Check to see if any important pipes, electrical wiring, and gas pipes are running behind the dismantling surface.Please refer to the stud finder sensor and drawings and check carefully.
- Understand the location of structural materials such as braces and columns and beams.Be especially careful when putting fish there.
- "Make a cut"
- When using a grinder, make a 2-3cm deep cut on the outer periphery of the area to be dismantled to make it easier to remove.
- At this time, a large amount of dust will be released, so try to prevent it from spreading by spraying water.
- "Spin mortar with an electric hammer drill (SDS hammer)"
- Attach the chisel bit and apply it while setting an angle between the mortar and the wood slide.
- If you put it in too deeply at once, the base material will likely be damaged, so gradually remove it while adjusting the angle.
- If the braces become exposed, switch to manual work and take action carefully.
- "Removal of the base material (wooden scraping and lath nets)"
- After hanging the mortar, the lath net and wood scrapings remain on the surface.If it is secured with nails or staples, remove it with a crowbar or nail remover.
- If you are going to remove all the wood scraps, it is efficient to cut and peel them off with a saber saw or a circular saw to a certain size.
- "Final finishing and cleaning of details"
- If you have any mortar pieces left, you can steadily use a hammer and chisel to hang them in place.
- Clean the entire work area and collect the scraps in designated locations.
- "Disposal of waste materials"
- It must be disposed of as industrial waste (mortar waste) in accordance with local government regulations.
- If it's a small amount, bring it directly to your local government's garbage disposal facility, or ask a company that will pick up your building waste.
- In the case of large quantities, it may be cheaper and safer to ask an industrial waste disposal company to dispose of it.
- "Reinforcement as necessary and new exterior wall construction"
- With the mortar exterior walls removed and the base is exposed, take necessary measures such as reinforcing the braces and replacing the waterproof sheet before installing new exterior materials.
- In particular, if earthquake-resistant reinforcement is carried out, there are methods such as laying structural plywood (strength-resistant surface material with a thickness of 9mm or more), and it is common to follow the Building Standards Act and manufacturer specifications, such as screw pitching (spacing between nails and screws) of approximately 150mm or less.
Disposal of waste materials and recycling after dismantling
Classification of waste materials
Mortar waste is considered industrial waste, and is classified as "debris" by some local governments.Wooden scraps and lath nets are also treated as building waste, so please check the disposal method in accordance with local regulations.Be careful not to classify the waste material properly, as disposal costs may increase.
Possibility of recycling
Concrete and mortar are sometimes crushed at recycling facilities and reused as roadbed materials.If you are experiencing a large amount, consult a professional recycling company and have them pick up all at once to make it easier.
Overseas case: Relocation to 2x4 construction methods and other materials
In addition to demolishing mortar exterior walls using traditional Japanese construction methods (wooden shaft construction method), similar work is also being carried out overseas in homes using the 2x4 construction method.Overseas, plasterboard exteriors and stuccos (a type of mortar) are often used, and the similarity is that the stucco is peeled off with an electric hammer drill and then plywood and OSB are exposed as load-bearing walls.In some cases, waterproof tarps and vapor seals (moisture-proof layers) are replaced at the same time.Although it is often possible to dismantle using the same methods as traditional Japanese construction methods, two-by-fours have many structural walls, so if the area of removal is wide, structural calculations are required, just like in Japan.Even those who are trying out foreign construction methods are important to understand which part is the load resistance wall.
Frequently Asked Questions (Q&A)
Q: "Even amateurs can easily tell if it contains asbestos?"
A: Unfortunately, it's difficult.It is necessary to ask a specialized analytical institution to send the sample, and then inspect it using a microscope to determine the type of fiber.
Q: "I'm having trouble because the mortar is different in thickness. What should I do?"
A: There are cases where the building is old and the thickness is unevenly thick, as it is hand-painted by craftsmen.It's easier to work by starting to peel off the grinder or chisel first and adjusting the position where the cuts are made moderately.
Q: "Are there any reinforcement methods that even amateurs can do?"
A: Typical examples include "striving structural plywood" and "adding braces," but both involve calculating the amount of walls, so it is recommended to consult an architect or earthquake resistance diagnostician.
Summary
So far, we have introduced a wide range of topics, including precautions for demolition of mortar exterior walls, tools needed, specific construction methods and step-by-step procedures, and disposal of waste materials.The benefits of DIY demolition include "cost reduction" and "the joy of building your own home," but if you fail to take safety precautions and take into consideration your neighborhood, there is a risk that it will lead to problems.Furthermore, if the load-bearing wall is accidentally removed, its earthquake resistance will deteriorate, and in the unlikely event of an emergency, the building may be severely damaged.
"Whether the wall to be demolished does not hit the load bearing wall?" is the most important thing.Always consult a professional or architect when demolishing a site that could damage the structure.Also, if there is a risk of harmful substances such as asbestos, it is wise to leave it to a professional rather than overdoing it.
Still, demolishing the exterior mortar walls within the range of DIY operations takes time and time, but there is an even greater sense of accomplishment.Please use this article as a reference and try it out with sufficient safety management and planning.
Related reference videos
Below is a video that I used very much as a reference when researching related topics in this article!(Titles omitted)
"Structure of mortar exterior walls"
a, "Changed outer wall of cracked mortar is sided using DIY (disassembly, plywood pasting) Change the cracked outer wall to siding with DIY -demolition-"
That's all.It's been quite a long post, but I hope this will be of some help to you with your self-renovation.When working, safety is your priority, and follow the rules and manners to create a wonderful renovation life.If you have any questions or concerns, please consult an expert to proceed.I'm rooting for you!
Leave a Reply
You must be logged in to post a comment.