
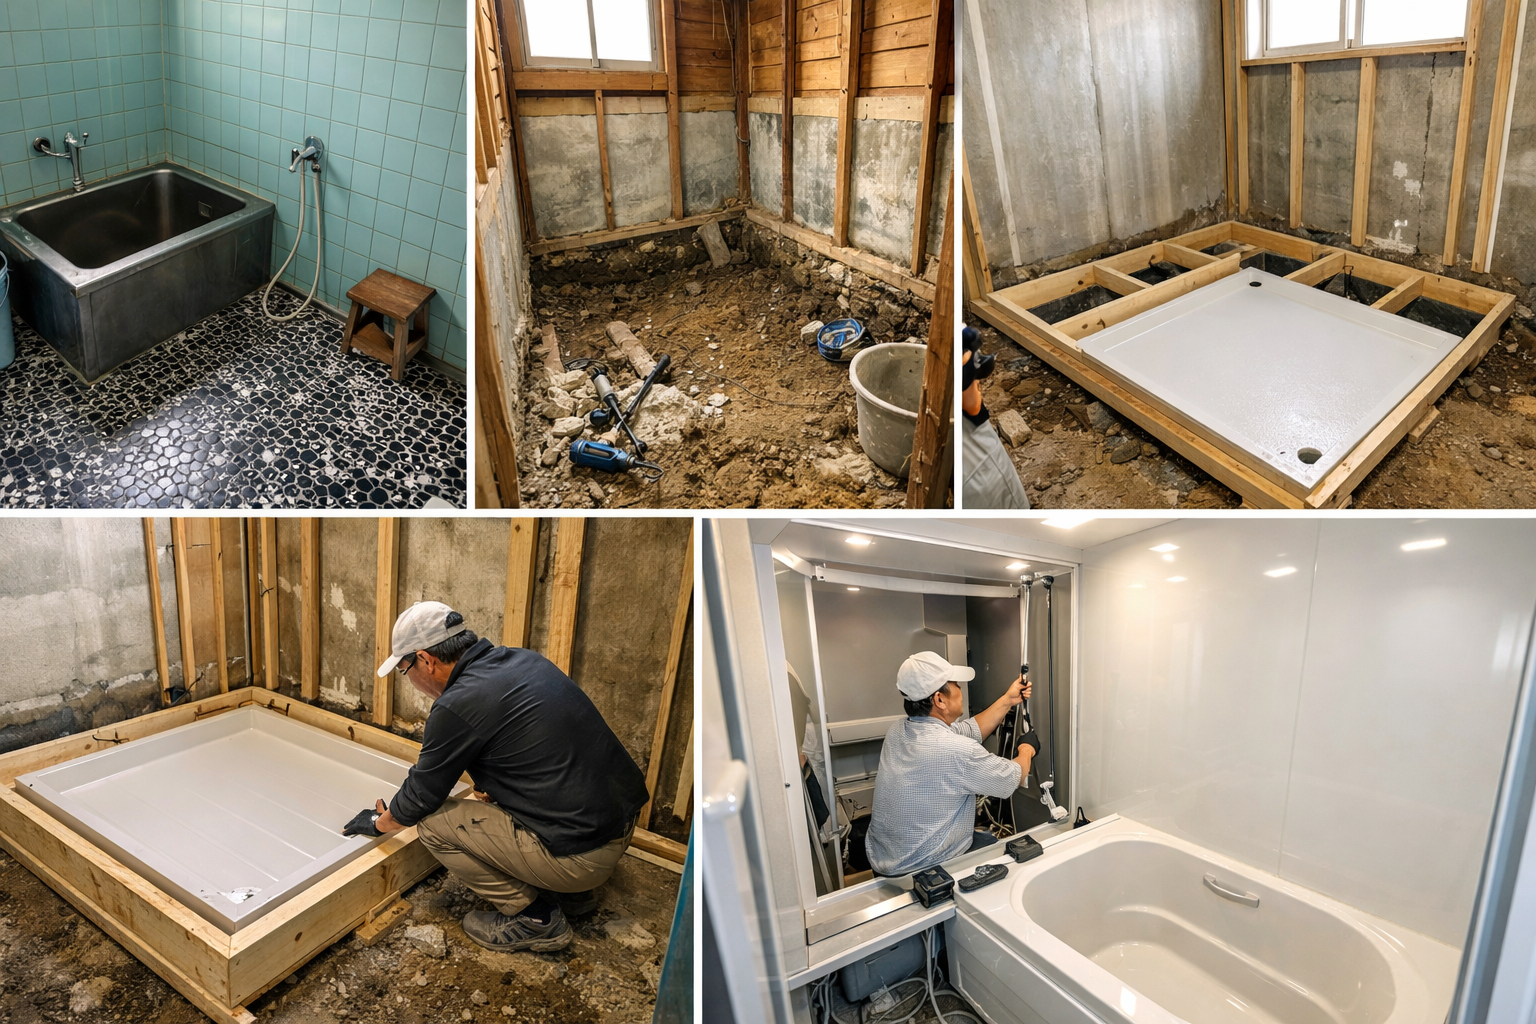
Hello everyone, this is DIY Renova.
Baths built using traditional construction methods (tiles + mortar + dirt floor, or wood base + waterproofing) have many elements that you won't know until you dismantle them. But on the other hand, the goal of creating a unit bath (system bath) is clear, and if you keep in mind the five points of ``dimensions'', ``horizontal'', ``drainage'', ``waterproofing'', and ``ventilation'', you can proceed with a highly reproducible DIY project.
This article will be written with a level of granularity that allows you to work with just this text, starting from the basics (redoing the underfloor) and ending with delivery and installation.
*However, water, electricity, and gas are subject to laws, regulations, insurance, and safety when touched by DIYers, so we will explain the practical pitfalls (prepare by DIY → final connection to a qualified person) (we will also quote the provisions of the Electrician Law and Water Supply Law) (Electrical Contractor Law, 2022; Water Supply Law, n.d.).
If you're wondering "How much renovation or remodeling can I actually do on my own home?" or "Where should I even start?", please visit this page. If you're looking to learn more about specific renovation processes or construction details, don't miss this page as well!
Information on updates to this website will be delivered to you once a month.NewsletterIf you are interested, please register.
Please note that this document is not necessarily accurate, and should be used as reference information only.
So, here you go.
First thing to decide: “Which unit bus conversion route should I take?”
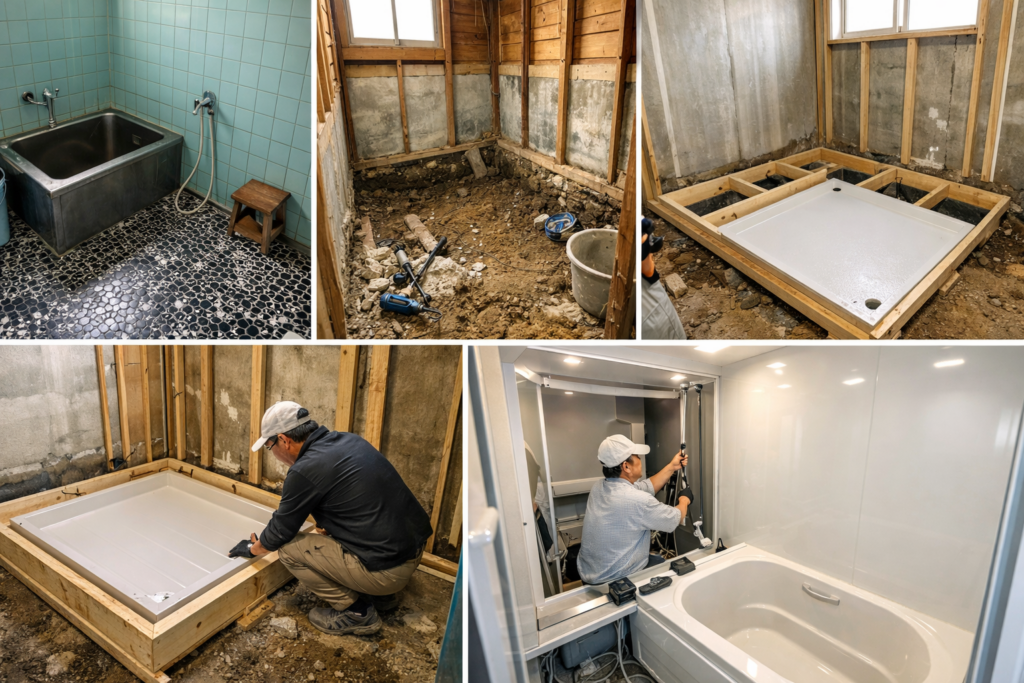
在来浴室→ユニットバス化は、床(基礎)をどう作るかで工法が分岐します。先に「工法の全パターン」を書き出します。
Construction method A: New concrete floor construction (highest priority if there is a bathroom on the first floor or above the ground)
- This is the most reliable method and causes fewer problems after construction.
- Easy to level drainage slope and installation surface.
- It is easy to eliminate the risk of moisture and termites (easy to plan for moisture barrier layers, risers, and ventilation).
"Criteria for selection"
- The bathroom is on the first floor, and the floor below is dirt (ground) or a low space.
- The existing dirt floor is crumbling/cracked/I want to reroute the drainage route.
- For people who want to win at once.
Method B: Adjust the level by making use of the existing dirt floor (if the 1st floor/existing dirt floor is sound)
- If there are no problems with the thickness, strength, cracks, or subsidence of the dirt floor after demolition, the project can proceed as quickly as possible.
- However, there are major restrictions regarding horizontality, height, and drainage core.
"Criteria for selection"
- The existing earthen floor is solid and the drainage core has not shifted significantly.
- I want to reduce the hassle of concrete pouring.
- Prioritize low cost.
Method C: Create a floor using a dry frame (made of wood or steel) (for bathrooms on the second floor or situations where concrete cannot be poured)
- Used in bathrooms on the second floor or in cases where concrete pouring is difficult due to structural reasons.
- Although construction is quick, it requires careful design in terms of rigidity, deflection, waterproofing, sound insulation, and ease of inspection.
- Since the unit bath itself is heavy, it is important to consider beams, joists, and bundles.
"Criteria for selection"
- The bathroom is on the second floor.
- Even on the first floor, the subfloor conditions are poor and we are unable to bring concrete in. We would like to use dry methods.
- For those who can understand and reinforce the structure.
Method D: Release with a drainage pump (drainage slope cannot be maintained or existing drainage is high)
- A "last resort" if you can't get the slope.
- Although construction is possible, it is necessary to design for power outages, breakdowns, noise, and maintenance.
- Strictly adhere to manufacturer's installation instructions.
"Criteria for selection"
- どうしても重力排水で流れない(排水本管が高い等)。
- The piping route is long and the slope cannot be secured.
- Maintenance is accepted.
The main story starts here: The whole process of making a unit bath by DIY (from the basics)
The following will be written based on "Method A: New construction of concrete with an earthen floor", and the branching points of B/C/D will be clearly indicated along the way.
(For those using method B/C/D, the procedure is the same up to the branching point.)
STEP0: Measurement and design (if you mess around here, everything will be off)
0-1. Decide the “unit bath size” first
The standard dimensions of unit baths (e.g. 1216, 1317, 1616, etc.) determine the required installation dimensions, delivery dimensions, and inspection space above the ceiling. For example, there are cases where a clearance of approximately 300 mm above the ceiling is required for ventilation duct piping and inspection (depending on the series and fitting conditions) (LIXIL, n.d.).
Things to do:
- Narrow down the candidate sizes to two (e.g. 1216 and 1317)
- Obtain the manufacturer's "construction instructions/fitting diagram" (many free PDFs)
- Note the following dimensions
- Installation dimensions (required floor dimensions)
- Opening (loading entrance) minimum width
- Required dimensions above the ceiling (duct, inspection)
- Drainage location (core under the floor)
"Tips for DIY"
- 最初はカタログで見栄を張らず、「搬入できる・納まる・点検できる」が最優先です。
- Rather than “breadth”, “fitting without failure” is justice.
0-2. Determine drainage rules by numbers
Gravity drainage is all about the slope. Local government guidelines for drainage equipment indicate standard slopes depending on the pipe diameter (e.g., the smaller the diameter, the steeper the slope) (Karuizawa Town, 2023; Machida City, 2012). In general, the indoor drainage water of houses is often between 1/50 (2%) and 1/100 (1%). You can check the actual standards in local government documents (there is almost always a PDF of the "Drainage Facility Guidelines" for your area).
Practical rules for DIY (guideline):
- 50A/VP・VU: Gradient 1/50 to 1/100
- The more curves there are, the more likely they are to become clogged.
- Merge at an acute angle (within 45°), avoid T-shaped orthogonal intersections (odor, clogging, poor flow) (Nagoya City Water and Sewerage Bureau, n.d.)
*Drainage facilities are subject to local government standards, so please follow the guidelines for your area (the source of the numbers will be listed in local government documents).
STEP1: Curing/dismantling (exposing the conventional bathroom to the “structure”)
1-1. First, shut off the water and electricity (safety is the top priority)
- Water: Close the main valve (for the entire house)
- Electricity: Turn off the circuit breaker around the bathroom
- Gas: If there is a gas appliance in the bathroom, close the main valve, but if it is impossible, do not touch it.
Legal reality:
- Direct connection or modification of electrical wiring is subject to the Electrician Law, and violations are subject to penalties (the article stipulates "imprisonment of up to one year or a fine of up to 300,000 yen") (Electrical Worker Law, 2022).
- Regarding the installation and modification of water supply equipment, the framework for water supply equipment construction is defined in the Water Supply Law, and there is a designated water supply equipment construction business operator system (Water Supply Law text/system materials) (Water Supply Law, n.d.; Ministry of Land, Infrastructure, Transport and Tourism, 2021).
In this article, I will separate ``preparations that can be made with DIY'' and ``final connections that tend to involve qualifications.''
1-2. Order of disassembly (at material level)
Traditional bathrooms generally go from top to bottom: Finishing -> Base -> Waterproofing -> Body. If you follow the order in which you break them, you will avoid breaking them unnecessarily.
Basic order:
- Removal of small items (mirrors, shelves, towel racks)
- Be careful not to lick the screws using an electric screwdriver + hand crank.
- bathtub removal
- Do not forcefully cut with a hole saw or grinder, find the "fixing point (screw, nail, mortar bite)" and remove it.
- Wall finish (if tile)
- Chisel + hammer or electric hammer (SDS)
- It will be easier to peel off the corner material (resin parting/metal parting) at the end if you remove it first.
- Base (lath mesh/mortar base)
- For metal lath, it is faster to use ``grip scissors'' or ``disc grinder'' than ``cutting with nippers''.
- It is less likely to damage the pillar if you pull the nail with a nail puller than by prying it with a crowbar.
- Floor finishing/earth floor
- The area around the drain trap is the last. If you break it first, the piping will become violent and break even more.
"Take a photo here."
- At least 30 photos in the following order: before demolition → during demolition → exposed structure → exposed piping.
- This photo will serve as a "blueprint" when considering drainage cores and steps later.
"Affiliate link insertion point (tool)"
- Electric hammer (SDS):View “SDS Hammer Drill” on Amazon / Search on Yahoo
- Crowbar/nail puller:See “Nail Pulling Crowbar” on Amazon
STEP 2: Survey of the current situation (check the “conditions for establishing a unit bus”)
2-1. Check items (at least these)
- Decay of pillars, foundations, and joists (if it's flaky when you touch it, it's out)
- Termite damage (ant trails, trees are sparse)
- Foundation defects (chips, junks, subsidence)
- Water supply/hot water supply/drainage route (where is it going?)
- Ventilation route (through ducts or outside)
2-2. “Floor levelness” in numbers
The lifeline of a unit bath is that the installation surface is horizontal. Even in the installation instructions, there is a warning that ``Adjust the level before installing the floor and bathtub.You cannot adjust the level afterwards.'' (For example, there is a similar warning in the instruction manual for bathtubs) (TOTO, n.d.).
DIY target (on-site guideline):
- Horizontal installation surface: Aim for within ±2mm at 2m
- Height difference between four corners: Aim for within ±3mm
(Allowances vary depending on the product, so be sure to check the installation instructions for the model you are purchasing.)
Recommended tools:
- Laser marker or 2m level
STEP 3: Piping planning (DIY up to “layout” and final connections are divided realistically)
3-1. Drainage: Decide core position and slope as top priority
Things to do:
- Pick up the unit bath's "drain core (center position under the floor)" from the drawing.
- Measure the current drainage pipe position
- Determine whether relocation is necessary
Judgment criteria:
- Small misalignment, short connections, and easy slope → High possibility of gravity drainage
- The center is greatly misaligned/the route is long/beams and foundations are in the way → redesign the route or consider a drainage pump
Precautions regarding drainage (something that appears repeatedly in local government guidelines):
- Prohibition of double traps (cause of odor and poor flow) (Nagoya City Water and Sewerage Bureau, n.d.)
- Insufficient slope causes blockage
- The merging angle is an acute angle (within 45°) (Nagoya City Water and Sewerage Bureau, n.d.)
3-2. Water supply/Hot water supply: "Resin-based" piping materials are suitable for DIY, but understand the barriers of inspection and qualifications.
Cross-linked polyethylene pipes are often used in the field. While it is easy to construct, the framework for water supply equipment construction is subject to the Water Supply Law, and there is a designated business operator system (system materials) (Ministry of Land, Infrastructure, Transport and Tourism, 2021; Water Supply Law, n.d.).
DIY practical solution:
- Create “piping routes, through holes, and fixing bases” with DIY
- Request connection, water flow, and pressure resistance confirmation to a designated company (even if you outsource only this part, it will be easier to reduce the total cost)
STEP 4: Make the foundation (floor): Method A “New concrete floor construction”
This is where we get to the main topic: ``Starting with the basics''.
4-1. Decide on the target floor configuration (draw a cross section)
Basic configuration of new dirt floor installation (from bottom to top):
- compacted ground
- Moisture barrier layer (polyethylene sheet, etc.)
- Crushed stone (if necessary)
- Concrete (earth floor)
- Adjust the level with mortar if necessary
- Unit bath installation surface (frame, legs, base)
“Why do we need a moisture barrier layer?”
- When moisture in the ground rises up from the dirt floor, it can cause wood rot, mold, and odors. A moisture barrier layer suppresses the "rise of water vapor" (basics of architecture).
There are two choices.
- "0.15mm polyethylene film (for underfloor moisture barrier layer)"
If you want to meet the lower limit of Japanese standard specifications, this is it.
Among the candidates above, it is easy to understand the one with "actual thickness 0.15 mm" (example: Showa Shokai's actual thickness 0.15 mm). - "0.20mm polyethylene film"
If you're worried about holes being made by stepping on or sharpened crushed stone or rebar on site, this is the place for you. The thicker it is, the less likely it will tear.
For a bathroom, the width should be around 1800 to 2000 mm, which reduces seams and makes it easier (1000 to 1350 mm is OK for narrow spaces).
If you just lay out the sheets, moisture will rise up through the seams and piping cutouts. Therefore, the correct answer is to purchase a "waterproof and airtight tape" type at the same time.
- Product name: "Waterproof airtight tape (one side)"
Example: Nitto No.6931 (standard for outdoor/waterproof type) - Product name: “Architectural airtight waterproof tape (acrylic)”
Example: Konishi architectural use
Things to avoid:
"Curing tape" "Cloth tape"
Although it can be pasted at first, it tends to peel off due to humidity, powder, and temperature differences (it is not suitable for long-term airtightness).
3) For “sealing” around piping (strong to have)
- Product name: "Butyl tape"
It is useful for sealing small gaps around the rise of piping (the above candidate is Soft 99 butyl tape).
- When in doubt, choose "0.20mm polyethylene film" + "waterproof airtight tape (one side)"
- If cost is your priority, use “0.15mm (actual thickness)” + “waterproof airtight tape (one side)”
(The standard line in Japan is 0.15mm or more.)
4-2. Leveling and compaction of existing soil (settlement is determined here)
Things to do:
- Dig the soil to ensure the required thickness
- Level the soil and compact it (tamper)
- If you want to add crushed stone, level it out → compact it.
Rough idea (for DIY):
- Crushed stone creates a layer that does not sink easily after compaction.
- If it sinks after construction, the drainage slope and level of the unit bath will collapse.
Tool: Tamper
4-3. Place the drain pipe “first” (the key is before concrete is poured)
procedure:
- Determine the route to connect to the drainage main
- Temporarily assemble the PVC pipes (VP/VU) and decide on the length and angle
- Measure and fix the slope (temporary fixation is OK)
- Provide a “rise (or connection port)” at the unit bath drainage position
- Harden the surrounding area to prevent movement due to concrete pouring
Quantitative check:
- Slope: For example, if it is 1/50, it will fall 20mm in 1m. 2m is 40mm.
- Check with a laser or level + ruler so that you can actually measure this with a tape measure.
Municipal drainage guidelines have a table of "pipe diameter and slope" (e.g. standard slope according to pipe diameter) (Karuizawa Town, 2023; Machida City, 2012). It is safe to look at the table for your region and adjust accordingly.
4-4. Lay a moisture-proof sheet (“close” the holes)
- Lay the polyethylene sheet and overlap the seams.
- Cut out the area around the pipe, but if the gap is large, cover it with tape.
- Stand up against walls (to the extent possible)
4-5. Formwork/level setting (determine the “installation surface height” here)
Things to do:
- Decide on the finished height (floor height of the unit bath)
- This also determines the difference in level between the bottom edge of the door and the dressing room floor.
- Turn the reference height line with a laser
ここで参考になるのがメーカーの「納まり寸法・踏み込み高さ」の考え方です(床仕上げ面を上げる/スラブを落とす等の納まり検討)(LIXIL, n.d.)。
4-6. Concrete pouring (if doing it DIY, “be sure to do it in small portions”)
Practical ways to DIY a dirt floor:
- If you can't call ready mixer, knead bag mortar/bag concrete and transport it.
- However, if the amount is large, it will be hell, so if it is a bathroom scale, plan the ``amount of kneading and transportation flow'' first.
Approximate quantity (roughly):
- Example: 1.6m x 1.6m x thickness 80mm ≒ 0.205m³ (approximately 0.2 cubic meters)
- 0.2 cubic meters is quite heavy when kneaded in a bag (physical strength test)
Construction key points:
- First, “rough leveling” → then “leveling” → finally “pressing”
- 排水管周りは叩き込みすぎない(管がズレます)
- 乾燥ひび割れが出るので、急乾燥を避ける(養生)
道具:
- モルタルミキサー
4-7. Level adjustment mortar (if necessary)
コンクリを完璧に水平に打てないのは普通です。ユニットバス据付は「最終的な据付面の水平」が重要なので、必要なら薄塗りモルタルで追い込みます。
DIY目標:
- 2mで±2mm以内(再掲)
- 「後からレベル調整できない」系の注意は施工要領でよく出ます (TOTO, n.d.)
STEP 5: Create the foundation (floor): Method B “Use the existing dirt floor”
工法Aと違うのはここだけです。
判断チェック:
- 既存土間が健全(沈下・大割れなし)
- 据付高さが確保できる
- 排水管の移設が最小で済む
Things to do:
- 土間を清掃(レイタンス除去、粉を取る)
- レベル測定→不陸(凸凹)を記録
- 不陸が大きいなら、セルフレベリング材やモルタルで補正
- 排水芯が合わないなら、部分的に斫って配管移設→復旧
Note:
- 斫りすぎると土間が薄くなり、割れやすくなります。
- 土間厚や配筋が不明なら、無理に削らず「上で調整」する方が安全です。
STEP 6: Make the foundation (floor): Construction method C “dry mount” (no second floor or concrete)
乾式架台は、ユニットバスの荷重(浴槽+湯+人)を「梁・根太・束」に流す設計になります。ここは本気でやるなら構造計算の世界ですが、DIY記事として「最低限の考え方」を落とし込みます。
6-1. Have a rough sense of the load
- 湯は1L=1kgで考えられます。浴槽に200L溜めたら200kg。
- ここに浴槽重量+人が乗ります。
- つまり「一点に集中させない」「面で支える」「たわみを抑える」が大原則。
6-2. Frame design rules (for DIY)
- ユニットバスの脚位置・支持点は製品ごとに決まります(施工説明書参照)
- 支持点の直下に「束」または「梁補強」を入れる
- 水平調整は“架台側”でできるようにする(床を削る調整は泥沼)
6-3. Be sure to install waterproofing and water leakage detection
2階浴室は漏水が即ダメージになります。
- 点検口
- 防水パン的な受け
- 漏水センサー(アラート)
このあたりは“保険”として仕込む価値が高いです。
STEP 7: Key points of drainage traps and waterproofing (water leaks are determined here)
ユニットバス本体の床は防水されていますが、「排水ユニットの取り合い」「防水層押さえ」など、部材の締結が甘いと漏れます。排水トラップ周りの施工注意は、部材の施工説明書に具体的に書かれています(例:防水層押さえをボルトで確実に固定しないと水漏れの恐れ)(TOTO, 2011)。
また、排水ユニットを床勾配に合わせて据える注意も見られます(例:水が溜まらないよう勾配に注意)(LIXIL, 2022)。
DIYの要点:
- 排水ユニットは“床勾配と整合”させる
- 締結部は規定どおり(トルクが指定される場合もある)
- 防水層押さえ、パッキン、接着剤は“代用品に逃げない”
STEP 8: Ventilation (lack of ventilation leads to mold. Crush it with numbers)
浴室は「高湿度+温度差」が出るので、換気が弱いとカビと腐朽が加速します。ユニットバスの天井上にはダクト・点検スペースが必要になり、上部クリアランスの指定(例:300mm確保)が資料で示されています (LIXIL, n.d.)。
つまり、換気扇を付けるだけでなく「ダクトが通る空間」も基礎設計の一部です。
DIYチェック:
- ダクトが曲がりすぎない(曲がりが増えると風量低下)
- 天井点検口が“塞がれない”
- 外壁貫通は防水処理までセットで考える
STEP9: Delivery and installation (win with “horizontal” and “fixed”)
9-1. Final check before delivery
- 据付面が水平か
- 排水芯が合うか
- 壁の下地位置(ミラー・手すり・棚)を施工説明書の指示どおりに入れてあるか
- 天井上のクリアランスが足りるか (LIXIL, n.d.)
9-2. Installation tips (no accidents with DIY)
- 先に床パン(ベース)を仮置きして位置確認
- 排水接続部は“無理に押し込まない”
- レベル調整は必ずこの段階でやり切る(後戻りが一番つらい)(TOTO, n.d.)
STEP10: Minimum requirements when selecting construction method D “drainage pump”
排水ポンプは、施工説明書に「配管長」「高低差」「曲がり箇所」「鳥居配管の禁止」など、かなり具体的な制約が書かれます(例として、配管長や曲がり箇所、鳥居配管への注意が記載される取説がある)(鶴見製作所/関連資料, n.d.)。
この手は「設計を守れば成立」「守らないと詰む」タイプです。
選ぶなら:
- 取説の制約を全部満たせる
- 点検できる位置に設置できる
- 停電時の運用を受け入れられる(風呂が使えない等)
List of things needed for DIY (“practical set” that is difficult to find too much or too little)
Measurement/marking
- Laser marker or 2m level
- コンベックス(5.5m以上)※金属製のテープ(コンベックスルール)をケースに巻き込んだ測定具。つまりメジャー
- 下げ振り、差し金
Piping (preparation)
- 塩ビ管(VP/VU)と継手一式
- 勾配確認用の小型水平器
- 仮固定材(結束バンド、仮止め木材)
Earthen floor (method A)
- 防湿シート
- Crushed stone (if necessary)
- 袋コンクリ・袋モルタル
- コテ、トンボ、バケツ、練り舟 or ミキサー
- 養生材
Installation
- 取説一式(PDFで印刷推奨)
- コーキング材(指定品がある場合は従う)
- 施工用ビス(指定長さ・指定種)
Points that are likely to fail and workarounds (avoid “redo hell”)
- 「排水芯」を甘く見て、据付直前に合わない
→ 図面で芯を拾う→現況測定→仮組みで検証、を必ずやる。排水勾配は自治体指針の数値で固める (軽井沢町, 2023; 町田市, 2012)。 - 「水平」を後回しにして、水が溜まる
→ レベル調整は据付前に完了が原則(取説にも同趣旨の注意がある)(TOTO, n.d.)。 - 天井上スペース不足で換気ダクトが通らない
→ クリアランスの指定(例:300mm)を最初に確認して設計する (LIXIL, n.d.)。 - 排水トラップ周りの締結が甘くて漏水
→ 排水ユニット取説の注意を守る(防水層押さえ、ボルト固定、勾配整合)(TOTO, 2011; LIXIL, 2022)。 - 電気・水道を全部DIYでやって、保険・法令・安全で詰む
→ DIYは「準備まで」、最終接続は「有資格者に一発で通してもらう」のが総合的に強い(条文・制度の枠組みを理解)(電気工事士法, 2022; 水道法, n.d.; 国土交通省, 2021)。
There are also good construction methods from overseas: Wet method → dry method concept
海外(特に北米・豪州)だと、浴室を「防水パン+下地+防水膜+タイル」で作る文化が強いですが、日本のユニットバス化は「工場防水の箱を置く」思想で、現場防水のリスクを減らす方向です。
DIYで再現性を上げたいなら、ユニットバスの思想(工場品質)に寄せる方が成功率が上がります。
If you're wondering "How much renovation or remodeling can I actually do on my own home?" or "Where should I even start?", please visit this page. If you're looking to learn more about specific renovation processes or construction details, don't miss this page as well!
Information on updates to this website will be delivered to you once a month.NewsletterIf you are interested, please register.
Please note that this document is not necessarily accurate, and should be used as reference information only.
Reference materials/videos (all listed at the end)
以下は本文中で参照した根拠資料です(断定が絡む箇所は文中で引用済み)。
電気工事士法. (2022年6月22日). e-Gov法令検索. https://laws.e-gov.go.jp/law/335AC0000000139/20220622_504AC0000000074
Water Law. (n.d.). e-Gov Law Search. https://laws.e-gov.go.jp/law/332AC0000000177
国土交通省. (2021年4月1日). 給水装置工事主任技術者に関する制度について. https://www.mlit.go.jp/common/830005260.pdf
LIXIL. (n.d.). 設計者の皆様へ(システムバスルーム納まり・必要寸法). https://www.biz-lixil.com/products/bathroom/systembath/barrier_free/construction/barrier_free-P198-209.pdf
LIXIL. (2022). トラップ付排水ユニット 取付説明書(PBF-TM4-XXXTB). https://store.lixil.co.jp/media/wysiwyg/product_image/pdf/PBF-TM4-XXXTB_directions.pdf
TOTO. (2011). 浴室排水ユニット(施工・注意事項). https://search.toto.jp/tr/YP03168_201106.pdf
TOTO. (n.d.). 【本体】取扱・施工関連マニュアル(浴槽レベル調整に関する注意を含む). https://search.toto.jp/contents/help/manual/bath/pdf/EKL61339N3.pdf
軽井沢町. (2023). 軽井沢町排水設備ハンドブック. https://www.town.karuizawa.lg.jp/uploaded/attachment/2975.pdf
町田市. (2012). 町田市排水設備指針(2012改訂版). https://www.city.machida.tokyo.jp/kurashi/suido/grsui/jigyoushanominasama/gesuidousetsuzoku/sisinnado.files/haisuisetubisisin2012kaiteiban.pdf
名古屋市上下水道局. (n.d.). 排水設備技術指針(配管注意事項:合流角度、二重トラップ禁止等). https://www.water.city.nagoya.jp/file/53278.pdf
鶴見製作所/関連資料. (n.d.). 汚雑排ビッグ 施工説明書(吐出管・鳥居配管等の注意). https://www.smartpump.jp/dl/pdf/sekou/bg201na_sekou.pdf
DIYヤーさん
プロ
 English
 Japanese
Leave a Reply
You must be logged in to post a comment.