Hello everyone, this is DIY Renova.
Unlike unit baths, conventionally constructed bathrooms have a bathtub, waterproof floor, riser (along the wall), and drainage piping all integrated on site. That's why dismantling doesn't end with just breaking the bathtub and transporting it.
In this article, with the theme of ``bathtub removal,'' we will summarize the demolition procedure in a way that even amateur DIYers can reproduce, without damaging the surrounding area too much and allowing for the next construction work (updating piping, reassembling the floor, and reinstalling the dirt floor).
*Assumed to be a Japanese wooden house (maximum 2 floors). Work that involves electricity/water supply/drainage laws and regulations and qualifications will be described separately for the scope that can be done by DIY and the scope for contractors (however, technical content will not be omitted).
If you're wondering "How much renovation or remodeling can I actually do on my own home?" or "Where should I even start?", please visit this page. If you're looking to learn more about specific renovation processes or construction details, don't miss this page as well!
Information on updates to this website will be delivered to you once a month.NewsletterIf you are interested, please register.
Please note that this document is not necessarily accurate, and should be used as reference information only.
We have summarized the conversion into a unit bath after disassembly in a separate article, so please see below.
So, here you go.
First, identify what a conventionally constructed bathtub is made of.
The method of disassembly is largely determined by the material. First, identify the type of bathtub.
Common bathtub materials and characteristics (points to distinguish them)
- FRP (fiber reinforced plastic)
- The surface is smooth and shiny. When you tap it, it makes a light "knock-knock" sound. Thin and light.
- Common in the 1970s to 2000s.
- Artificial marble (acrylic/polyester)
- It's heavier than FRP and feels dull when you hit it. It's thick. The surface is hard.
- Enamel (steel plate + glass)
- Magnets stick. heavy. When chipped, metal is visible.
- stainless
- I hear a metallic sound. Magnets differ depending on the product. It's thin but surprisingly sturdy.
The difference between FRP type and metal type is mostly based on whether the magnet sticks. This is directly connected to the decision whether to break the bathtub or take it out entirely.
Construction order (overall image)
When dismantling a conventional bathtub, the following order is safe and less likely to fail.
- Preliminary confirmation (water supply, hot water supply, drainage, electricity cutoff and removal of remaining water)
- Securing curing/export flow lines (measures against dust and debris)
- Remove surrounding "interfering parts" (apron/inspection port/lower edge of surrounding walls, etc.)
- Disconnecting drain traps and pipes (this is the easiest place to stumble)
- Removal of the bathtub body (break it or leave it as is)
- Removal of floors, waterproof layers, and foundations (only necessary areas)
- Cleaning, drying, recording (photos and measurements for the next process)
- Sorting/temporary storage/carrying out
If this order is disrupted, problems such as ``water flowing backwards,'' ``necessary damage to walls,'' and ``debris falling under the floor'' are likely to occur.
How to determine the quantity of required materials (estimate for curing/disposal)
The most troublesome things when dismantling are things that are heavier than expected, not enough trash bags, and not being able to be transported. We will give you a quantitative estimate first.
1) Approximate transport amount (weight)
Assuming the bathtub size is 1100-1200mm class, the approximate weight is as follows.
- FRP bathtub: approximately 20-40kg
- Artificial marble bathtub: Approximately 40 to 80 kg (product difference)
- Enamel bathtub: It can weigh more than 60 to 100 kg.
In addition, conventional bathrooms come with mortar, tiles, a waterproof layer, and a base plate around them.
It is not uncommon for tile + mortar removal to cost around 30 to 60 kg/m² per area (depending on the thickness and substrate).
You can reduce accidents by keeping in mind that if you remove 2m² of debris from around the bathtub, you can easily get 60 to 120 kg of debris.
2) Required amount of curing material (minimum)
- Blue sheet: Floor surface of unloading flow line + work area
Example: Corridor width 0.8m x length 5m = 4m², bathroom front 1.8m x 1.8m = 3.2m² → total around 8m²
If you buy one 3.6 x 5.4m (approximately 19m²) piece, you will have more room. - Curing tape (weak adhesive): 1 to 2 rolls
- Duct tape: 1 roll
- Corner curing (foam material): As necessary (to protect columns and fitting frames)
3) Garbage bags/sandbags
Sandbags are almost essential when dismantling a bathroom. If you put heavy garbage in a regular bag, it will tear.
- Sandbags: at least 20-40 (more if there are tiles/mortar around the bathtub)
- Thick garbage bags (45L or more): 10 to 20 bags for wood chips, plastic, and insulation materials
Product example (if you buy it, it will hurt if this part is off)
Here I will list only the standard ones that are effective for demolition. Manufacturer is just an example (words that make it easier to search for similar products on Amazon/Yahoo are also included).
- Dust mask: DS2 equivalent (measures against "dust", "tile" and "mortar")
- Goggles: Sealed type (there are many accidents where debris gets into the eyes)
- Earmuffs or earplugs: Electric chisels make more noise than you might imagine.
- Electric chiseling: SDS-plus hammer drill (this is practical for small scale)
- Crowbar: around 450mm + small size
- Reciprocating saw: For cutting pipes and substrates (separate blades for metal and woodworking)
- Bucket, rag, sponge: residual water treatment
- Sandbags, blue sheets, curing tape
``If you skimp on a cheap blade, the work time tends to double.'' Especially when it comes to replacement blades for reciprocating saws, it's cheaper if you don't skimp on them.
Construction method (step by step)
0. Safety and legal premises (delineating the scope of DIY)
- Turn off the water supply/hot water supply valve/confirm water stoppage: DIY possible
- Cutting/updating drain pipes: DIY is possible, but understanding of pipe slope, ventilation, and odor prevention is required.
- Touching electricity (ventilation fans, lighting, water heater wiring): As qualifications and laws are involved, this is generally within the realm of electricians (within the scope of the Electricians Act)
- If you suspect building materials that may contain asbestos (old tile base materials, spray paint, insulation materials, etc.): Do not forcefully destroy them; investigate first (relevant guidelines from the Ministry of Health, Labor and Welfare, Ministry of the Environment, and Ministry of Land, Infrastructure, Transport and Tourism can be found on the local government page)
1. Preliminary confirmation: Water stoppage, remaining water draining, and eliminating the risk of electrical leakage
- Water stop
- Close the main water valve near the water meter or the water stop valve in your home.
- Open the bathroom faucet and make sure the water has completely stopped.
- Hot water supply (gas/electricity) stopped
- Turn off the power to the water heater/close the gas valve (please refer to the instruction manual as the procedure varies depending on the device).
- If there is reheating piping, residual water will remain on the bathtub side.
- Remove remaining water
- Open the bathtub drain valve and wait until the water drains completely.
- There will still be some water left in the trap, so prepare to soak it up with a bucket or sponge.
Quantitative guideline: Even 0.3 to 1L of water remaining in the trap will wet the floor and cause slipping. Proceed with the assumption that you will be sure to suck it all up.
2. Curing: Create a 3-piece set for dust, debris, and removal
Conventional bathtubs can break, so dust protection is essential.
- Simple curtains made of vinyl + curing tape at entrances and exits (to prevent dust diffusion)
- Blue sheet on the floor + anti-slip (risk of falling if the sheet shifts)
- Lay sheets on the delivery flow line (corridor to entrance)
- Protect corners (pillars/frames) with foam curing material
Point: Even if you run the ventilation fan, dust will still flow into the other room. In fact, it can become negative pressure and spread throughout the house, so it is better to ``physically isolate'' it first.
3. Remove “removable parts” first (search for screws before breaking)
If you do this carefully, you'll have a better chance of getting the entire bathtub out.
- Apron (inspection cover on the side of the bathtub)
- Most have screws or claws. First, shake it by hand to check the direction of movement.
- Inspection port (floor or wall)
- If it is caulked, cut it with a knife and remove it.
- caulking around the bathtub
- Making cuts with a cutter will prevent the wall from cracking when lifting.
If you can't find the screw, it may be hidden under sealant or a cosmetic cap.
Even if you assume destruction, it's worth searching here once.
4. Separating drainage: This is the key to success
Drainage from conventional bathtubs is done through a drain port -> trap -> drain pipe under the bathtub.
The trap is designed to collect water to prevent odors.
4-1. Distinguishing the types of traps
- PVC (VP/VU) + adhesive (whitish hard pipe)
- Metal traps (often found in older homes)
- Union (structure that can be removed with a nut)
If there is a nut, you can "remove and separate" it. If it is glued, it will be "cutting".
4-2. Cutting position when cutting (criteria for not failing)
When cutting, the golden rule is to leave a section of straight pipe that can be connected later.
As a guide, cut at a position that leaves at least 50 to 80 mm of straight pipe.
Reason: A socket (fitting) and insertion allowance (several centimeters depending on the nominal diameter) are required. If the straight pipe is too short, it will have to be traced to the bottom of the floor during renewal, resulting in major construction work.
A clean tool is a reciprocating saw (metal blade for metal piping, fine blade for PVC) or a pipe cutter for PVC.
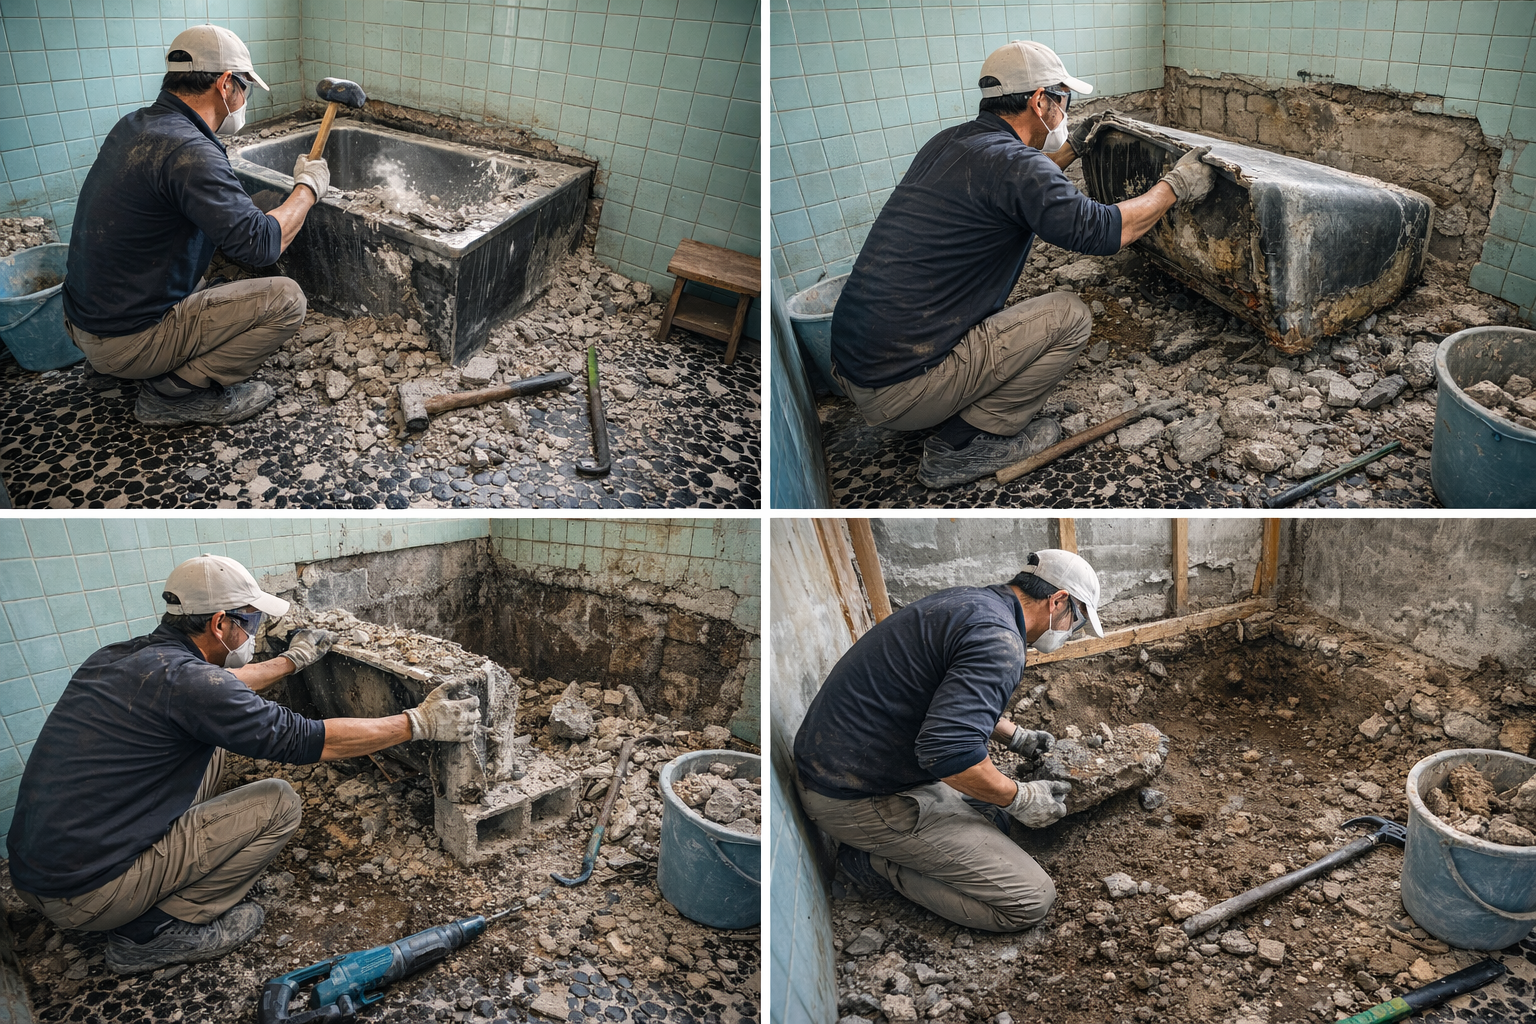
5. Bathtub removal: split/take out as is
This is the main thing. I will write everything according to the situation.
Pattern A: The bathtub can be transported as is (recommended)
Approximate conditions:
- There is enough clearance around the bathtub
Example: The width of the entrance is wider than the short side of the bathtub, or the bathtub can be turned upright. - The bathtub is lightweight (FRP, etc.)
- I want to leave the walls and floor (reused in the next process)
procedure:
- Cut the caulk around the bathtub
- Remove any fixed hardware (screws, nails)
- Lift the bathtub and check "where it's touching"
- Remove only the parts that are in contact with each other (base board, support material, etc.)
- Removal requires two people (even if the weight is 30 kg, it will be slippery if wet)
Quantitative concept:
The amount of weight a person can safely carry varies dramatically depending on their posture and how they hold it. Even if you are 30kg, if you only bend forward and use your arms, you will break your lower back.
The best way to remove the bathtub is to lift it from a position lower than your waist, so don't try to do it alone.
Pattern B: Break and remove the bathtub (practical in a small bathroom)
conditions:
- Entrance/exit is narrow/has many curves
- bathtub too heavy
- I'll remove the floors and walls anyway.
How to divide by material:
- FRP: Relatively easy to break, but dust protection is required as the fibers fly off.
- Artificial marble: Breakable but hard. Needs a blow and the pieces are sharp
- Enamel: Dangerous if broken. Basically cutting or recommended by a professional (weight is also an issue)
Procedure (for FRP ~ artificial marble):
- Lay a blue sheet inside the bathtub (easier to collect debris)
- Decide the hitting range (from near the center)
- If using a sledgehammer, first make a small crack.
- Divide the debris into sandbags (one bag should weigh around 10-15kg)
- If the weight exceeds 20kg, it is easy to break your hips and knees while transporting it.
- Always collect debris as you proceed so that it does not fall below the floor.
When "splitting" it, the trick is not to make it too small from the beginning. The finer the debris, the more dust it creates.
Divide into pieces from large to small and collect them.
Pattern C: Removal of metal bathtub (stainless steel/enamel)
This is where the difficulty of DIY increases.
- If it is possible to carry it out as it is, then carrying it out is the top priority.
- For cutting, you can use a reciprocating saw metal blade or a disc grinder, but this increases the risk of sparks, noise, and fire.
Work that generates sparks in a wooden house can be dangerous if there is wood chips or insulation nearby.
If the metal bathtub is small and requires only cutting, it may be practical to ask a contractor to partially cut the tub (for example, request only the cutting and do the removal by DIY).
6. Removal of the floor, waterproof layer, and foundation (only the area necessary for removing the bathtub)
Traditional bathrooms have waterproof floors. The main patterns are:
- Tile + mortar base (many)
- FRP waterproof (floor is integrated with resin)
- Seat waterproofing (can be an old renovation)
If the sole purpose is to remove the bathtub, ``it may not be necessary to remove the entire floor.''
However, if you are updating the drainage or re-installing the dirt floor, floor removal tends to be included.
The key is to ``determine the area of removal first with a line.''
Example: If you only remove the area around the bathtub and the drainage route, leaving 100 to 150 mm from the wall may prevent the bottom edge of the wall from collapsing (there are exceptions depending on the wall structure).
Approximate amount of chiseling (chip mortar):
- Just peeling off 1m² of 10mm thick mortar creates a considerable amount of dust and noise.
- The impact of an electric chisel will cause a chain reaction of cracks in the surrounding tiles, so if there is a part you want to keep, it is effective to make an ``edge cut'' (cut with a disc).
7. Cleaning, drying, and recording (data collection for the next process)
Things to do after removing the bathtub:
- Record the location, height, and nominal diameter (thickness) of the drain pipe with photos.
- If you can see the bottom of the floor, check the condition of the foundation, main drawers, and joists and take photos.
- If there is mold or decay, take a picture with a scale so you can see the extent.
Recording is the weapon of DIY. If you mess around here, you won't be able to figure out the dimensions later and it will get stuck.
Checklist of points to consider (preventing accidents and rework)
- Water comes out even though the water has stopped: The water stop position is incorrect/There is residual pressure on the hot water supply side
- The smell rises when you turn off the drain: It is normal for the trap water seal to disappear. temporarily stopper
- Sharp fragments: cut-resistant gloves are recommended instead of work gloves
- Dust flies: Half of the performance of masks is how well they are worn
- Transporting heavy objects: Divide each bag into 10-15 kg.
- Work with sparks on wooden structures: Removal of surrounding flammable materials + fire extinguisher or water bucket required
- Neighborhood consideration: working hours and noise (especially chiseling)
Construction checklist (action list for the day)
- closed the main valve
- Check that water does not come out of the faucet
- I turned off the water heater
- If there is reheating piping, prepare for residual water treatment.
- Created protection (entrance/exit/floor/flow line)
- Wear a dust mask/goggles/gloves/ear plugs
- Apron/inspection port removed
- I cut the caulking
- Confirmed the structure of the drain trap
- The cutting position was determined to leave 50 to 80 mm of straight pipe.
- Decided whether to leave the bathtub as is or break it.
- Divide the debris into sandbags (10-15kg per bag)
- Photographs of important points (piping, foundations) were recorded.
Material checklist (consumables)
- Blue sheet (if required)
- weak adhesive curing tape
- duct tape
- Sandbags (high durability)
- thick garbage bag
- Rag/Sponge
- Temporary sealing caps and tape (to prevent drain odor and foreign matter from entering)
tools checklist
- Dust mask (DS2 equivalent)
- sealed goggles
- cut resistant gloves
- Crowbar (large and small)
- Hammer (sledgehammer if necessary)
- Reciprocating saw + spare blade (woodworking/metal)
- SDS-plus hammer drill (if you need to chisel the floor)
- major marker
- bucket
Summary
When dismantling a bathtub using conventional construction methods, the success rate will immediately increase if you understand that it is not just the bathtub, but also the drainage, waterproofing, and surrounding foundation that are all integrated.
There are three points.
- First, identify the material and decide whether to break it/put it out.
- For drainage, cut the straight pipe leaving at least 50 to 80 mm (more flexibility in the next process)
- Divide the weight into 10 to 15 kg portions using sandbags and create dust countermeasures first.
If you follow the steps above, even amateur DIYers can safely remove it and move on to the next step of updating the pipes or reinstalling the floor.
If you're wondering "How much renovation or remodeling can I actually do on my own home?" or "Where should I even start?", please visit this page. If you're looking to learn more about specific renovation processes or construction details, don't miss this page as well!
Information on updates to this website will be delivered to you once a month.NewsletterIf you are interested, please register.
Please note that this document is not necessarily accurate, and should be used as reference information only.
Well, then!
Reference (videos/literature)
- Concepts regarding dust and protective equipment in demolition and renovation in Japan: Materials related to dust injury prevention and protective equipment from the Ministry of Health, Labor and Welfare (Ministry of Health, Labor and Welfare, n.d.)
- Scope of qualifications for electrical work: Electrician Law and related commentary (Ministry of Economy, Trade and Industry, n.d.)
- Basics of asbestos in building materials: Related pages of the Ministry of Land, Infrastructure, Transport and Tourism, Ministry of the Environment, and Ministry of Health, Labor and Welfare (Ministry of Land, Infrastructure, Transport and Tourism, n.d.; Ministry of the Environment, n.d.)
(The above shows "How to search for references." Since local government rules and latest procedures vary by region, please be sure to check the public information of each local government/processing plant for disposal/delivery conditions.)
Leave a Reply
You must be logged in to post a comment.