Hello, this is DIY Renova.
This article is a complete version that summarizes how to choose and install "asphalt roofing" and the construction procedure, along with quantitative engineering information, to the point where you can do it without hesitation, for those who self-renovate their roofs in wooden houses in Japan (up to 2nd floors).
It is true that there are situations that should be left to experts, but the technical details will not be omitted. With the goal of "progressing through this page alone," we will implement the techniques for tools and materials, disassembly order, base adjustment, tensioning method, stacking width, starting up, valleys, buildings, crenava (gaze), wall mating, and penetration, countermeasures for snowy regions, and quantities calculation formulas.
So, here you go.
Safety first: Scaffolding, parent rope, and full harness are prerequisites. It's very slippery on wet roofing. Please cancel the event of strong winds, rain, or condensation and thoroughly prevent materials from falling. Do not overdo it when weather conditions are poor.
The role and standards of roofing can be determined using "numbers."
The standard for what is commonly referred to asphalt roofing in Japan is JIS A 6005. Among them, "940" is the lowest level, indicating that the unit area mass of the product is 940g or more per m2, and is widely used for undercover roofs (the same standard also includes higher-end standards such as 1500). The standard also defines performance requirements such as tensile strength, penetration status, and heat resistance.Tajima Roofing +1
The important "stringing values" for DIY are as follows.
- Overlap width (top and bottom = flow direction): 100mm or more. Left and right (longitudinal direction): 200mm or more. Temporarily fasten staples (tacker) at intervals of about 300mm at the overlapped portion. The tension direction must be from below the water to above the water. Go over the ridge and fold it back by at least 250mm (later add the ridge and cover it from above).aspdiv.jwma.or.jp
- Approximate wall and rise: at least 150 to 200 mm above the roof surface (200 to 250 mm is recommended for wooden houses).cad.tajima.jp
- Measures against eaves in snowy regions (leaks): Double layered about 1,000mm from the eaves, or modified asphalt with adhesive layer is used.〖Sanshu tiles〗Tsuruya Co., Ltd., Disaster prevention tiles
These figures are based on domestic organizations and manufacturer construction guidelines. If you follow the evidence, it will be easier to stabilize the "rain-close" performance even in DIY.
How to choose the type (determine based on the slope, area, and roofing material)
Roofing can be broadly divided into "materials" and "fixing methods." You need to choose the right one for your purpose.
- Asphalt roofing 940 (JIS A 6005)
General cost-conscious. It is widely used in metals, slates, and tiles, but its waterproof performance and nail hole sealing performance are inferior to those of higher-end products.nisshinkogyo.co.jp - Modified asphalt roofing (non-woven fabric reinforcement)
Improved nail hole sealability and durability. A standard high-grade grade that has excellent workability and safety (slip control) and is easy to handle for DIY.Tajima Roofing +1 - Modified asphalt roofing with adhesive layer (commonly known as rubber asphalt, self-adhered)
It adheres to the entire surface without using staples as much as possible. Strong for low slopes and temporary waterproofing before a storm. However, it becomes more difficult to re-stick it, so it is practical to install it with more than two people. Recommended for slower slopes such as lower than 3 inches (approximately 15/100).shizureki.co.jp - Breathable system (functionality such as breathability + heat insulation)
An option if you have a secure ventilation design in the attic. Be careful when using it on a straight metal roof that does not air ventilate easily, as the risk of internal condensation increases.
Selection axis summary (practical guideline)
"3.5 dimensions or more" → Modified asphalt or 940 is also acceptable (determined by region and roofing material).
"Less than 3 inches" → First choice is to modify it with an adhesive layer.
"Snowy/cold regions" → Double eaves + modified/adhesive layer added, valleys and ridges added.〖Sanshu tiles〗Tsuruya Co., Ltd.+1
For more details, please take a look at this article as well!
Pre-construction (determination of disassembly and base)
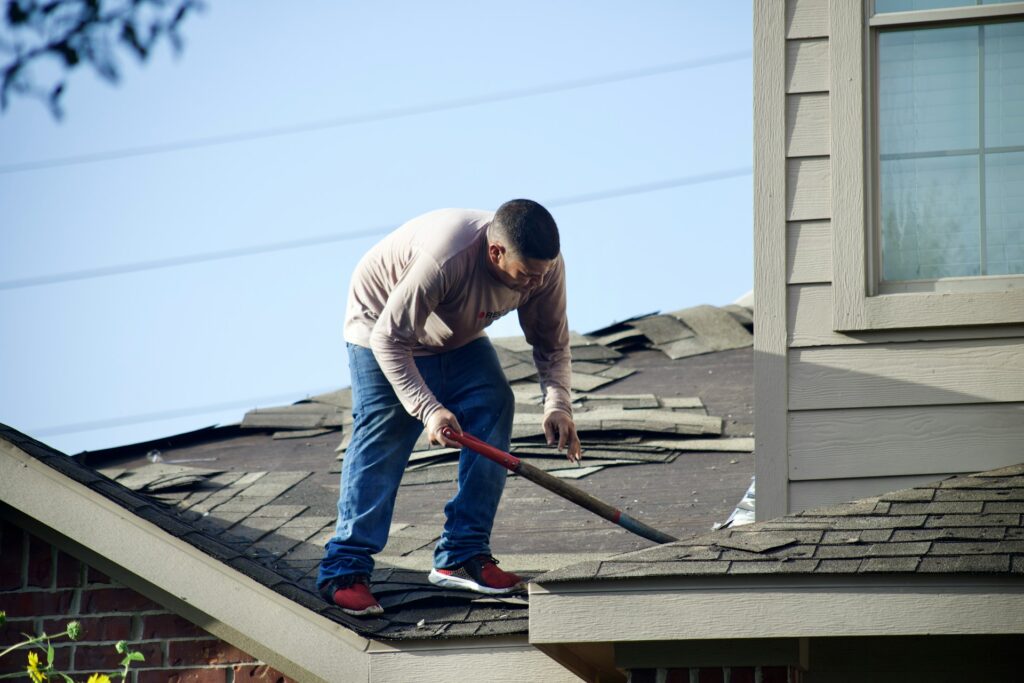
Basic order of demolition (for re-roofing)
- Scaffolding and curing. 2) Remove the gutter (if it interferes). 3) Remove the ridge wrap sheet metal → kerabas sheet metal → valley sheet metal → "top to bottom" in the order of the order. 4) Removed existing roofing materials (slate, metal, tiles, etc.). 5) Peel off the old roofing. 6) Completely remove any remaining nails and staples.
In principle, this order is to "remove from the top presser first." The valley sheet metal is a key to collecting rainwater, so it is carefully removed at the end (assuming that it will not be reused).
Checking the base (field boards and structural plywood)
- Visually check for decay, cracking, and deflection. Local sinking suspects the condition of the joists and rafters, and plywood is added or replaced.
- Trace your hands to check whether the screws and nails are not exposed or not.
- If the product contains a lot of water (such as immediately after it gets wet), dry it thoroughly before applying.
- When a ventilation layer is provided in the flow direction (body edges, air vent rafters, etc.), the arrangement is inconsistent with the "contact" arrangement described below.
Tools and materials to prepare (real name and size guide)
- Roofing body: Many of them are 1m wide x 20m long (standard) and 21m long. The modified thickness is generally 0.7-1.3mm, and the adhesive layer is generally 1.0-1.5mm.Tajima roofing +2 Tajima roofing +2
- Roofing for extra tension: A reinforcement sheet with a width of around 500mm for valleys and rising (e.g. liner roofing 500, etc.).Tajima roofing
- Staples (tackers)/or roofing nails (with caps are safe)
- Butyl rubber waterproof tape and waterproof seal (for joints and reinforcement of through parts)
- Arabesque (eaves drainer), verge drainer, valley sheet metal (new recommended)
- Cutter, spatula, earthen blat, chalk line, measure, roller, skin-like
- Harness, parent rope, safety shoes, fall prevention cord
Overall view of the construction (first look at the bird's eye view)
- Attach the arabesque (drainer at the eaves) first.
- The first stage roofing is "parallel to the eaves" and then go down the water → above the water.
- The second level and beyond also stretches in a certain direction, folding over 250mm over the building. The building has been expanded to about 1000mm wide.aspdiv.jwma.or.jp
- The longitudinal joints on the left and right are stacked over 200mm. Staples are spaced 300mm between the stacked portions.aspdiv.jwma.or.jp
- The valleys, walls, chimneys, etc. are covered with an additional width of about 500mm and butyl to stop water.Tajima roofing
- In snowy regions, 1,000mm eaves are doubled.〖Sanshu tiles〗Tsuruya Co., Ltd., Disaster prevention tiles
Below, we will explain the details at the material level, including the confusing "startup" and "order of peripheral sheet metal".
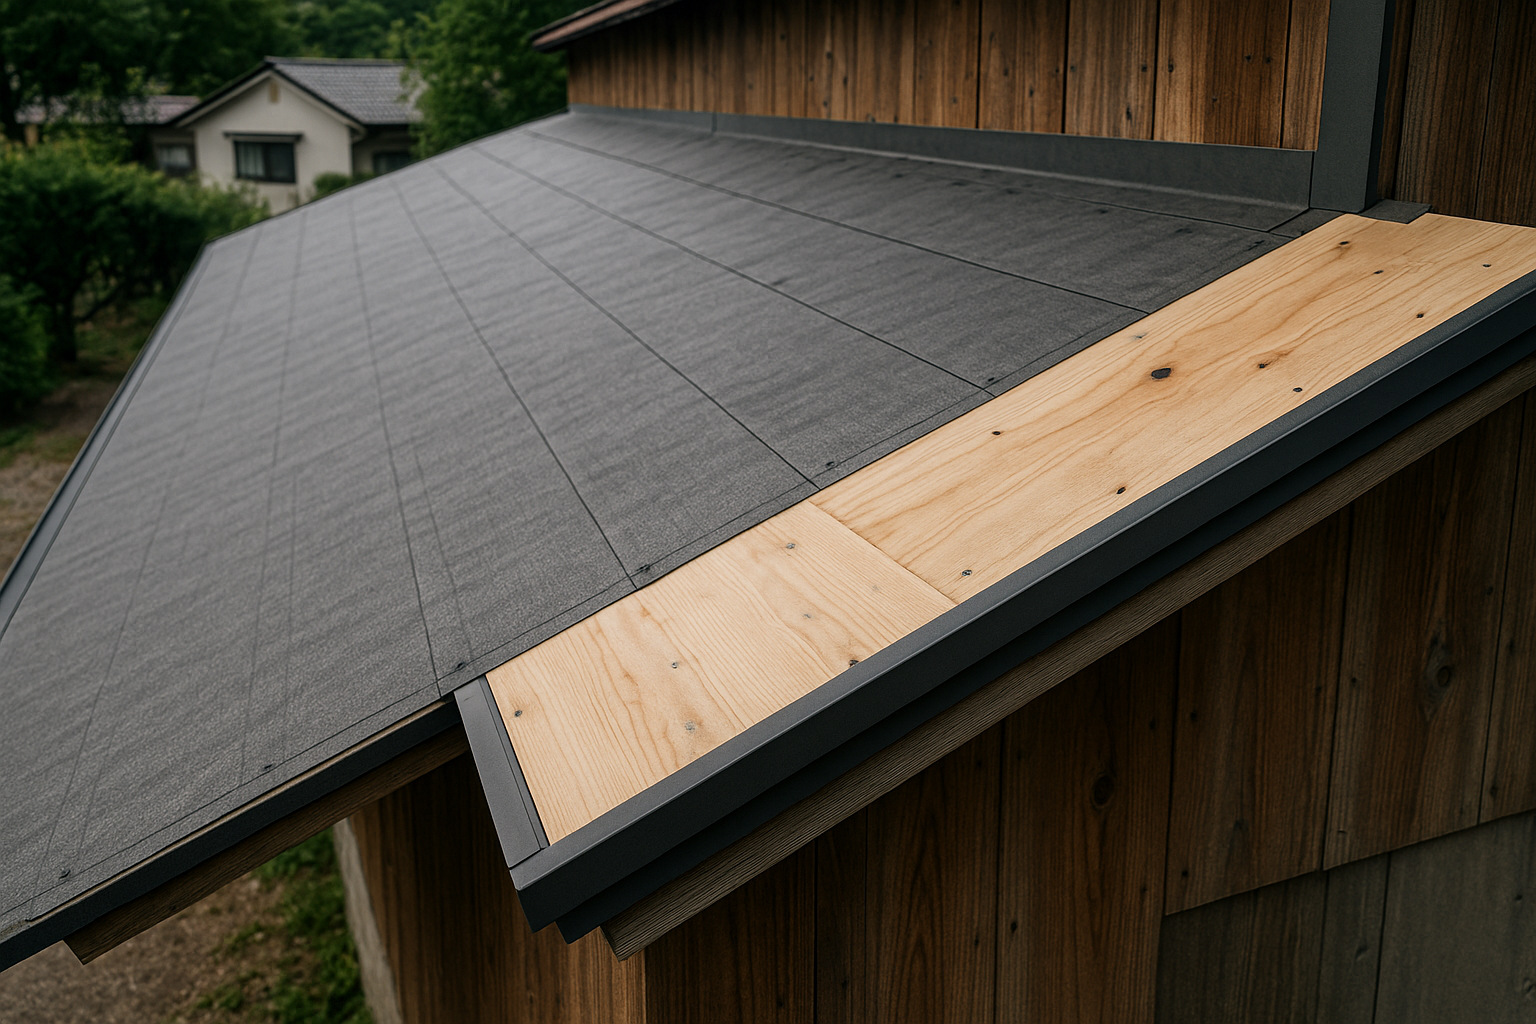
Basic dimensions and concept for start-up and connection
- ``How much to raise from the roof surface'' is extremely important. Wall joints, parapets, and rising parts should be at least 150 mm from the finished surface (200 to 250 mm is recommended for wooden houses). The basis of the numbers is the manufacturer's standard fit and the principle dimensions of technical data.cad.tajima.jp+1
- It is likely to "break" when the sheet rises, so it is doubled with a 500mm wide sheet for extra tension to increase strength and water stopping.Tajima roofing
- The battle between the wall and roof is made into a layered structure that does not disrupt the "flow of water" in the order of the roof rise → primary drainage on the wall → waterproof paper (breathable waterproof sheet) → exterior.
Implementation work: Step by step (premises on re-roofing)
Step 0: When should you remove/attach the peripheral sheet metal?
- Removal (disassembly) order: Build wrap → crenava → valley → roofing material → old roofing.
- Installation (new installation) order: First attach the arabesque (eave drainer) and then the roofing up to the top of it will suit domestic procedures. By installing the eaves arabesque first, it stabilizes the drop of water into the gutters, making it less likely to be flipped by the wind at the edges of the roofing (the domestic manual clearly states that "lay modified asphalt roofing all the way up to the eaves arabesque").Shinto Co., Ltd.
Step 1: Put the reference line out
- I put a chalk line on the eaves and checked the street heading from underwater to above water. In particular, one flow emphasizes linearity up to the ridge (highest point).
Step 2: Extrude the first step (below)
- The roofing was laid "parallel to the eaves."
- Fits at the eaves: If you lift it up to a position that does not exceed the top of the arabesque, and use butyl tape in conjunction with the arabesque top and the roofing fighter, it will be resistant to backflow in the event of wind and rain.
- Fixation: Secure the stacking fee and temporarily fasten it with staples (or nails with caps). The needle spacing between the overlapping portions is approximately 300mm.aspdiv.jwma.or.jp
参考動画:板金戦隊様「【ルーフィング】わかりやすく!尚且つ効率的な切り方 止め方 角収め」
Step 3: Threading from the second stage onwards
- Up and down stacking (flow direction) 100mm or more. The left and right joints (longitudinal direction) are over 200mm.
- Always stack the longitudinal seams in the direction that "the sheet above straddles the water." The more the slope, the more the amount of stacking is the practical task.aspdiv.jwma.or.jp
- Another trick is not to point the "upper opening" towards the leech side (the side that is hit by the outstanding wind).
Step 4: Overcoming and increasing the building
- Folds over 250mm from one side over the building. Stump it up from the other side and stack it on the wing.aspdiv.jwma.or.jp
- Finally, add a 1000mm wide extension across the ridge core in a straight line to cover any weaknesses in rain protection.
Step 5: Fitting on the gable side
- The roofing is firmly inserted to the ground under the draining burrs, and place the top shelf inside the "water-returning" position.
- To start up, remove at least a few centimeters from the roof surface, turn it into a gable material if possible and reinforce it with butyl. The metal sheet metal is added afterwards, and the screw head is sealed.
Step 6: Valley (V-shaped rainwater concentration area)
- First, we laid down a roofing piece with a width of about 500 mm to straddle the valley core and ``add on''.Tajima roofing
- Bring the left and right tension on the left and right sides from above, and do not place needles on the valley core (needle-right 150mm belts should be made to prevent needles).
- Finally, cover the valley sheet metal, and the nails on the sheet metal side are "high enough to be far from the valley core."
Step 7: Wall and Rise Talk (Most Important Details)
- Raise the roofing from the roof to the wall 200-250mm (recommended).shizureki.co.jp
- The rising part is 500mm wide and seals the interlayer with butyl.
- In the later process, the first drainage → breathable waterproof sheet → exterior material is used to create a layer structure where water drains from bottom to top.
Below “Sheet Metal Squadron"'s videos are very easy to understand, so I recommend them! ! (I'm so fantastic that I bought the same tool.)
Step 8: Penetration part (ventilation ridge underneath, piping, skylight)
- The roofing is cut out above and below the penetration part, and cover the flushing part in the order "from bottom to top."
- The four circumference is increased to a width of 200mm or more and butyl tape.
- The skylight must always follow the manufacturer's special waterproofing parts instructions.
Step 9: Double eaves in snowy countries
- It is double-layered about 1,000mm from the eaves (one piece is strong if it comes with an adhesive layer). If the slope is gentle, the north face, or the eaves are large, spread it conservatively.〖Sanshu tiles〗Tsuruya Co., Ltd., Disaster prevention tiles
Guidelines for "selection and alignment" for each slope (organizing points that are easy to confuse)
- 3.5 inches or more (approx. 19.3° or more): Standard use with modified asphalt or 940. Specifications for the roof material side, such as metal roofs, slates, and tiles, are given priority.nisshinkogyo.co.jp
- 2.5 to 3 dimensions: Based on modified asphalt, the valleys, eaves, and ridges are thickened. If the roofing material is metal, pay special attention to nail hole sealing.IG Industries, Inc.
- Less than 3 inches (slow slope): Modified asphalt with adhesive layer (self-adhered) is recommended. It also adheres to the longitudinal layering to reduce leakage.shizureki.co.jp+1
- Direct metal with no ventilation layer: Breathable systems are generally not allowed. All you can do is use resin roofing materials. Heat shielding + modified asphalt-based measures against both heat and condensation.
Quantity estimate (for calculating the number of rolls)
Standard roll: 1m wide x 20m long, the "effective step" is 0.9m, assuming that the upper and lower stacking is 100mm. The theoretical effective coverage area per roll is approximately 0.9m x 20m = 18m2. Look at the loss caused by 200mm left and right joints, cutouts, valleys, rising and temporary fixing.+10-20% allowanceRecommended.
- Example) One side roof area of 100㎡
Required number of turns ≒ 100 / 18 × 1.15 (15% allowance) ≒ 6.4 → Volume 7Arrange. - Example: Two gables and two through-holes (large loss)
similarly +20% It's safe to watch.
The numerical basis for the stacking fee is based on the domestic construction guidelines (upper and lower 100mm, left and right 200mm).aspdiv.jwma.or.jp
Common mistakes and countermeasures
- Reversing the stacking direction
Make sure to go below the water and above the water so that the sheet above the water is on top. If this collapses, capillary action will cause sucking up. - Lack of overlapping width
Minimum lines are 100mm up and 200mm left and right. Slow slopes and strong winds are redundant.aspdiv.jwma.or.jp - Lack of rise
A rise of less than 150 to 200mm will cause problems on the rain covering hardware. Approximately 200-250mm.kanema2.com+1 - Needle into the valley core
The valley has the highest amount of water. Keep it far enough away from the core, tighten it first and then press it with a valley plate later.Tajima roofing - A light-hearted eaves in snowy countries
However, if you neglect the double-layered leakage band, you will first encounter a problem. Double lining is approximated to 1000mm.〖Sanshu tiles〗Tsuruya Co., Ltd., Disaster prevention tiles - Misuse of breathable systems
Putting a breathable system into a direct metal roof that does not allow ventilation will induce condensation inside. Change your policy to heat shielding + reforming systems.
Construction checklist (for reading aloud at the site)
- Weather: No rain, strong winds or thick fog during the construction period until 24 hours. Cancel if it gets wet.
- Base: No rot, no nail heads, flat surface.
- Arabesque: First. Butyl is used to fight the roof with the top.Shinto Co., Ltd.
- Threading direction: parallel to the eaves. Underwater → above water.
- Layering fee: 100mm in the top and bottom, 200mm in the left and right.aspdiv.jwma.or.jp
- Punching: 300mm intervals on stacked parts. The valley core and rising angle are set to a no-pull belt.aspdiv.jwma.or.jp
- Building: 250mm folded + 1000mm wider and tensioned.aspdiv.jwma.or.jp
- Valley: Increased width by 500mm → genuine layer → valley sheet metal.Tajima roofing
- Rise: 200-250mm + extra tension + butyl.shizureki.co.jp
- Snowy country: 1000mm doubled eaves.〖Sanshu tiles〗Tsuruya Co., Ltd., Disaster prevention tiles
Connecting until finishing (cautions for temporary waterproofing)
Even if it is modified or has an adhesive layer, the roofing itself is not permanently waterproof. It's supposed to be "temporary waterproofing" until the roofing material is installed, so that it will keep raining away, so that roofing up early. With adhesive layer, the adhesive layer increases the adhesiveness and dust adhesion in direct sunlight reduces the installation performance, so the period of time it takes to be left unattended after applying it is shortened.
How to incorporate excellent ideas from overseas (precautions when applying in Japan)
Overseas (North America, etc.), many areas standardize self-attaching waterproofing materials equivalent to the eaves "Ice & Water," making them effective in combating snow, ice and frozen dams.
Even in Japan, in snowy countries, it is reasonable to incorporate local rules such as "1000mm double eaves" and "with adhesive layer."〖Sanshu tiles〗Tsuruya Co., Ltd., Disaster prevention tiles
It's best to stick it on flexibly depending on the weather of your construction location (construction location)!
- The basis for "Ice and water (self-adhesive bitumen membrane)" is clearly stated in the American Building Standards (IRC) and Materials Standards (ASTM D1970).ASTM International | ASTM+3ICC Digital Code+3ICC Digital Code+3
- To prevent backflow of ice dams and wind and rain, the international standard is to apply the product continuously from the eaves up to at least about 24 in (24 in) above the inner line of the exterior wall.ICC Digital Code +2Fine Homebuilding +2
- It is reasonable to adopt local rules in Japan with "1,000 mm eaves (duplexed)" and "with adhesive layer," but it is currently not at the level of uniform laws and regulations nationwide. Japanese official specifications and explanations require material standards (JIS A 6013, etc.) and "additional tension at key points," but numbers of 1000 mm lengths are not specified as national standards.Ministry of Land, Infrastructure, Transport and Tourism +2 Sumiai information +2
- Regarding "Double-layered water flows backwards/Capillary phenomenon occur?", if the overlapping direction (always below → top), sufficient overlap width, adhesive integration (self-adhesive membrane), and the risk of reversed water or capillary rise can be reduced. In fact, self-deposition membranes are considered effective for leaking water during ice dams.Building Science+2Building America Solution Center+2
Below is a detailed explanation.
1) Standards and effects overseas (North America)
- The IRC requires an ice barrier in areas where snow and ice dams are likely to occur, and uses a method of "adhesing two layers of undercover" or a self-adhesive polymer modified bitumen sheet (=ice and water). The scope of application is defined as continuous coating "from the lowest edge of the eaves to the line inside the exterior wall from at least 24 in (approximately 610 mm)."ICC Digital Code
- Self-sealing material specifications are specified in ASTM D1970, and performance requirements such as thickness, adhesion and sealing (nail hole self-sealing) are defined in order to prevent back-up water from ice dams.ASTM International | ASTM
- The mechanism of backflow and leakage caused by ice dams and the "eaves part self-deposition membrane" as a countermeasure has been repeatedly shown in technical documents such as Building Science.Building Science +1
2) Application in Japan (Notes)
- Standard specifications and guides for public buildings require the use of modified asphalt roofing (JIS A 6013) and "additional tension at key points," but the regulations do not directly express the eaves of 1,000 mm double-layered eaves as a uniform nationwide provision. Therefore, it is reasonable to organize the system by "strengthening it with local rules according to the region, design, and manufacturer specifications."Ministry of Land, Infrastructure, Transport and Tourism
- In addition, Japanese technical documents also show that "ice dams (thawing → flowing → freezing at the eaves) can occur," and it is reasonable to strengthen the eaves in cold and heavy snowy areas.Geospatial Information Authority of Japan
- In the construction guidelines of tile manufacturers, etc., the eaves are stacked on top of the drainage drainer and the contact is made by attaching them closely with adhesive tape etc. (Please check the latest manufacturer version).〖Sanshu tiles〗Tsuruya Co., Ltd., Disaster prevention tiles
3) Is there any backflow or capillary phenomenon with "double-lined eaves only"?
The main causes of reflux and capillaries are "reverse water wrap, insufficient stacking, steps that cause stagnant water to form, and blowing in due to wind pressure." If we follow measures, eaves double-layering itself will not induce reflux.
Practical key points:
- Lap direction and overlap width: Be sure to lay it in the order of "bottom → top" to follow manufacturer regulations (e.g. length 100 mm or more, width 200 mm or more, etc.). This creates a "water water" line that is less likely to rise in capillaries with overlapping results.arise1.jp
- Use of self-adhesive film: The self-adhesive film self-seals the nail holes and is resistant to backflow during wind, rain, and ice dams (target purposes for ASTM D1970). It is particularly effective in slow slopes and heavy snow areas.ASTM International | ASTM
- Fighting with the eaves drain:
- Practical and group documents are basically to "put the under roof on top of the drainer at the eaves." When using self-adhesive membranes, the method of placing them "on the drain" or "under the drain" is also in accordance with local testing practices and manufacturer instructions, so follow the instructions of the recruitment system (there are differences in interpretation between NRCA, IRC and manufacturers).
- In either method, it is recommended to cover the step portion with a stripping sheet (wide self-sealing piece) to cut off the capillary path.Journal of Light Construction
- The lower the slope and the better the surface is: The more the slope is, the higher the risk of water and wind pressure water entering the area below the wrap, so the design is carried out in cold North American regions (from valleys, eaves to the inner line of the exterior wall, and sometimes the entire surface).Building America Solution Center
From the above, the idea that "just double-sided at the eaves" is rational in cold/heavy snow conditions, and is supported internationally. However, in order to avoid backflow and capillaries, it is essential to ensure (1) forward-water wrap, (2) specified stacking dimensions, (3) self-adhesiveness, (4) proper interaction with draining and eaves gutters, and (5) the required length (up to at least the inner line of the exterior wall + approximately 610 mm).ICC Digital Code
4) Practical checklist (reflux and capillary measures)
- Ensure continuous self-adhesive membranes from the eaves up to the inner line of the exterior wall + approximately 610 mm or more.ICC Digital Code
- The wrap is shifted from bottom to top, and the vertical joint is shifted by a minimum of 150 mm (according to manufacturer's recommended values).arise1.jp
- When fighting with the eaves, strictly follow the instructions in the recruitment system (in EAVE, the self-layer coating is on top of the drainage, or under the drainage + stripping).Journal of Light Construction
- For low slopes (≲3/12), heavy snowfall, and valleys, we will consider expanding the scope of application of self-deposition films and duals.ナチ協会
- The materials used must be compliant with JIS A 6013, etc. (Japan)/ASTM D1970, etc. (equivalent to North America).Ministry of Land, Infrastructure, Transport and Tourism
Check points after installation
- We followed the water in the order of buildings, valleys, rising and keraba, and re-checked the position of the reversed eyes, insufficient stacking, and needle-punching.
- Completely remove chips and old nails from the roofing (causing or rust marks).
- When the wind is forecast, the number of temporary fixing points is increased and the edges are reinforced with butyl. Protect the roofing material before it is delivered (do not place the blue sheet directly on the roofing).
Summary: Today's to-do list
- Decide whether to use "modified or adhesive layer" based on the gradient and local conditions (less than 3 inches, adhesive layer is included).shizureki.co.jp
- Arrange the number of rolls = roof area ÷ 18m2 x 1.1 to 1.2 as a guideline.
- Arabesque tip → Standard for the first tier → Up and down 100/Left/Left 200 stacks → Building 250 fold + 1000 increase in stitching → Valley 500 increase in stitching → Starting 200-250 + increase in stitching.shizureki.co.jp
- In snowy regions, there are 1,000 double eaves.〖Sanshu tiles〗Tsuruya Co., Ltd., Disaster prevention tiles
- Breathable systems are limited to those with ventilation design. Avoid using straight metals.
lastly
Roofing is "secondary waterproofing of the roof," but in reality, primary waterproofing (roofing material) protects your home in case of an unexpected situation.The last fortressis. That's why performance can change dramatically by simply carefully following the "simple but crucial" elements such as the stacking fee, the starting dimensions, and the additional position. Please use this article as a guide to how to put it into today's work. If you're unsure, you can use (1) more stacking, (2) higher rise, and (3) double valleys and eaves, so it's not too far off.
Let's work hard together!
If you're wondering "How much renovation or remodeling can I actually do on my own home?" or "Where should I even start?", please visit this page. If you're looking to learn more about specific renovation processes or construction details, don't miss this page as well!
References, manufacturer's materials, videos (primary information useful in practical work)
- Construction guidelines for roofing material (Basic values such as 100mm up and bottom/200mm left and right, 300mm needles, 250mm folding of buildings, etc.)aspdiv.jwma.or.jp
- Shinto's "Hook Single" Construction Guide (Example of operation laying it all the way up to the arabesque at the eaves)Shinto Co., Ltd.
- Protective Sumai Insurance Design and Construction Standards (Example of Regulations for JIS A 6005 Compliant Products)filebox.mamoris.jp
- Nisshin Kogyo "How to select roofing" (comparison of performance and selection axis for asphalt/modification/adhesion)nisshinkogyo.co.jp
- Tajima Roofing "Roofing Undercover Material/Specifications" and "Lineer Roofing 500" (Specifications: Increased valley and rising edge material)Tajima roofing
- Shizureki "Residential Waterproofing Materials Catalog" (adhesive layer recommended for slopes of less than 3 cm, rising height 250 mm recommended, overlap allowance specified)shizureki.co.jp
- Tsuruya construction instructions (recommended 1000mm double eaves in snowy areas, with adhesive layer less than 3cm thick)〖Sanshu tiles〗Tsuruya Co., Ltd., Disaster prevention tiles
- IG Industry Construction Materials (Examples of the concept of slope classification and designated under roofing materials)IG Industries, Inc.
- Standard values for JIS A 6005 (asphalt roofing felt) (940, 1500, etc.)Tajima roofing
Leave a Reply
You must be logged in to post a comment.