Hello everyone, this is DIY Renova.
Wooden houses in Japan from the Showa era to the early Heisei era often feature "shutters." Although it has roles as a security, windproof, and light shielding, many people have been thinking, "I want to remove shutters" or "I want to block shutters" due to the recent strengthening of aluminum sashes, the spread of double-layer glass, and the design-oriented approach.
In this article, we will explain "How to safely remove shutters using DIY", including structural and engineering perspectives, so that even beginners can understand this.
The target is a home of less than two stories built using the "wooden shaft construction method (conventional construction method)." It covers all the necessary tools, points to note, waterproofing after removal, and structural reinforcement concepts. I make this with just one piece in mind.
If you're wondering "How much renovation or remodeling can I actually do on my own home?" or "Where should I even start?", please visit this page. If you're looking to learn more about specific renovation processes or construction details, don't miss this page as well!
So, here you go.

What is the structure of a shutter?
A shutter is a sliding door-shaped board installed outside a window, and is used to slide left and right using rails. The general configuration is as follows:
- "Shrimp main unit (board)"
- "Rail (fixed up and down)"
- "Door bag (the box part where the shutters are stored. Many are buried in the wall)"
If the door bag is visible, it is an external type, and if it is not visible, it is an "embedded type" type that is embedded in the wall.
In the case of embedded type,Structure that cannot be removed unless the wall is partially damagedAs such, careful work is required.
Why take shutters
- I want to make the design neater
- It's a hindrance to replace sashes and insulate windows
- We want to block walls to improve earthquake resistance and insulation
- Interfers with sunrooms and wood decks
In particular, old aluminum shutters are heavy and difficult to use, and many people find it difficult to use when renovating DIYers and want to remove the whole door bag and turn it into a wall.
There are two ways to remove shutters
There are two main ways to remove shutters:
A: Remove only the shutters from outside (door bags are left)
【merit】
・Eliminate the walls
- Minimum cost and work
[Disadvantages]
・The appearance doesn't change
・The inside of the door bag becomes a hangout for insects and trash
*In many cases, the process is incomplete, such as removing only the rails or blocking them with simple boards, and is not suitable for complete renovations.
B: Dismantle the whole door bag and rebuild the wall (recommended)
【merit】
・Very appearance and function
- Increased insulation, airtightness and security prevention
・Structural strength can be ensured as a wall
[Disadvantages]
・Some level of "wall breaking up" is required
・Waterproofing and repair of the base will occur
In this article, we will focus on how to "B: Remove the entire door bag and remodel it as a wall" which is more reliable and reusable.
Structural points to be checked before removing shutters
1. Whether or not there is a brace and location (important)
Sujikai is a "different material" that prevents buildings from being distorted by earthquakes or wind.
It is stored inside the wall as an "x" or "/", and cutting and processing this will have a major impact on earthquake resistance.
[How to check]
- Remove the wall inside and look inside
- Remove plasterboard and veneer with a screwdriver to visualize the structure
Places where there are braces must be left as is or "reinforced and moved after structural calculation."
When it comes to DIY, the basic rule is to "never cut off the braces."
2. How to construct and destroy the exterior wall of mortar
Many wooden houses are finished with "las mortar walls." The structure is as follows.
- Mortar layer (thickness 10-20mm)
- Lass mesh (metal mesh)
- Base wood (body rim, etc.)
- Structure (pillars and braces)
It does not mean "breaking mortar = breaking the structure."
Mortar is a "finishing material" and does not necessarily directly affect earthquake resistance.
However, please note that when combined with structural plywood, there are cases where the lath net and mortar exterior walls can be certified as a 5.0 wall magnification wall, so it can be a strength-bearing factor! (reference:Fujikawa Construction Materials Industries, Ltd.)
However, if you break it you will need to do the following:
- Cutting and removing the last net
- Repairing remaining base material
- Reupholstering waterproof paper (breathable waterproof sheet)
- Re-constructing exterior wall finishing materials (siding and plastering)
When breaking, it is safe to "set a cut line with a sander and then carefully break it with a hammer and a chisel."
3. Check storage space in the shutters
It's hard to tell from the outside, but the depth of the door bag is approximately 150-200mm.
To see if the braces interfere with each other, peer inside, drill holes and check with an endoscope.Is it a space that can be removed?Be sure to determine this in advance.
The Japan Breathable Waterproofing Tail Association's common construction specifications are recommended for . (reference:Japan Breathable Waterproofing Tarpaulin Association)
Necessary tools and materials (can be purchased on Amazon etc.)
[Minimum required tools]
- Impact drivers (Makita or HiKOKI recommended)
- Bar (small to medium size)
- Tiger + hammer
- Thunder or disc grinder (makes cuts)
- Protective goggles, dust masks, gloves
[It's convenient to have]
- Gypsum board cutter
- Convex (major)
- Ladder or scaffolding platform
[Materials (for repair after breaking)]
- Breathable waterproofing sheet (e.g. Tyvek)
- Waterproof tape for exterior walls
- Kinoshita base material (wild edges, body edges, plywood, etc.)
- Mortar or exterior wall panels (siding)
Learn how to take shutters step by step
Step 1: Check the structure from inside the room
- Peel off the interior of the wall with shutters (plasterboard, veneer, etc.).
- FirstThe part that corresponds to the back of the shutter door bagOpen it and check the structure.
- The wall base is made up of columns (105mm square is standard) and studs (30-45mm).
- Check the location of the braces.
- Is the diagonal material crossing the door bag?confirmation.
- If there is any interference, we also consider switching to "extract only the shutters" rather than removing them.
*The subsequent construction methods will be divided depending on whether or not there is a brace.
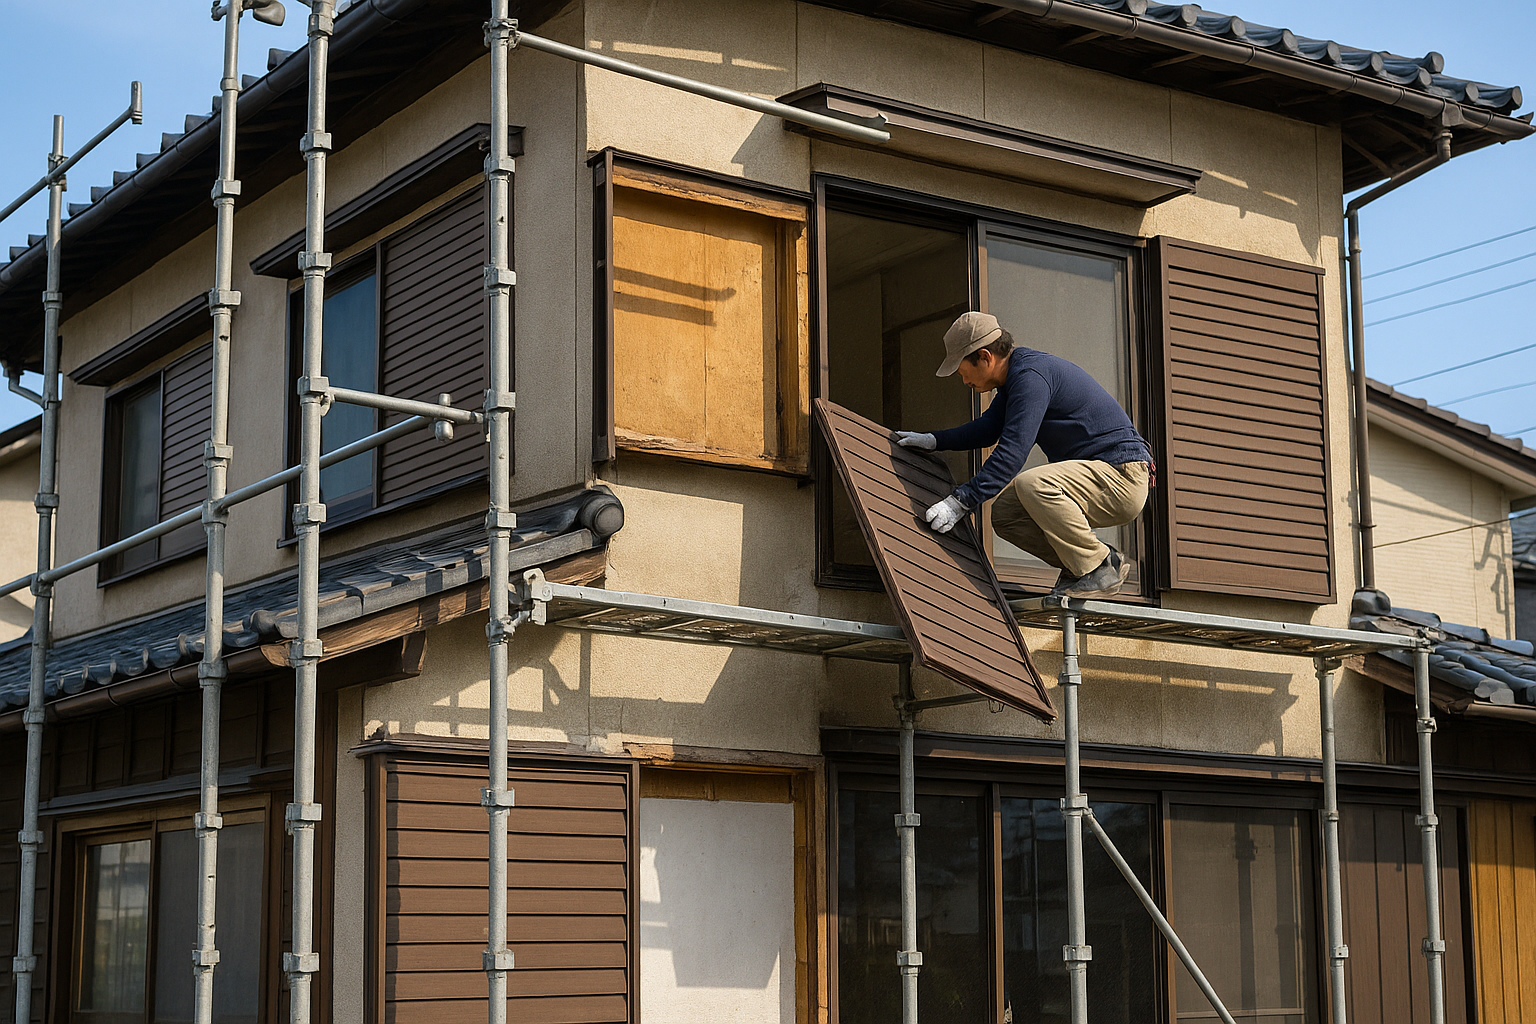
Step 2: Remove the shutters
- Pull out the shutters and lift them up and remove them.
- The type that is drawn inside the door bag isRemove the inner wall and push it out with your handIt is necessary.
- If it gets caught on the upper and lower rails,Remove by lifting it slightly towards the top rail side..
- Remove the rail screws and remove the frame.
- Screw fastening makes it easy and impactful.
- If it has been caulked, use a cutter to remove it.
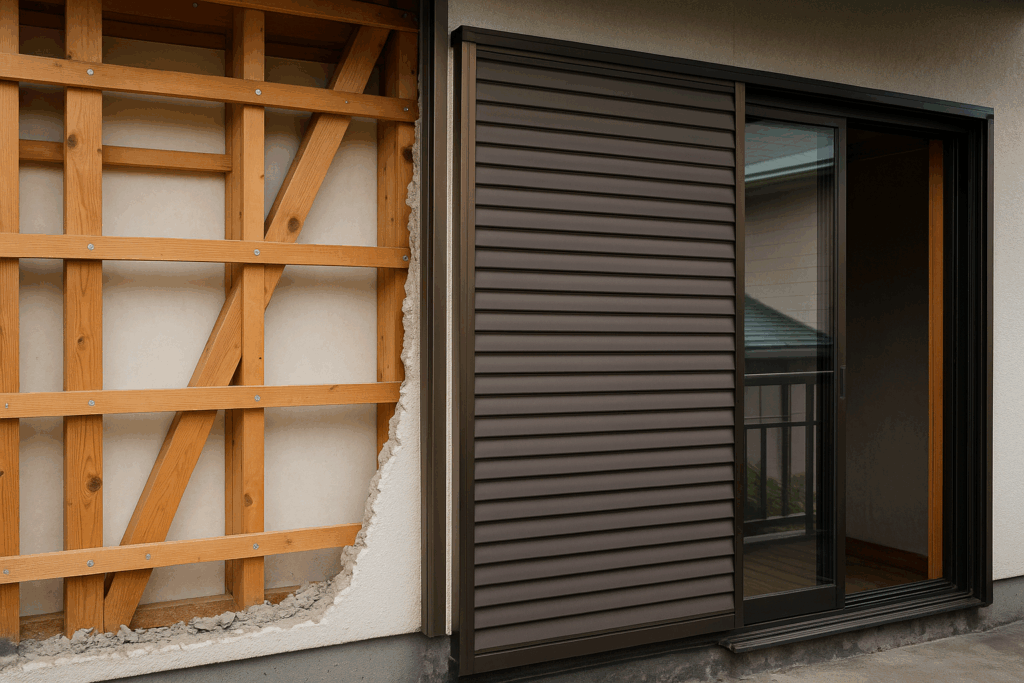
Step 3: Remove the door bag
- Cut the outer mortar with a sander and carefully break it with a chisel and hammer.
- Working range: Width 30-40cm, height 1.8m
- Dust prevention: Cover window area with protective tape and blue tarpaulin
- Cut and remove the lath net using pliers.
- Remove the body edge (kinoshita base) with a crowbar or something similar as necessary. There may be cases where you do not need to take it, so you need to look at the situation and make a decision.
- Remove the back panel of the door bag (decorative veneer and plywood) andExposes the entire storage space in the shutters.
Step 4: Waterproofing and repairing the base
- Apply waterproof paper (breathable waterproof sheet) around the exposed pillar.
- Examples: DuPont "Tyvek" (high performance and durability)
- The covering area is 100mm or more up, down, left and right (compliant with JIS A 6111)
- Stitch structural plywood (e.g., coniferous plywood, 9mm or more) on the exterior wall side.
- The body edge (for ventilation layer) is installed vertically (wood around 18mm)
- Fill the inside with insulation (glass wool or styrofoam) if necessary.
Step 5: Finishing (outer walls and interior walls)
- The exterior walls are finished with siding, mortar, and boarding.
- If you can't get the same exterior wall materials as the existing ones, there is also an accent.
- For DIY purposes, siding (Nichiha/KMEW) is easy to apply and recommended.
- The interior is finished with plasterboard + cloth or wood.
How does the insulation and earthquake resistance change when you remove a shutter?
- The door bag part of the shutters often did not contain insulation, and it was a "passing for heat."
- Therefore, after removal, remodeling it as a wall,Thermal flow rate (U value) is greatly improveddo.
- Example: U-value: 3.5W/㎡K → 1.5W/㎡K
- By revealing the braces,It is easy to reinforce structurally(Plywood can be attached to make it a wall-resistant surface material.)

Common problems and solutions
| trouble | Solution |
|---|---|
| The mortar has cracked considerably | Make fine cuts with the sander before working |
| The bristles intervened with the storage of the shutters. | Changed to a method of removing only the shutters and leaving the door bags. |
| I drilled a hole in the wall and found an ants | After injecting boric acid treatment (termite prevention agent), sealed installation |
| I can't get siding | Change to "accent" in the same color as the existing wall |
| I don't know how to apply waterproof paper | Paste it from the vertical direction and stack it at least 10cm above and below (so that rain will flow from top to bottom) |
Learn from overseas renovation examples
In Europe and the US, shutters are used less frequently, and there are many shutter-type or outward-opening types, so door bags generally do not exist.
Instead, "external louvers" and "blind shutters" are used, and building materials are often renovated with a focus on design.
Things to learn overseas:
- "Insulation board installation" where insulation material is cut into a plate shape and easily embedded
- A ventilation layer construction method that does not create airflow inside the wall (Rainscreen system)
- Because of its strong DIY culture, it is easy to reuse, such as a modular panel replacement method.
These may differ slightly from Japan's climate and climate, but they are very helpful in terms of the rationality of insulation, waterproofing and DIY.
Renovations that we recommend after removal
- Changed the window to "double glass or triple glass" (energy saving grade increased)
- Install "decorative windows" and "FIX windows" on the remains of the door bag to increase the lighting
- Ensuring ventilation of the eaves and installing bird blocks
- Inner sash installation (inner window) enhances soundproofing and heat insulation effects
[Checklist]
- Have you checked the location of the braces?
- Do you have the tools? (including blades and batteries)
- Have you prepared the waterproofing materials?
- Are you OK with work hours and weather (rain and wind)?
- Have you secured a place to dispose of the dismantled parts? (Confirmation of industrial waste rules)
Finally: To safely perform this task
Removal of shutters involves "small structural changes" and "waterproofing work," so careful planning and observation is important.
Use the checklist below to double-check it before you start.
If you're wondering "How much renovation or remodeling can I actually do on my own home?" or "Where should I even start?", please visit this page. If you're looking to learn more about specific renovation processes or construction details, don't miss this page as well!
Leave a Reply
You must be logged in to post a comment.