Hello everyone, this is DIY Renova.
Many Japanese wooden houses have complex roof shapes.For example, there may be cases where the roof is complicated as a result of repeated expansions, or cases where the design is intentionally made to have a complicated shape.However, if the roof shape is complicated, there are many valleys and more seams, which tend to increase the risk of leaks and the maintenance burden.
In this blog, we will explain in detail how to renovate (renovate) such complex roofs into simple shapes such as gable roofs or roofs, at a level that even beginners can do so by themselves.I try to include supplements that are easy to understand even for beginners when technical terms or numbers appear, including engineering perspectives.
By reading the work procedure from scratch while reading, you should be able to determine whether you can really DIY yourself, and how far you should do it yourself, and where to start.Please read to the end and use it to help you plan a renovation that suits your home.
When should you consider changing the shape of the roof and criteria for determining it
Roof renovations, especially the decision to "change the shape itself," is not so often.Therefore, many people may be worried about whether they don't know when to decide, or whether they can't decide whether they can repair or whether they should review the shape in each case.
This section explains "conditions that should be seriously considered changing the shape of the roof" and the criteria for determining it.If multiple items below apply, it is not just a partial repair, but a time to reconsider the structure of the entire roof.
"Leaks" occur repeatedly
A leak is the most obvious sign of a roof malfunction.In particular, in the following cases, it is likely that a "review of the structure itself" will be necessary, not only on the surface layer of the roof material.
- There are many leaks in the same place
- Even after repairing, water gets in one after another in another location.
- The stains on the ceiling are spreading
- The cause of the leak is from a "valley" or "complex seams."
In particular, leaks from the valley are often caused by complex roof shapes, and a review of the shape is effective for fundamental improvements.The valley area is structurally prone to rainwater concentration, and due to poor drainage, it deteriorates more quickly.
Corrosion, deterioration and distortion can be seen in the "roof structural components"
If the underlying or structure that supports the roof (rafters, field boards, beams, main purse, etc.) is damaged, repairing the surface alone will not last long.If you have any of the following symptoms, please review the structure.
- Mold, moisture, and decay bacteria can be seen in the attic
- The rafters are bent and sinking
- The ground floor is "soaked" when stepped on
- Nails may come out or cracked boards
- Termites have been damaged
This condition can be caused by a fundamental defect in the design, such as a lack of ventilation and drainage, which leads to moisture buildup.When renovating, the set should be considered: "replacement of structural parts and reviewing the roof shape."
"Last building" has been over 30 years old and maintenance history is unknown or small
Buildings before 1981 (Showa 56) may not meet current earthquake resistance standards.In such buildings, the roofing material may be heavy and vulnerable to shaking, or the structure may not be as streamlined as it is now.
Furthermore, if past renovation history is ambiguous, the construction accuracy is often unknown, and unexpected corrosion or insufficient strength is often found.
In such buildings, the shape can be simplified at the time of roof renovation, and by changing the material to a lighter material, it is possible to improve earthquake resistance and safety.
"The roof shape is extremely complicated," and construction and maintenance estimates are too high
If the roof has a structure with many unevenness, such as an L-shaped or U-shaped, the following disadvantages are noticeable.
- Larger area increases material and construction costs
- There are many valleys, making it complicated to close the rain
- More labor required for regular maintenance (painting and waterproofing) and more expensive
- Drone inspections and roof scaffolding installations tend to be expensive too
In this way, it is often decided that "it would be more cost-effective to integrate the roof surface, reduce the number of buildings and unify the slope" rather than maintaining the current shape.By asking a contractor or architect for an estimate, the cost difference will be clear.
When remodeling to make a major change in the "exterior design"
- From Japanese to Western style
- From Western style to modern design
- A minimalist roof
In this way, even when changing the direction of appearance, it is effective to review the roof shape.For example, if you change from a Japanese tiled roof to a simple gable roof made from galvanized steel sheets, the exterior will look completely different.By combining it with the exterior wall replacement, you can make renovations that are "just like they've been rebuilt."
Summary: In such cases, consider changing the shape of the roof.
If the following applies, it is recommended that you plan based on the assumption that you will be "a fundamental review of the roof shape" rather than simply repairing or painting.
- There are recurring and frequent leaks
- There is clear deterioration or corrosion in structural parts
- Old building, low earthquake resistance and thermal insulation performance
- We want to significantly reduce future maintenance costs
- I want to change the exterior design significantly
In such cases, changing the simple shapes such as the "gable roof" and "pillow roof" introduced in the main text of the article can be a reasonable option both structurally and cost-wise.In the next section, we will introduce how to actually change the roof shape and specific methods.
[Absolutely check] 3 things to keep in mind when changing the shape of your roof
If you're thinking, "I'd like to change the shape of my roof myself," first make sure to take these three points into consideration.If you do this without knowing it, you could end up saying things like, "It was illegal later," "My house has become weak," or "My house cannot be used."
① Don't change the "height" of the roof without your permission!
Changing the slope (angle) or shape of the roof can change the "wide building height" and "eave height."
But in fact, in JapanThere are restrictions under the height law (Building Standards Act)So, you need to be aware of the following:
- If you raise the height too much, you will need to apply for a confirmation
- Blocking sunlight in the surrounding house will violate the "slanted line limit"
- If it is considered an extension, it may exceed the "building coverage rate/floor area rate" and become illegal.
→ The basic rule is to ensure that the current roof height and the "higher roof that is about to be created" do not change.
→ If you are unsure, it is safer to show the drawings to the city hall or an architect and consult with them.
斜線制限とは:前面道路から斜め上に見て自宅の屋根・2F以上の外壁が斜面から出ていないかを確認する
詳しくは、クレバinfoさんの記事がわかりやすいので見ていただいたほうが良いかもしれません。
そのほか参考:http://kakukikaku.com/law-p2.htm
② Don't cut the pillars, beams, and braces without permission!Don't make it weak!
The roof frame (rafters, main buildings, beams, etc.) is an important part that supports the building.If you accidentally cut this, cut it down, or put it in the wrong way...
- Become vulnerable to earthquakes
- Increases the risk of typhoons flying the roof
- The walls and ceilings are distorted
→ Be sure to check out "timbers related to the structure" before touching them.
→ In DIY, the golden rule is to add reinforcement and not make it weaker than it is now!
③ In some areas, the "construction itself" may be required.
For example, in urban areas, fire prevention areas, and landscape areas...
- The roof material is determined (it must be non-combustible)
- The height, color and slope angle are finely specified.
- When changing the appearance, it may be necessary to submit a "landscape ordinance" or similar notification.
→ If you wonder, "What's with my area?", first go to the local government's Construction Guidance Division or renovation consultation center.
④
Summary: Check this out before changing the shape of your roof with DIY!
✅ Make the roof height "unlike the same as it is now"
✅ Reinforce the roof frame to prevent the structure from being weakened.
✅ Be sure to check with the government office in advance whether local rules and applications are required.
If you follow these three, you can also use self-renovation.Safe, legal, and you won't regret itRoof renovations are possible.
It's not enough to just say "I didn't know" so even if it's a hassle, "check and work carefully" is the key to successful DIY!
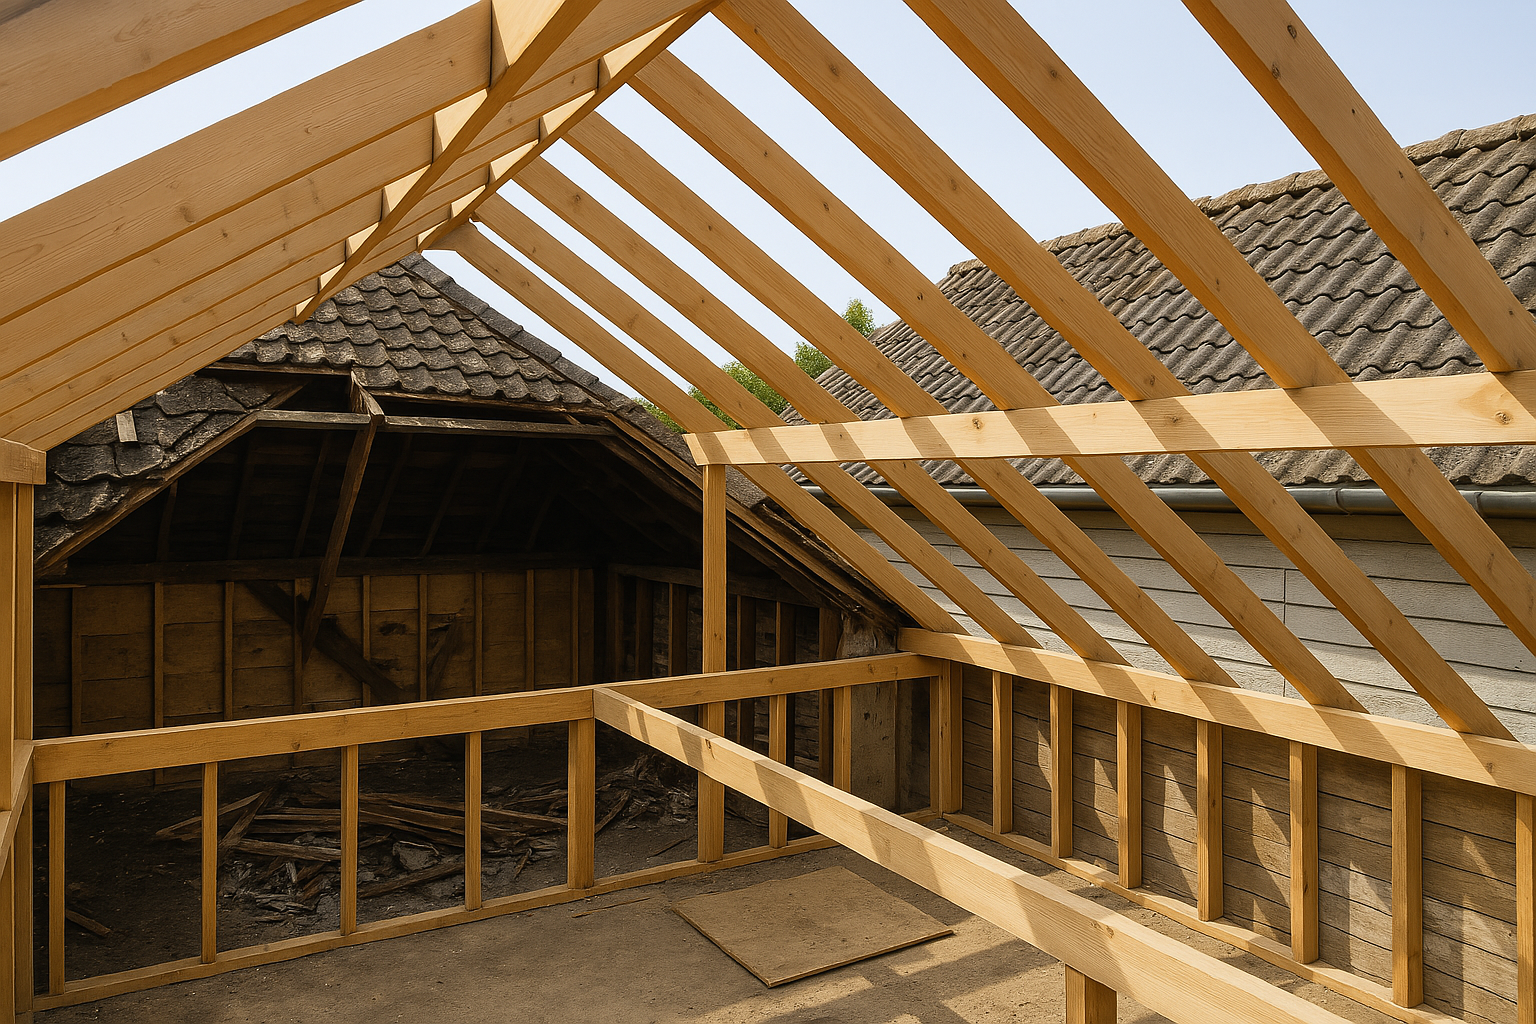
Step 1: Current status of existing roofs
Understanding the shape of existing roofs
First, you need to know exactly how complicated the roof of your home is.If you open the inspection port in the attic and partially open the ceiling on the second floor to check, you can easily see the condition of the internal beams and the shed assembly.While sketching on paper, you will record the slope (slope) of the roof, the number of valleys, and the location of the beams and girders.
- "Koubai" is often called a "how many gradient", and for example, a "6 inch gradient" would be an image of it increasing 60cm vertically with a horizontal 1m.
- A large number of valleys and "sumimune" causes complex rainwater concentration and construction, so let's count to see if there are any places at the moment.
Check for old and damaged areas
The more complex the shape, the more likely it is to cause leaks and corrosion.You should focus on the following points and incorporate them into your renovation plan if there are any issues.
- Corrosion and peeling of "nojiita"
- Flexibility caused by cracks, insect damage, and moisture in "drips"
- "Rust on the joints of the huts and hardware"
- Presence or "termite" or "anth path (anti path)"
If corrosion or termite damage is serious, repairs to the structural parts as well as the roof are required, so costs and construction periods are also necessary.
Step 2: Decide on material and roof shape
You may think, "Should I just choose the material at the final stage before installation?", but in reality, if you don't decide early, it will affect load calculations (consideration of earthquake resistance and wind resistance) and cost estimates.In addition to the shape (gable or hanging), first select what kind of roofing material you will use.
Roof shape
Gable roof
- "merit"
- There are only two sides, so it is simple and easy to install.
- There are no valleys and it's relatively easy to close the rain.
- "Disadvantages"
- When viewed from the front, the triangle becomes larger, and there is a need to be ingenious about the wall design.
- It is likely to cause sides that are properly exposed to the wind.
Hoisted roof
- "merit"
- It has four roof surfaces, which disperses the wind and is easy to receive, making it advantageous for typhoons and other factors.
- Even when the rain is closed, it's as simple and easy to understand as the gable (but be careful about the corner building).
- "Disadvantages"
- It takes more effort to install than gables (because there are four sides).
- Depending on the material, processing costs may be slightly higher.
Selection of roofing materials
Roof material is determined by multiple factors, including "finished design," "maintenance," "price," and "weight."The larger the weight, the more seismic reinforcement is, so make a comprehensive judgment based on your budget, structural safety, and preferences.
- "Galvanized Steel Plate"
- "Advantages": Lightweight and rust resistant.Construction is also relatively easy.
- "Disadvantages": Low insulation performance.The sound of rain easily echoes.
- "Slate (makeup slate)"
- "Benefits": Relatively inexpensive.There are also many color variations.
- "Disadvantages": The useful life is about 20 to 30 years.Regular repainting is required.
- "Ceramic tiles (clay tiles)"
- "Benefits": Very durable and often lasts for over 30 years.There is a design that goes well with both Japanese and Western styles.
- "Disadvantages": Due to its heavy weight, reinforcement of the sheds and walls is required to prepare for an earthquake.
- "Asphalt single"
- "Benefits": Lightweight and versatile design.It is commonly used overseas.
- "Disadvantages": The lifespan tends to vary depending on the base (field board or roofing).In humid environments like Japan, the quality of the installation is particularly important.
At this stage, you will decide on the rough outline of which roof shape and which roofing material to use, and understand the quantity of materials you will need and the budget you will need.
Step 3: Confirm legal procedures and structural calculations
Building Standards Act and confirmation application
If the roof shape is significantly changed, it may be considered an "extension and renovation."In some areas, there is a high possibility that an application for building confirmation may be required, so be sure to check with your local government's construction department or architectural firm.
In particular, if the height of the building or eaves changes due to "changes in the slope of the roof," it may violate urban planning restrictions, such as diagonal restrictions.
- "point"
- Even if the confirmation application is not required, earthquake resistance and fire resistance must not be impaired.
- It will be smoother if you consult with the government office in advance.
Structural calculation (simple is OK)
- "Load calculation"
- It is necessary to check how heavy the new roofing material is (kg/m²) and calculate whether existing beams and columns are under excessive load.
- Tiles vary greatly depending on the roofing material, such as about 40-60kg/m² and galvanized steel sheets, and about 5-10kg/m².
- "Responding to horizontal force"
- Check how much force flow changes due to changes in the roof shape in response to earthquakes and strong winds.
- If you need to add hardware, bristles, or structural plywood, consult an expert.
It is very difficult to perform structural calculations from scratch using DIY, but please make sure to use a minimum level of safety check by using a "load calculation simulation service" or a "simple request from a renovation expert."
Step 4: Preparing scaffolding and safety measures
Installing scaffolds
Roof renovations almost certainly require high-level work.Even if you are doing it DIY, make sure to use a scaffolding rental company to create a solid safety footing.Costs vary depending on the total floor area and height of the building, but for a typical two-story building, the average price is around 200,000 yen (of course it depends on the region and type of scaffolding).
- "Using a full harness"
- Always use a safety belt as a fall accident can lead to serious injuries and death.
Consideration for those around you
- "Shatterproof sheet installation"
- If removed roofing materials such as tiles and sheet metal accidentally fall, sheets and nets are placed to prevent damage to the surrounding area.
- "Greetings to the Neighborhood"
- Noise and dust are inevitably prone to appear, so greeting the neighbors with a word will help prevent problems before working.
Step 5: Removing old roofing materials and base
How to remove roofing materials
- "For tiled roofs"
- Remove each tile and carefully lower it to prevent it from breaking.Take into consideration the cost of disposal of waste materials.
- "For slate roofs and galvanized steel sheets"
- The process of removing the nails or screws continues.Use crowbars and impact drivers.
- "For asphalt single"
- In many cases, the roofing is peeled off.The turning work involves surprisingly many muscles, so don't push yourself too hard to take a break.
Check the condition of the base material (field boards and rafters)
Remove the roofing material and the ground flooring will be exposed.If there is corrosion or stain, the cause of the disease must be identified and replaced or repaired as necessary.It cannot be left unattended if the rafters are cracked or termites are contained.
- "A rotten field board is replaced entirely or partially?"
- A full replacement will increase the cost, but it will increase long-term durability.
- Partial replacement costs are reduced, but waterproofing is important to treat the joints with adjacent parts.
Step 6: Assembling the new structural base (hut assembly)
This is the core task of major changes to the shape.We will introduce the process of reinforcing the necessary reinforcement materials and the new shed structure to replace complex roofs with gables and a "horizontal building."
Large construction pattern
Pattern A: Partially utilizes existing shed structures and adds a new frame above
- "Reconfirm the location of existing buildings and beams"
- Determine which parts are still usable and only repair or replace parts that are corroded or defective.
- "New rafters and main houses"
- If you have a gable, pass through the ridges and arrange the rafters evenly on both sides.
- If you are looking for a ridge, you will need to set up ridges in the four corners as well as ridges.
- "Reinforcement using hardware"
- The rafters and main house are fixed with hardware (such as a talkick).This is especially important in areas with high typhoons.
- "Reinforcement of beams and girder joints"
- In DIY, it is often difficult to build authentic wood like a carpenter, so you can also rely on structural hardware.However, follow the construction manual.
Pattern B: Almost demolishing existing sheds and creating a new roofing set
- "Demolition of the hut group"
- If you are changing the ceiling on the second floor, you may need to remove existing beams and rafters.
- The amount of work is enormous, so you have plenty of effort and time to do so.
- "New beams and girders installed"
- You won't get confused if you ask an architect or expert to draw the blueprints in advance.
- Install accurately while checking the horizontal (level) and the street (line).
- "Assembled new huts (purlin, main building, rafters)"
- How to set the height of the building and what dimensions the slope should be carried out according to the drawing plan in advance.
- Reinforced with hardware to ensure strength to prevent earthquakes and wind pressure.
Pattern C: Simplify by removing valleys in part
- "Removing and combining unnecessary undercarriages and roofs"
- This is a method of removing some parts and passing through the building, such as by unifying the multiple roofs, which are divided into two or more.
- "Renovations to improve the rain shutdown"
- Even if full renovations are difficult, reducing the number of valleys greatly reduces the risk of leaks and the maintenance burden.
Processing and installation of wood and reinforcement materials
- "Large (Large)"
- To accurately determine the location of rafters and main buildings, ink (chalk lines) are drawn based on blueprints and site dimensions.
- "Cutting and processing"
- Use a circular saw or tabletop circular saw to cut the wood at the appropriate length and angle.Cut the edges diagonally to match the slope.
- Wear protective gear such as safety goggles and gloves.
- "attachment"
- Made with hardware, nails and screws.One way to increase the strength of nails is to hammer them diagonally (double shear).
- Plan a layout in advance to prevent conflicts (interference) between hardware.
Step 7: Installation of the base plate and waterproof sheet
Field flooring
- "Structural plywood (about 12mm thick) is common."
- The plywood is attached in a direction perpendicular to the rafters and nailed it.A gap of several millimeters is left between adjacent boards, and consider expansion due to moisture.
- "Nail pitch (interval)"
- The recommended interval is approximately 150mm (15cm) (depending on location).The nail position and spacing are important to increase the rigidity of the roof surface.
Waterproof tarp (roofing)
- "Uses asphalt roofing and modified asphalt roofing"
- Modified asphalt roofing is the norm in Japan.It is less likely to crack even with slight temperature differences or age.
- "Layer width"
- It depends on the product, but the basic method is to ensure that the overlap is at least 10cm.Areas with lots of typhoons and snowfall can also be stacked even more.
- "Closing the rain"
- Water is prone to getting into the buildings, corner buildings, and eaves, so the roofing is carefully finished by double-layering and using sealing materials in combination.
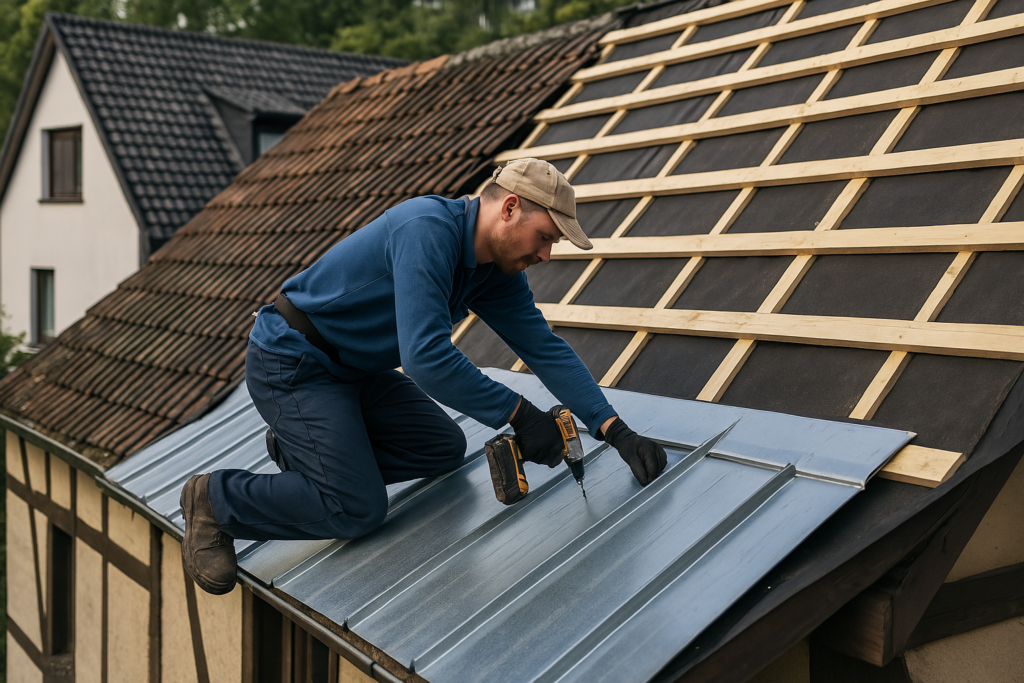
Step 8: Finishing roofing materials installation
Construction overview by roof material
- "Galvanized Steel Plate"
- Generally, the main body is thated up from the eaves in order, and finally a ridge wrap or burial wrap is attached.
- Some products have insulation on the back to prevent condensation.
- "slate"
- The slate body is secured with special nails or screws.The roof is thated so that the top shelf overlaps the bottom shelf.
- The building part may also serve as a ventilation building.
- "Ceramic tiles"
- It is common to hang tiles with tiles and hang tiles while hanging them (for hook-and-mounted tiles).
- The construction methods, such as thatched soil, waterproof sheets, and nailing, differ slightly depending on the region and type of tile.
- "Asphalt single"
- Attach singles with adhesive layers together and secure them with nails.
- In particular, the valleys and buildings are used in conjunction with special equipment and ceilings.
Ensuring ventilation and ventilation layers
To prevent condensation and summer heat, ridge ventilation and eaves are often provided.Air builds up in the attic, causing corrosion of the wood and degraded insulation performance.Ensure ventilation is ensured using ventilation components and ventilation wings appropriately.
Step 9: Finishing, guttering, final inspection
Installing a rain gutter (rain gutter)
- "Ensure the slope"
- The gutters should be installed so that they drop moderately from the eaves, so that the water is properly drained.
- "Grid fittings"
- While checking the pitch and height, fix it to the field board or gable board.
Inspection and test water sprinkle
- "Test watering"
- Use a hose or something similar to let water flow from the eaves to check whether there is any leakage from the buildings, valleys, or joints.
- "Finishing Cleaning"
- Before removing the scaffolding, the nails and screws that have fallen on the roof are collected and the roof surface is cleaned.
- "Greetings to the neighbours"
- We apologize for any noise during the construction period and any inconvenience caused by the work vehicle, and express our thanks to you, so that you can complete the process comfortably.
Tips for making DIY successful
- "I'm not stingy with tools."
- Stinging large tools such as impact drivers, circular saws, and securing scaffolding will not only significantly reduce work efficiency, but also increase the risk of injury.
- "An affordable schedule"
- It is not uncommon for construction periods to be extended due to bad weather or sudden problems (such as corrosion detection).Schedule a schedule with plenty of room to spare.
- "Get partial cooperation from experts"
- Even if it's ideal to DIY everything, it's wise to consult a professional about structural calculations and beam reinforcement parts.
- "We'll prepare a 20% increase in our budget."
- Renovation work is likely to result in unexpected expenses.Additional scaffolding costs, disposal costs for disposal of scrap materials, reinforcement costs, etc.
- "Safety first"
- Don't underestimate work at high altitudes.You must wear a helmet and safety belt.It's also effective to gather friends and work.
Overseas construction methods and applications
We have explained this in Japan's traditional shaft structure method (columns, beams, and braces), but there are some areas overseas where the mainstream is "two-by-four (2x4)" and "truss structure method."These methods include manufacturing "roof panels" and "roof trusses" in factories or workshops in advance, and then assemble them all at once using cranes on site.
- "2x4 construction method"
- Wall and roof panels are assembled as a frame wall construction method.
- To do it DIY, you will need to do large-scale tools and work with multiple people.
- "Truss method"
- The truss based on triangles are continuously mounted, which increases the strength of the roof base.
- However, there is also the disadvantage of narrowing the attic space.
If you are using overseas-style prefabricated trusses, you need to pay attention to the cost of import, transportation methods, and differences in dimensions (inch standard vs millimeter standard).
Summary
We have explained in detail how to renovate a complex roof into a simple and easy-to-maintain shape for self-DIY purposes.What do you think?If you keep the following points in mind, your work should go smoothly.
- "First, decide on the material and shape (gable or ridge)." If you determine the roofing material and slope at an early stage, it is easier to calculate the structural and cost estimates.
- "Legal procedures and structural strength are supported by professionals." In areas where confirmation applications are required or structural calculations are required, obtain expert advice.
- "Make sure to take full safety measures for high-level work such as scaffolding and safety belts." Falling accidents are the most serious risk.Never underestimate it.
- "The construction of the shed assembly is carefully reinforced with hardware." Even in DIY, rigidity can be ensured by using the hardware firmly, but the correct position and installation method must be followed.
- "Emphasis on waterproofing and ventilation" The roof is exposed to the most severe natural environment.Control rainwater and moisture with waterproof tarps and ventilation buildings.
- "The finishing roofing material is well understood" Select by comparing weight, durability and maintenance costs.
Renovating the roof is both time-consuming and costly, but the satisfaction level after completion is very high.Roofs play an extremely important role in maintaining your home for a long time, such as "reducing the risk of leaks," "improving maintenance," "improving exterior design," and "ensure earthquake and wind resistance."Please use this article as a reference and renew the roof of your home.
If you're wondering "How much renovation or remodeling can I actually do on my own home?" or "Where should I even start?", please visit this page. If you're looking to learn more about specific renovation processes or construction details, don't miss this page as well!
References, videos, etc.
- "Architectural Institute of Japan: Wooden Building Design Criteria" (Architectural Institute of Japan)
- A full-scale document that summarizes detailed standards regarding structural planning for wooden houses.
- "Seismic diagnosis and reinforcement methods for wooden houses" (Ministry of Land, Infrastructure, Transport and Tourism)
- You can learn about seismic reinforcement ideas through materials published by public institutions.
- "Building Standards Act" (Ministry of Land, Infrastructure, Transport and Tourism website)
- Laws and regulations that should be maintained when renovating roofs.Please note that there are ordinances in some regions.
- "DIY/Renovation-related Videos" (Many cases from both Japan and abroad on YouTube)
- Examples: "Carpenter's DIY Channel," "Video of 2x4 Truss Assembly from Overseas."It's easy to get an idea when you look at the actual process.
- Official website of the Japan Housing Renovation Industry Association (JERCO)
- It includes guidelines for preventing renovation problems and construction.
The video by DIYer below was also very helpful, so please let me introduce it to you!!(Titles omitted)
Kurimori Meeting Hall
Leave a Reply
You must be logged in to post a comment.