最終更新日:2025年11月10日
Hello everyone, this is DIY Renova.
Have you ever wondered, "There are so many types of kenten, which one is the correct answer?" When thinking about DIY renovations, many people first come across this question.
In this article, we will explain the materials and easy installation methods for Japanese wooden houses (up to two stories).
If you're wondering "How much renovation or remodeling can I actually do on my own home?" or "Where should I even start?", please visit this page. If you're looking to learn more about specific renovation processes or construction details, don't miss this page as well!
So, here you go.
What you can learn from this article
- Minimum checking procedures for regulations such as "parts that may spread fire" and "Article 22 area"
- How to calculate the required ventilation area for attic ventilation
- How to choose typical materials such as calculus plates, galvanized steel plates, and PVC (resin)
- Step-by-step procedure for each method
- Thinking about initial costs and lifetime costs
- Word templates that can be used when ordering
Let's start by checking the regulations
Before deciding on the materials and construction methods for the eaves, you must first check the regulations. In Japan, depending on the location of the building and surrounding conditions, regulations such as "fire-proof structures" may be imposed on exterior walls and "secret eaves." Two particularly important points:
- Are there any parts that may spread out?
Based on the center line between the boundary line of the adjacent property, road center line, and exterior walls and soles are subject to restrictions, the first floor within 3m and the second floor or above within 5m. Performance such as a "fire-proof structure" is required to prevent the flame from spreading in the event of a fire. - Whether it's a "fire-proof area, semi-fire-proof area, roof-proof area (Article 22)"
Performance requirements for roofs and eaves vary depending on the region. Check the municipality's urban planning map to see which area your home is included.
By checking these two points, you can narrow down the selection of materials and construction methods.
Calculate the area required for attic ventilation
The eaves are not just "boards" but rather play an important role as an intake in the attic. Therefore, it is essential to calculate the effective ventilation area.
The general criteria are as follows:
- Gable ventilation (ventilation holes in both gable walls): 1/300 or more of the ceiling area
- When intake and exhaust in the eaves: 1/250 or more
- In the case of intake and wing ventilation: Intake = 1/900 or more of the ceiling area, exhaust = 1/1600 or more
"Effective ventilation area" uses the values listed in the catalog, not the product's apparent dimensions.
As an example, let's calculate the case where the ceiling area is 90 m2.
- Intake area = 90㎡ ÷ 900 = 0.10㎡ (1000cm²)
- Exhaust area = 90 m2 ÷ 1600 = 0.056 m2 (560 cm²)
The product catalog lists the effective ventilation area per meter. For example, if 150.5cm²/m of ventilation is used, the required extension is 1000 ÷ 150.5≒6.6m. If the ridge ventilation material is 118.8cm²/piece, 560 ÷ 118.8≒4.7 pieces will be required.
In this way, "understanding the required ventilation area through numerical values" is the first step in the eaves plan.
How to choose materials (general)
Next is how to choose the material. Three types of products are easily available in Japan and are suitable for DIY purposes: "Cal plate," "Galvanized Steel plate," and "PVC (resin)."
- Silicon board (calcium silicate board): Good value for money and durability changes depending on the paint quality. It's easy to handle in terms of legal terms.
- Galvalume steel plate: Lightweight, highly durable, and requires little maintenance over a long period of time. The initial cost is high, but the lifetime cost can be reduced.
- PVC (resin): Light, rust-free, and easy to process, but it may not be usable in places where fireproofing is required. Also, be careful about solar radiation and thermal expansion.
Basically, in areas with strict regulations or areas where fire spreads, we recommend that you prioritize galva and non-combustible caliber.
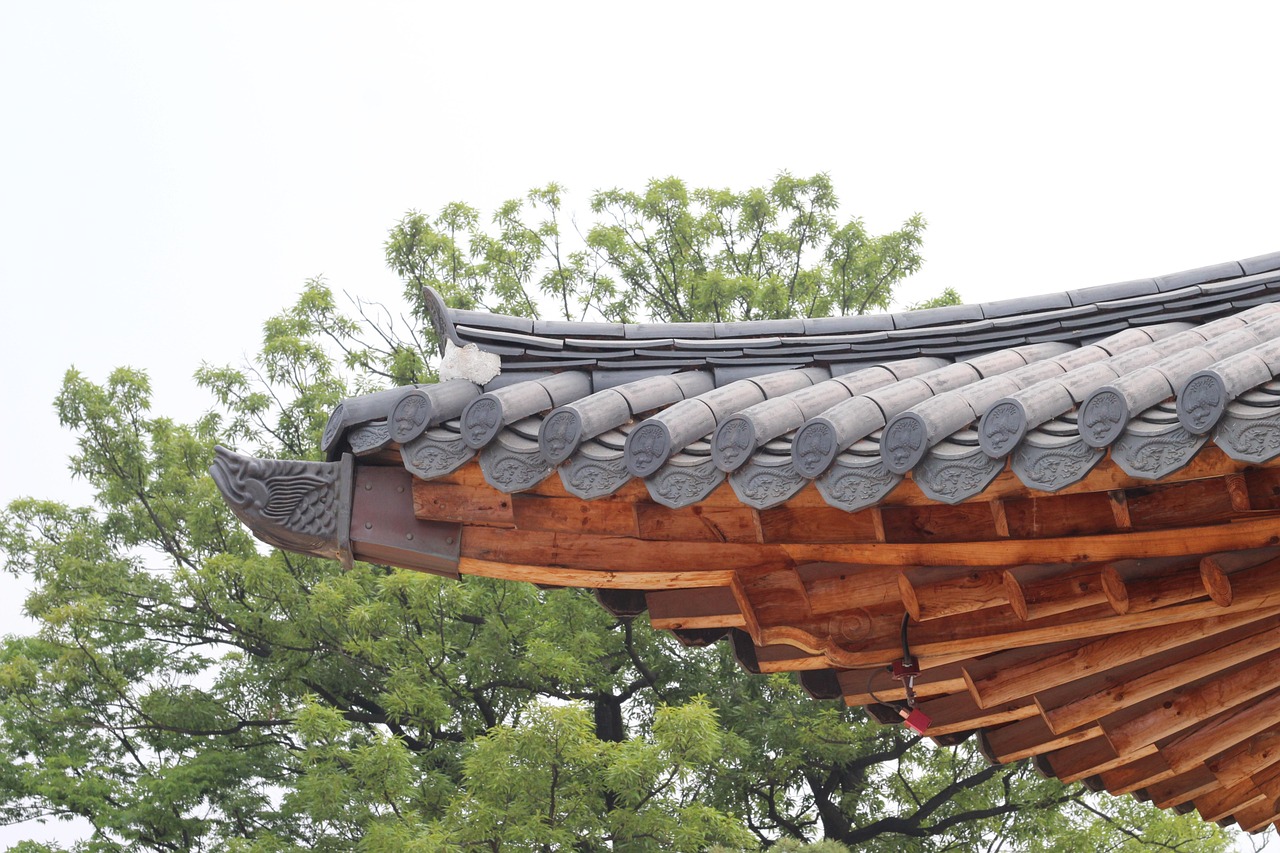
Construction method 1: Eave ceiling made of non-combustible silica board (the most cost-effective practical solution)
Cicula board is the most commonly used eaves material in Japan. It is non-flammable and easy to use even for DIY purposes, so it is a recommended option for many people.
What you need to prepare
- Circular saws and jigsaws
- Pin hole cone
- Stainless steel screws (φ3.8-4.2 x 25-32mm)
- Body edge material (30 x 45 mm, embalmed)
- Aluminum parting material (J type/U type)
- Primer and top coating (2-component urethane or inorganic)
- Ventilation materials with an effective ventilation area specified
Substrate and allocation
- The recommended spacing between the torso edges is 303 to 455 mm. We recommend 303mm for eaves exceeding 500mm or for surfaces exposed to strong winds.
- Choose a plate thickness of 6-12mm.
- The screws are fixed at 150-200mm intervals at the ends and at 300mm intervals at the center.
Construction procedure
- The old eaves are removed and inspected for corrosion around the gables, fascia and girders. If there is corrosion, we will always repair it.
- Install the body edge. The surface of the eaves is 1 to 2 mm/m outside to prevent rainwater from accumulating.
- Install the continuous ventilation material first. The required extension must be the value calculated.
- Cut the calculator plate according to the allocation and apply a primer to the cutting surface to prevent water absorption.
- Secure the board with screws. Pull pilot holes if necessary to prevent the screw head from flying off.
- Attach the cut-off material and seal only the edges.
- Paint in the order of primer, medium coating, and top coating. The color is ivory and light gray, which are resistant to dirt.
- Finally, double check the ventilation volume and make sure that the required area is met by combining it with the ridge ventilation and wife ventilation.
Construction Method 2: Galvanized steel plate eaves (long life and minimum maintenance)
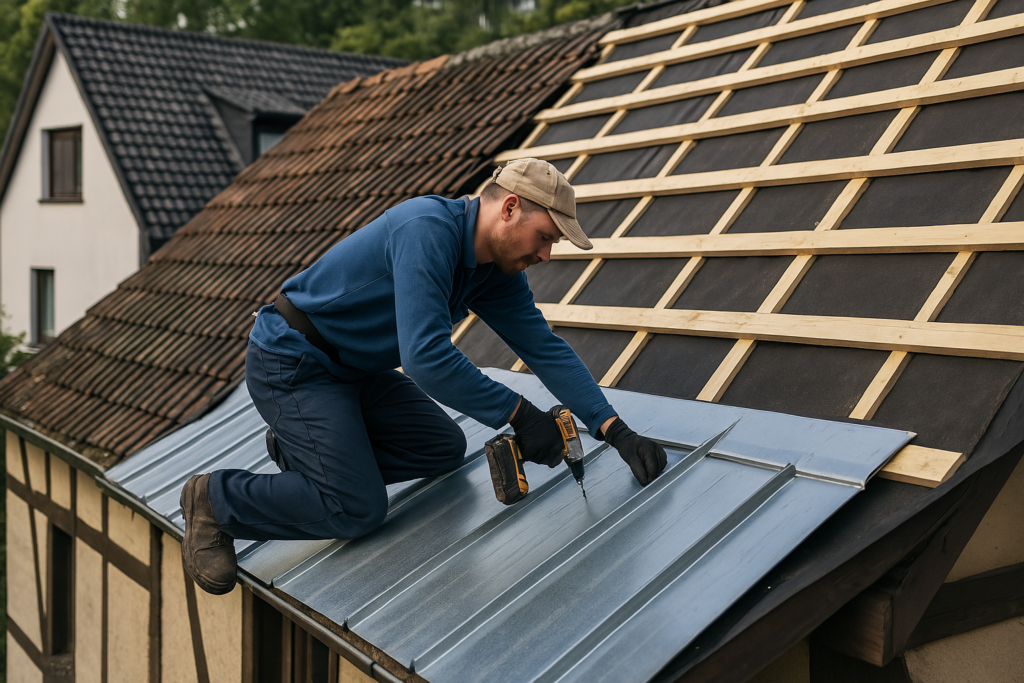
Galvanized steel sheets are extremely durable, and the lifespan of the coating film will be extended even further. The initial cost is high, but maintenance such as cleaning can last longer, making it ideal for those who want to reduce their "lifetime costs."
What you need to prepare
- Spandrels and molded plates
- Fitting material such as J trim and starters
- Stainless steel screws (drill screws)
- furring material
- Continuous ventilation materials (fire-resistant products are recommended)
Correspondence to base and thermal expansion
- The body edges should be installed at intervals of 303 to 455 mm.
- When using long material, it is important to ensure that it is in place to allow movement caused by thermal expansion to escape.
- The screws are made of stainless steel, with the edges being 150-200mm and the center being 200-300mm apart.
Construction procedure
- Attach well through the body edge and create a slope of 1-2mm/m on the outside.
- Continuous ventilation materials are installed at the eaves to ensure the necessary extension.
- Install the starter and insert the spandrel.
- Stick it out and screw it together while checking the position of the base.
- The ends should be secured with a J trim or U-shaped parting, and sealing should be kept to a minimum.
- Finally, install the ridge ventilation material to make sure it meets the required area.
Construction Method 3: PVC (resin) eaves (recommended under certain conditions)
PVC has the advantage of being light, easy to handle and not rust-resistant. However, please be careful as it is often not possible in areas where fire prevention performance is required.
Conditions that can be adopted
- Does not fall under fire protection or semi-fire protection areas
- Does not apply to spreading fire lines
- Uses light colors on small scales (entrance pouches, etc.)
- Avoid strong sunlight and long continuous installation
Construction points
- To account for thermal expansion, use slot holes to secure the product. The ends are pinned and the middle has fun.
- The spacing between the body edges is 303-455mm. It's safer to fill the thin board with a pitch.
- Use stainless steel insect repellent nets. This is because plastic is easily tearable.
参考:基本素材意外にも今はダイライトなど苦手な点を克服した新素材も
最近は上記3つの代表的な素材だけではなく、建材を販売しているDAIKENやケイミューからも素敵な見た目(つまり、意匠性の高い)でかつ機能性も抜群の素材も出ています!お財布が許すのであればぜひ検討しましょう。木目調なのに腐りにくいって最高!
ダイライトはネットでも購入できますが、筆者調べによりますとケイミュー製品はお近くの工務店で基本飼うしかないため、気を付けましょう。
Common mistakes and ways to avoid them
- Insufficient ventilation
→Please calculate based on the ``effective ventilation area'' instead of the ``apparent hole.'' - Construction required for caulking
→It will crack and become noticeable in a few years. It is important to store it in aluminum cut-out material. - Choosing too white colours
→Insect marks and raindrops are noticeable. Choose light grey or ivory. - Ignore thermal expansion
→Walking occurs in long metal materials such as PVC and metal. Make sure to escape. - Overview of laws
→If you do not check the spreading line or area, it will become a problem during inspections or sales.
Cost comparison and lifetime costs
- Cable board + paint: 2,500-5,500 yen/m2
- Galvanized steel sheet (fluorine type): 5,500-10,000 yen/m2
- PVC: 2,000-3,500 yen/m2
PVC and Cals have low initial costs, but galva can be advantageous when considering long-term maintenance.
Word templates that can be used when ordering
- "Incombustible Cal Elephant 6-12mm, continuous ventilation material, effective ventilation area ○○cm²/m, aluminum cut-out material, stainless steel screws"
- "Galvanized eaves top spandrel (fluorine coating), fire-resistant ventilation material, effective ventilation area ○○cm²/m, J-trim, starter, cap, stainless steel screws"
- "PVC eaves (light color), continuous ventilation material (effective ventilation area ○○cm²/m), stainless steel mesh, stainless steel screws, long hole slot specifications"
The final checklist
- Check "fire prevention, semi-fire prevention, and 22-Article area" on the local government's urban planning map.
- Draw a fire line (3m on the first floor and 5m on the second floor) on the site to check if it is eligible.
- Decide on the attic ventilation method and calculate the required ventilation area.
- Choose the material (Cal = cost performance, Galva = long life, PVC = conditional).
- Designs the body edge pitch, cut-off material, and external water gradient.
- Prepare ordering terms and let the dealer know.
- Installation is carried out in the following order: "Installing ventilation materials → Boarding → Finishing → Minimum seal → Painting."
- Once completed, the product will be cleaned and inspected once a year.
How to choose the "angle" for the eaves and how to set the corners (outside corners and inside corners)
Whether the eaves should be level or diagonal to match the roof slope will change the appearance and plan for lighting and ventilation. First, we will organize and add the concept of "angles" and then add the specific methods for dealing with "corners."
How to choose the "angle" for the eaves (horizontal finish/gradient finish)
"Horizontal finish (right angle to the exterior wall)" is said to make it easier to enhance the boxy look, while "slope finish (parallel to the roof slope)" is said to give a clean impression. The projection width is efficient to consider using modules such as 30cm, 45cm, 60cm, and 90cm to avoid waste of material (the idea is that the standard width of the eaves is approximately 90cm, making it easy to reduce residual material loss). Furthermore, increasing the projection reduces rainfall, but on the other hand, the room may become dark, so considering the angle of sunlight is effective.machiyane-shizuoka.com
You can't be confused about whether you choose between "horizontal" or "slope" from the following perspectives.
- "Exterior design": Horizontal if you want to give a boxy look, and slope if you want to make it light.machiyane-shizuoka.com
- "Cost and effort": Horizontal positioning makes it easier to allocate and allow for easy passage of the body edge. The slope will be diagonally open and end up, increasing the number of steps required for consideration.
- "Lighting and Sunlight": The larger the projection, the stronger the solar shielding, and the more sunlight the more likely it will be to reduce the sunlight in winter. We recommend simple calculations before planning.machiyane-shizuoka.com
"Simple solar irradiation calculation (Summer and winter shielding guide for the south window)"
- If the solar altitude is "θ", the vertical distance from the top of the window to the eaves is "H", and the eaves are "D", the distance that reaches the shadow at the eaves is approximately "H x tan θ".
- For example, on a day when the sun is high at noon at the summer solstice, the "θ is large (short shadows)" will strongly cut off solar radiation even if the same projection is the same. On the other hand, the winter solstice is "small (long shadows)" so if the projection is too large, it will hinder the acquisition of sunlight in winter.
- Adjust the "pole D" to match the local latitude and the desired shielding/acquisition balance (for practical use, a rough sketch of H and D from the top edge of the window and hitting a shadow line is sufficient).
Variations and how to choose the corners (outside corners and inside corners)
The "corner" of the eaves are important points that affect the appearance, durability, and cleaning. Here we will summarize the typical fit and the orientation and non-direction by material.
1) Aluminum "Outside corner" + thrust-up (the most popular DIY)
- Summary: Poke the eaves on both sides at right angles, and cover the outside with L-shaped or B-shaped aluminum cutouts.
- Advantages: Easy to process and reduces caulking dependence. It is highly cleanable and prevents corner chipping.
- Cons: The ending looks like an accent in the design, making it difficult to create a complete sense of unity.
- Compatibility: Cal/Metal/PVC Both are acceptable. PVC ensures thermal expansion and retraction escape (long holes and clearance).
【procedure】
- The base (body edge) is perpendicular to the corners, creating a line that can be securely screwed to the edge.
- Measure and cut the eaves on both sides at right angles, and hold them in place with a clearance of 0 to 2 mm at the corners.
- Cover the corner with a straight corner and secure it with SUS screws (pilot holes are recommended at the end).
- Water stops on the terminal and edges with minimal stickers (be careful not to block ventilation).
2) "Cutting (45 degrees)" fitting (for advanced users, with design emphasis)
- Summary: Cut the eaves on both sides at 45 degrees, butt at the corners to make them look like a "single ceiling."
- Pros: There is no end to the scene, and it gives a flat, high-quality impression.
- Disadvantages: Cutting accuracy is required, and joint misalignment and dust may be noticeable over time.
- Compatibility: Suitable for metals and thick calibers whose edges are less likely to crack. PVC is deprecated as it is thermally stretchable and makes joints easier to move.
【procedure】
- Apply ink on both sides of the corner and accurately cut the board at 45 degrees (with a ruler guide).
- After checking the surface of the fabric by using a sample assembly, secure it to the base with SUS screws.
- The edges are impregnated and reinforced (scaled) with sealer and finished with paint if necessary.
- If you install an L-plate on the back of the corner to prevent the surface from fluttering, it will be less likely to crack.
3) "Cover cap (decorative cover)" fits (for metal and spandrels)
- Overview: Uses the original "outer corner cap" of metal spandrels and molded plate systems.
- Advantages: The designs are all in one place, and it is easy to match the battle with the end of the day with the original.
- Disadvantages: The cost of parts will increase slightly. You may be concerned about the narrow difference between the cap color and the board color.
- Compatibility: Metal◎, Cal○ (if special parts are available), PVC△ (available if the manufacturer has genuine products).
【procedure】
- Follow the clearance and screw pitches specified by the manufacturer, tension both sides at the specified dimensions.
- Insert the cap into the corner and secure it using the specified fixing method.
- Protect the heat-stretch and contract escape dimensions and minimize water stopping of the device.
4) "Inside corner" fitted (L-shaped inside corner and joint holder)
- Summary: Pass an L-shaped cutout through the inner corner (inside corner) and point it at both sides.
- Advantages: Protects inward corners that are prone to cracking and reduces dirt accumulation.
- Disadvantages: Due to the design, there is a single line running.
- Compatibility: Compatible with all materials. On surfaces where moisture tends to accumulate, it is important to ensure that the ventilation channels are not blocked.
【procedure】
- Priority is given to correct the corrugated street on the inside corner, and the L-side-down is added first.
- The board is secured with SUS screws, leaving a 0-2mm escape when thrusts.
- The joints are basically non-sealed, with only the terminal and penetrating parts being minimal.
5) Minimizing "caulking finish"
- Summary: This is a method of slapping the boards together and finishing the corners with caulking.
- Recommended: Avoid in the long term. Caulking can lose weight due to UV rays and heat, causing cracks and dirt to occur in a few years. Only unavoidable areas will be used locally.
Precautions to avoid cutting "ventilation continuity" at corners
If the "continuous perforated material" is interrupted at the corner of the eaves, the efficiency of attic ventilation will decrease. The following ingenuity will ensure continuity.
- For perforated materials, use a "replaceable short length" corner to obtain the required effective ventilation area.
- Continuous metal perforations are used to continue the row of holes using corner bending members and fastening.
- The insect repellent net uses SUS to prevent scrubbing and peeling at corners.
- During the design stage, plan to fill the required extension (e.g., assuming an effective ventilation area of 101 to 150.5cm²/m) all around.
How the corners change with "horizontal" and "slope"
- "Horizontal Finish": The corners are right angles. Pre-made caps and ready-made caps are easy to use and are suitable for DIY.
- "Gradient finish": Since one side of the corner is slanted, the parting and cap are cut to match on-site, or the surface is made continuous by fastening. Openings (inspection ports, downlights) will also fit neatly if you choose edge materials and fixtures that are compatible with diagonal surfaces.
- In both cases, a "slight gradient of 1 to 2 mm/m" is added to the outside to avoid rainwater accumulation. The water stops with a priority, and the caulk is basically minimized only on devices.
Corner work checklist (final confirmation before finishing)
- Check the orthogonal edge and the street (no step at the corner).
- Ensure that the "slip" and "escape dimensions" are enough to be completed (don't forget to escape from PVC and metals due to thermal expansion).
- Recalculate whether the ventilation is not continuous at the corners or whether the effective ventilation area is summed sufficient.
- The impregnation treatment (calcul) and touch-up (metal) of the edges are first performed to prevent deterioration.
- Caulking is only required for terminals and the minimum necessary. Prioritizes cleanability and long-term durability.
Reference (re-checking angle and projection)
- On-site blogs for practitioners also provide explanations about ``differences in horizontal/gradient and appearance impressions'', ``projection width modules (30, 45, 60, and 90 cm),'' ``width concepts to reduce material loss,'' and ``careful consideration of projection width and lighting/solar angle,'' which are useful as guidelines in the early stages of design. If you use it as a starting point for consideration, decisions will be made faster.machiyane-shizuoka.com
If necessary, we will also add "Examples of model numbers for corners (aluminum corners, inside corners, outer corner caps)" and "tool lists (clasp guides, fine file, trimmer)" that correspond to this additional item based on specific product names. When introducing affiliate marketing, there is a large difference in specifications for cut-off materials, so we recommend a product link that clearly states the size, material, and compatible plate thickness.
Additional items | How to choose corner details (outside corners and inside corners) of the eaves and how to deal with slopes
Whether the finish of the eaves looks beautiful or whether it is less likely to appear stains or cracks can vary greatly depending on the corners. Here, we will organize the main details of the corners and corners across multiple manufacturers' documents and standard fittings, and will provide specific suggestions on what to choose, including continuity of ventilation and fire prevention considerations.
General discussion of corner fittings (first decision)
- Decide the type of finishing material (scaled plates, metal spandrels, ceramic kento, PVC). First check to see if there is a standard "corner cover (outer corner cover, inward corner cover, slope cover)" made by the manufacturer. When the items are prepared, they look more consistent and are durable.nichiha.co.jp
- Plan to avoid "continuous perforated ventilation" at the corners. The continuous ventilation material is joined with dedicated corner parts, and the extension across the corners is ensured to meet the required effective ventilation area. Steel eaves top ventilation materials come with publicly available values for effective ventilation areas and corner parts, so it is safe to calculate the quantity accordingly.Joto Techno Co., Ltd. +1
- The inside corners are prone to cracking and dirt, so the basic structure is to be placed in the "inside corner" position after adding additional base (receiving material). It is common for standard drawings from major manufacturers to clearly state additional bases for corner hardware.nichiha.co.jp
Outside corners and inside corners with flat angle (90 degrees) | 4 typical patterns
This concept can be applied to both "Cal/Ceramics", "Metals", and "PVC", but inventory and variations in parts vary depending on the material. If you are unsure, check the "corner features of each company's technical documents" first and design based on the assumption that you can use them.
1) Aluminum protruding corner parting + butting (basic shape that is difficult to make mistakes in DIY)
The eaves on both sides are pointed at right angles, and the L-shaped or L-shaped corners are covered with the outer edges. The edges protect the edges, reducing caulking dependence and improving cleaning. It is easy to match with any of the following: Cigarette, Metal, or PVC, and you can adjust the appearance of the design by choosing the width of the cut-off. Construction guidelines have been established to assume that a corner cover is used even on ceramic eaves.nichiha.co.jp
"Top of the procedure"
- The base is perpendicular at the corners to ensure screw lines that are fixed.
- The board is thrust with a 0-2mm escape, and first try and check the street.
- Secure it with SUS screws in the order of the ending → board, and only the terminal is kept to a minimum sticker.
- If you want to carry out perforated ventilation at the corners, make it continuous with corner parts of the ventilation material.Joto Techno Co., Ltd.
"Approximation and unsuitable"
- Direction: Easy to wipe off dirt and when you want to finish it properly
- Not suitable for: Highly designed scenes where you do not want to show any lines (consider the following fastening method)
2)45度の留め合わせ(見切りを見せない高意匠)
This is a method of cutting the edges on both sides at 45 degrees and buttting at the corners to make it look like a single ceiling. Cutting accuracy is required, but the result is flat without giving up. In ceramics and metals, the design is to use the surfaces in conjunction with construction drawings and corner covers for slopes to be continuous (if the manufacturer provides corner covers that correspond to slope angles, priority will help stabilize accuracy and durability).nichiha.co.jp
"Top of the procedure"
- Cut exactly 45 degrees on both sides of the corner (with guide).
- Confirm the uniformity by using a temporary assembly and secure it with SUS screws. The edges of the calyx are impregnated and reinforced with sealer before finishing with paint.
- A pad (L pad) is installed on the back to prevent dust from appearing over time.
- Continuous ventilation is combined with a special item on the corners, allowing for both continuous surface and continuous ventilation.Joto Techno Co., Ltd.
"Approximation and unsuitable"
- Direction: Design-oriented, with short sides that make it easy to control accuracy
- Not suitable: Long or highly heat-stretched materials (PVC, etc.) for wide surfaces
3) Spandrel outer corner cap (aligned with system components)
The metal spandrels are made from genuine "outer corner caps, end caps, starter, J trim," and the corners are caps to create a uniform look. Standard fittings such as indoor ceilings, eaves, and slope ceilings are also systematically shown, as well as ending the tension, gradient response, and inspection ports, and the corners allow for heat expansion and fixed pitch.asahi-kinzoku.co.jprikenkeikinzoku.co.jp
"Top of the procedure"
- Follow the manufacturer's specified body edge pitch and starter position, and ventilation materials are passed through first.
- Cover the outer corner cap with the specified clearance and secure it with the specified screws.
- Touch up scratches and cut surfaces to thoroughly prevent rust.
"Approximation and unsuitable"
- Direction: A eaves aimed at long life and orderly design, corners that are prone to wind pressure
- Not suitable: On-sites that want to keep costs down as much as possible (but lifetime costs tend to be advantageous)
4) Basic form to be accepted by a locked corner (L locked corner).
The inner corners are prone to cracking, dirt and suction. Even with the manufacturer's standard, there is an instruction to always insert additional base to fasten the hardware in the inside corner, and if you leave the inside corner, it will be stable for a long time. Even with PVC or metal, L-sealing is effective, and the seal is minimal to no longer interfere with ventilation.nichiha.co.jp
"Top of the procedure"
- An additional base is added on the inside corner, and the L-side-down is added first.
- The board is pushed with a relief of 0 to 2 mm and fixed with SUS screws.
- Ensure a slight slope outward to prevent water from stagnating inside the corner.
Gradient corners (gradient corners and slope corners)
If you are finishing the eaves diagonally to match the roof slope, using a "slope" tool for corners will greatly reduce the hassle of cutting and fitting them on site. Ceramic eaves and ventilation components include "slope corner covers, slope corner covers, top covers," which makes it easier to meet ventilation, insect prevention, and fire prevention conditions while maintaining continuity of the surface.nichiha.co.jp
The metal spandrel has also been equipped with a "slope ceiling condense" and the heat expansion and fixed pitch are clearly shown when combined with the cap at the corner.asahi-kinzoku.co.jp
Practical points to keep in mind when you "do not run out of ventilation" at the corner
- Plan to ensure that continuous ventilation materials are transferred using corner parts, and ensure the required effective ventilation area (e.g. 101cm²/m or 100cm²/m), including the corners. The required extension calculation is calculated not only through straight sections but also through corner joints.Joto Techno Co., Ltd. +1
- In areas where fire prevention and semi-fire resistance are required, we will check whether the ventilation materials themselves are certified, and we will arrange the combination of the base, reinforcement, and fireproofing materials according to the certification.Joto Techno Co., Ltd.
Notes by material (points only for corners)
- Ceramics and Ceramics: To prevent water absorption at the edges, the cut corners are impregnated with a sealer and pressed down with paint. For products with a craftsmanship, the shortest way to match the corner cover and base conditions (screw type and pitch) according to the installation instructions.
- Metal spandrel: The corners are unified with outer corner caps. If you match the starter and J trim, the sloped ceiling and inspection port fittings in the same system, the finish will be stable.
- PVC: The corners ensure that the heat expansion and contraction escape are escapable. Remove the long hole slots and clearance, and secure them thoroughly by pinning the ends and allowing them to play in the middle (basic operation of standard PVC installation). Ventilation is carried out using corner parts or short lengths to prevent it from being interrupted at the corners. *PVC has restrictions on how to handle fire prevention and semi-fire resistance in Japan, so be sure to check in advance the area and the spread of fire lines.nbl-asnon.co.jp
Design and construction checklist (corner version)
- Check the presence or absence of corner parts (outer corners, inward corners, slopes, top) and ventilation material corner parts, and if possible, get the original parts.nichiha.co.jpJoto Techno Co., Ltd.
- Always add additional base to the inside corners and set the screw pitch and base material dimensions for the hardware according to the installation instructions.nichiha.co.jp
- Check the quantity to see if continuous ventilation is out of range at the corners, and check that the combined effective ventilation area meets the standard value.Joto Techno Co., Ltd. +1
- With gradient finishing, cutting accuracy and thermal expansion escape are achieved according to the corner cover for gradients and the gradient fitting drawing.nichiha.co.jpasahi-kinzoku.co.jp
- If fire prevention or semi-fire resistance is involved, the ventilation components, reinforcement materials, and base structure will be unified according to the certification specifications (do not remove the certification combination).Joto Techno Co., Ltd.
Technical data that can be referenced (corners and fittings)
- There is a systematic construction of the manufacturer's standard corners (outer corners, sloped corners, inward corners, sloped corners, top covers), so you can't be confused by referring to this before deciding on the site.nichiha.co.jp
- Continuous ventilation materials are effective in ensuring continuity at corners, as the published value of effective ventilation area (e.g. 101cm²/m) and the presence or absence of corner parts are specified.Joto Techno Co., Ltd.
- Metal spandrels have a set of layout diagrams for ceilings, eaves, sloped ceilings, end of the ridge, inspection ports, etc., making it easy to understand the operation of the caps and fixing conditions at the corners.asahi-kinzoku.co.jp
- Construction guidelines for caliber and ceramic eaves, as well as handling precautions for non-combustness and fire prevention (including restrictions on plate thickness and parts used) also affect the design decision of corners.nbl-asnon.co.jpkonoshima.co.jp
- Each company's installation diagram database (CAD/PDF) helps you check the specific dimensions and clearance of corners.K-May
Summary
If you are aiming for the strongest, galvanized steel sheets are the most likely, but if you are focusing on cost performance, Cal sheets are also excellent. PVCs are best used in small locations with certain conditions.
Today's action list
- Check the "fire prevention, semi-fire prevention, and 22-article area" on the local government's urban planning map, and draw "fire spread lines (3m/5m)" on the drawing.Fire Department
- The attic ventilation method is determined and the "required effective ventilation area" is calculated based on the ceiling area.Joto Techno Co., Ltd.
- The required extension and number of units is determined based on the "effective ventilation area (cm²/m, cm²/piece)" of continuous ventilation materials and ridge ventilation.Joto Techno Co., Ltd. +1inuico.com
- The materials are selected from "Cal (cost performance),", "Galva (long life)," and "PVC (conditional)."
- Decide on the body edge pitch, cut-off material, and external water gradient, and prepare the ordering terms.
- Construction will proceed in the order of ``continuous ventilation → boarding → parting → minimum seal → painting (Keical)''.
- After completion, the service will last longer by cleaning and inspection once a year.
If you want to reduce the burden of DIY inland, or the future maintenance burden, my personal choice is "Cal plate + good paint + continuous ventilation material that is fire-resistant," and if you prioritize lifetime costs, then "Galva + continuous ventilation + light gray."
PVC is also possible for local areas such as pouches, but you should first draw the area and spread line.
References and technical documents (online)
- “Basics of attic ventilation (arrangement of ratios in accordance with the Quality Assurance Act and wooden house construction specifications)”: Howzeco technical data (1/300, 1/250 concept)Hauseco Co., Ltd. – Manufacturer of ventilation buildings Balconies, parapets and Kasagi ventilation materials
- "Examples of how to get attic ventilation (1/250, 1/900, 1/1600, etc.)": Joto (Joto Techno) Support Page Joto Techno Co., Ltd.
- "Specific value of effective ventilation area (101-150.5cm²/m, etc.)": Joto GAISO (Catalog of steel sheet and resin eaves)Joto Techno Co., Ltd. +1
- "Example ventilation area for building ventilation": Tanita housing ventilation building catalog (118.8cm²/piece, etc.)inuico.com
- "JIS Standards for Calcium Silicate Boards": JIS A 5430 (Fiber Reinforced Cement Board) Explanation PageKikakuriu
- "Example opening ratio of a cal perforated plate and description of a 30-minute underfleet structure": Chiyodaute Technical Documentchiyoda-ute.co.jp
- “Example of specifications for ceramic eaves (noncombustible material certification number, base conditions, etc.)”: Nichiha technical data/downloadnichiha.co.jp+1
- "Parts that may spread fire and performance requirements (exterior walls and soleflight)": Fire and Disaster Management Agency's materials, definitions and distances of fire spread fire lines
- "Notice and technical standards regarding fire protection structures in the backrest": Ministry of Land, Infrastructure, Transport and Tourism's notice materials, related to the Building Standards Act Enforcement OrdinanceMinistry of Land, Infrastructure, Transport and TourismLawzilla (Legal database that won't hesitate)
Specific product information
Wood grain, tougher eaves (available in Japan, with primary information)
- Nichiha Kenten 12/14 (Wood grain)
Ceramics made of pulp fiber-mixed cement boards. Non-combustible material certified (NM-3010/3011) and 45-minute semi-fire resistant (part number requirements apply). Wood grain lineup available. Fire resistant and dimensional stability than plywood. Nichiha+2Nichiha+2
- KMEW Empty Light 30/45 (Wood grain (decorative sheet)
It is developed as a "non-flammable eaves." There is a wood grain look (cosmetic sheets) in the catalog. You can choose from a 30-minute/45-minute semi-fireproof setting, which is lightweight and easy to install. Chemicalware Co., Ltd.+13cata - DAIKEN DAIKEN (30/45, siding board (wood grain sheet)
Inorganic base material "Dyrite". There are wood grain designs such as a "wainscot pattern" with a decorative sheet finish. Creates a wood grain look while ensuring fire resistance and durability. DAIKEN – Daiken Kogyo Co., Ltd. +1
- Kamishima Chemical Industrial "Heavy Ceiling Board" DRESSE PREMIUM (Altezerto/Laforet)
The eave ceiling series focuses on nonflammability and fireproof performance. red cedar etc.Highly designed wood grainThere are lines that realistically reproduce this. Another advantage is that the special hardware "Atra Fit" allows for installation without compromising the design. konoshima.co.jp3cata+12x4assoc.or.jp - Metal (aluminum/galvanium) Wood grain spandrel type
Suitable for "semi-outdoor" useAluminum galvanized with wood grain print. It is advantageous in terms of non-flammable and weather resistance, and reduces maintenance frequency. Manufacturer examples include Asahi Metal's "Wooden Grain Spandrel" (a model certified as semi-outdoor and non-combustible materials), and introductions to Mitsui Metal-based wood grain galva eaves top materials. If the design is right, it's a candidate for the longest lifespan. asahi-kinzoku.co.jp〖Building Materials Navigation〗Search site specializing in building materials and building materials
(supplement)There was also a wood grain eaves board like the Asahi Tostem exterior "Planer Wood Nokiten", but officially ordered on October 31, 2025 and delivery on March 31, 2026There is a guide. For new hires, give priority to the above four companies + metal companies. asahitosem.co.jp+1
What's tougher than "Nokiten"?
- The base material is inorganic (ceramics/metals): From plywoodNon-flammable and fireproof, due to moisture and UV raysWarp/crackingStrong against Nichiha, KMEW, and DAIKEN are all available as nonflammable and semi-fireproof (please confirm model and thickness).
- It is also highly skilled with the "fake" wood grain: Samples are recommended for Kamishima Chemical's premium wood grain and Nichiha wood grain.
- Metal grain is a candidate for the longest lifespan: Aluminum/galva wood grain spandrels are non-flammable and some products clearly state that they are compatible with outdoors (semi-outdoor), and maintenance burden is small outside of coastal areas.
Roughly used
- Design priority + fire prevention is also ensured → Kamijima Chemistry(Altezerto/Laforet) or NichihaWood grain style.
- Balance between cost performance and construction → KMEW Escape Light 30/45.
- Long life and low maintenance → Aluminum/Galva wood grain spandrel(If the design is right).
Wood grain cosmetic sheetIn comparison, on a regular price basisDAIKEN tends to be cheaper than KMEWIt is located in.
Rough price comparison (wood grain/decorative sheet/reference price)
- DAIKEN Dailight Eketten 45 (wood grain sheet):7,260~9,010 yen/㎡(Compatible with 12mm semi-fire resistant 45. If painted on-site, it will be reduced to **5,380 to 6,270 yen/m2**).
- DAIKEN DAIKEN HAKE WAINT PLAY (Wood grain):10,430 yen/m2(12mm, nonflammable).
- KMEW Elite Light 30/45 (wood grain/cosmetic sheet):11,650-12,500 yen/m2(12mm, non-flammable/semi-fireproof).
Practical points other than cost performance
- Fire prevention and durability: Both are inorganic base materials and have non-flammable and semi-fire-resistant settings, making them advantageous over plywood systems for a long period of time. DAIKEN 45 minutes applicableFor wooden bases onlyPlease be sure to confirm that conditions are clearly stated.
- Breathable: DAICEN's eaves 45No perforated plate(If necessary, use involves combining ventilation hardware separately).
- The width of design: KMEW has a wide range of sizes and grades (= it's easy to find a pattern that matches your needs), butWood grain sheets tend to increase unit prices. Prices depend on the actual distribution site's market, but when comparing the list price, the above is as follows.
Summary
- Cost performance is the top priority + wood grainIf so:DAIKEN's "Dailight Kenten 45 (wood grain sheet)" is the first choice (7,260-9,010 yen/m2). If you need holes, use ventilation hardware in additionDesigned to do so.
- Darker wood grain/T&G style appearanceIf you want:DAIKEN "Etsuten Wing Board"(10,430 yen/m2) is also an option.
- The meaning of choosing KMEW: There are cases where the finishing options, brand unification, and ease of use of the parts surrounding the installation are advantageous, but the unit price of wood grain sheets is likely to be higher.
If you're wondering "How much renovation or remodeling can I actually do on my own home?" or "Where should I even start?", please visit this page. If you're looking to learn more about specific renovation processes or construction details, don't miss this page as well!
Leave a Reply
You must be logged in to post a comment.