Hello everyone, this is DIY Renova.
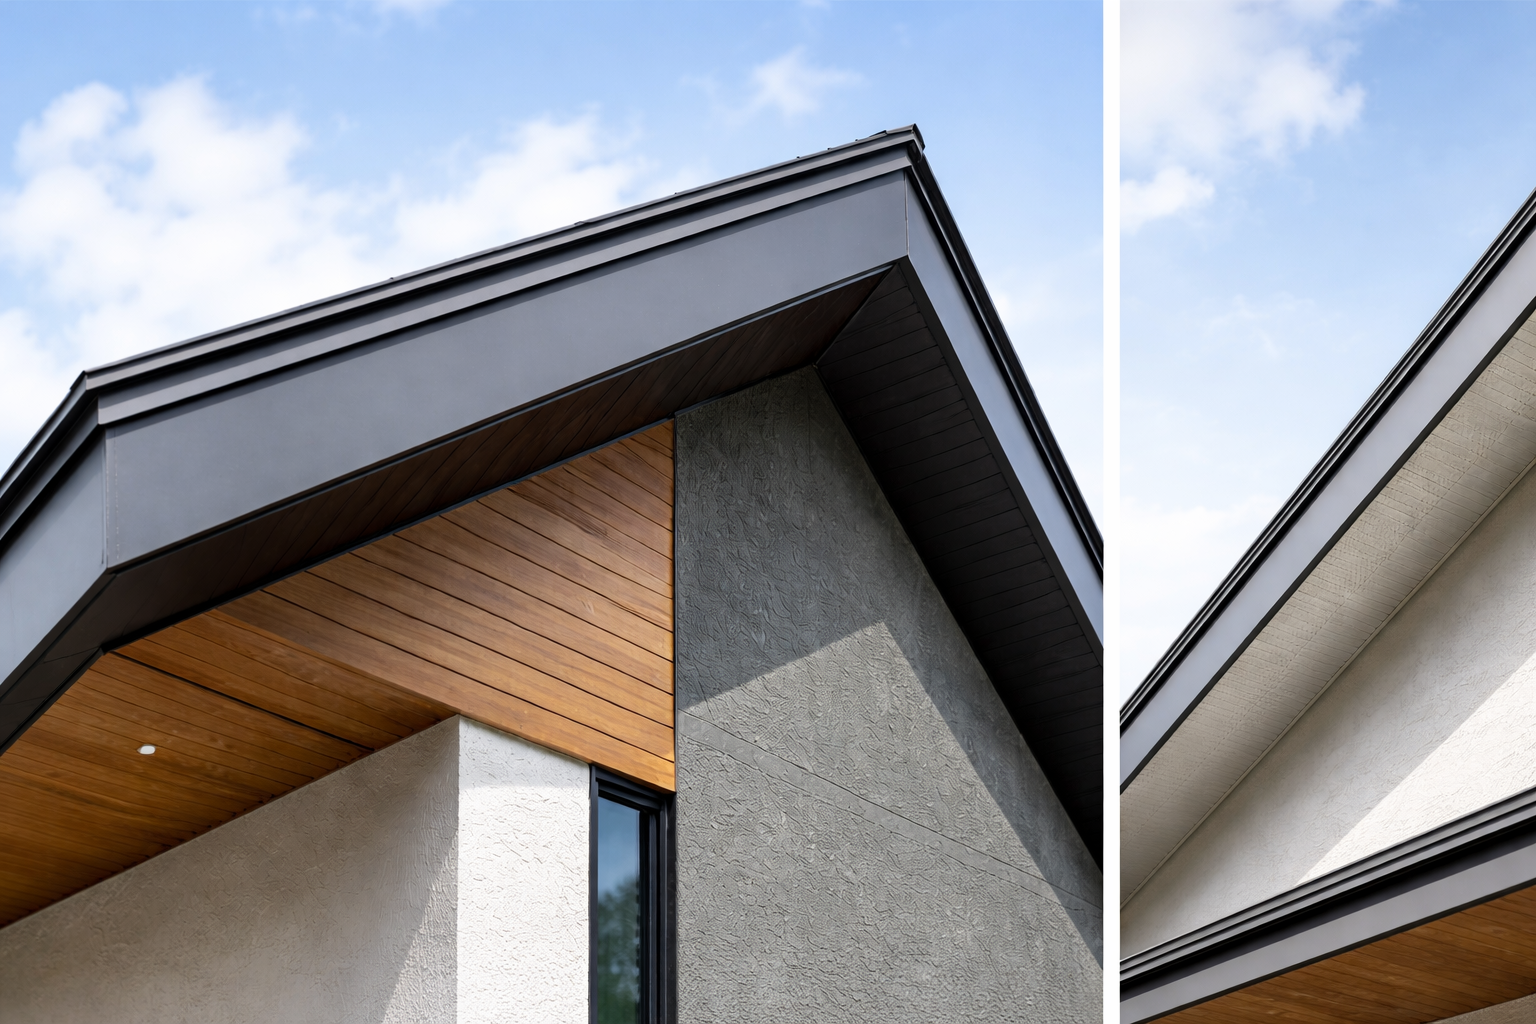
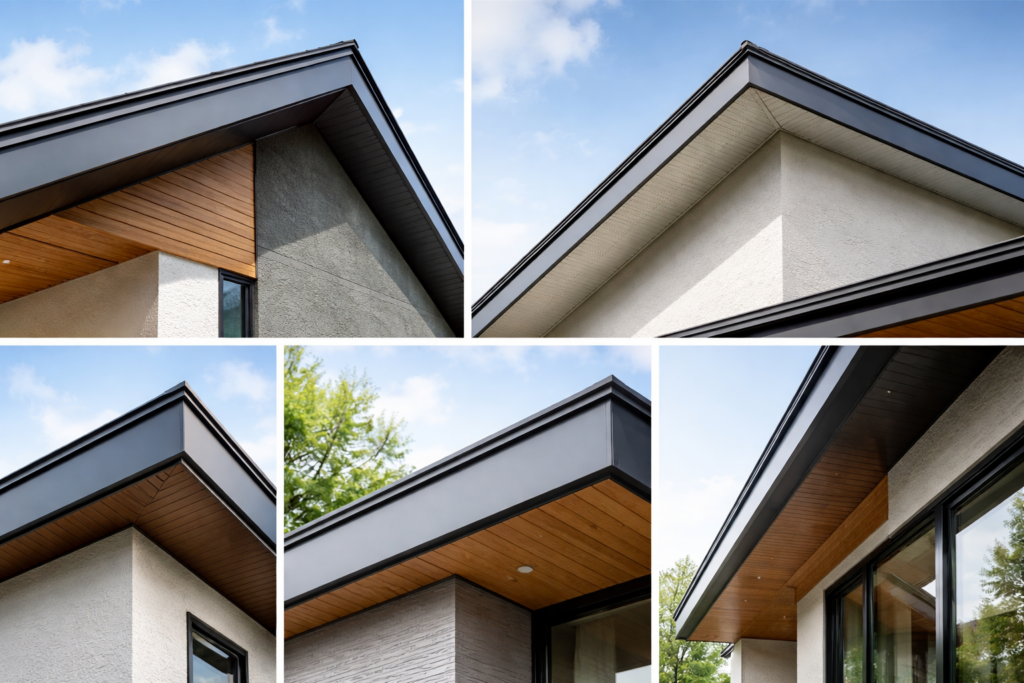
A gable board is a member on the gable side of a roof (the triangular end of a gable) that tends to be the ``front line of protection from the wind.'' If the paint breaks or water absorbs water from the end of the wood, the wood will rot, the board will warp, and the wood will become more susceptible to rainwater, causing damage all at once. Therefore, the standard method is to wrap wooden gables with galvalume steel plates (sheet metal wrapping/gable wrapping). The purpose is to reduce the number of painting maintenance and increase the durability of the edges.
This article is based on the premise of ``Japanese wooden construction with a maximum of two floors'' and will include ``quantitative'' information such as how to think about dimensions, how to calculate quantities, and the construction pitch so that you will not be confused from ordering to construction in a completely DIY manner.
*Since you will be working at heights, preparations for scaffolding and fall prevention are essential (I will keep the discussion of safety to a minimum, but this is the one thing I can't skimp on).
If you're wondering "How much renovation or remodeling can I actually do on my own home?" or "Where should I even start?", please visit this page. If you're looking to learn more about specific renovation processes or construction details, don't miss this page as well!
Information on updates to this website will be delivered to you once a month.NewsletterIf you are interested, please register.
Please note that this document is not necessarily accurate, and should be used as reference information only. There are many different ways to do it.
So, here you go.
Equipment and equipment to consider
まず用語を統一(ここがズレると発注が事故ります)
- Gable board: A board attached to the edge of the roof on the gable side (keraba side)
- Fascia: board on the eaves side
This time, the main character is the gable board (gable side). It is strongly related to the vertex (gable end of the roof).
Preconditions for galvalume steel sheets (basis for material selection)
Generally, "galvalume steel sheet" is standardized by JIS as a 55% aluminum-zinc alloy plated steel sheet (JIS G 3321).Standard workshop.
Most gable wrappers use ``color galvanized'' or a similar material with stronger corrosion resistance (product names vary by company).
Required materials (key points for DIY = “accessories” and “how to fasten”)
- Sheet metal for wrapping gables (accessories) If the roof has a complicated shape, it seems important to prepare sheet metal coils on site in advance so that you can process them yourself (see Youtube https://www.youtube.com/watch?v=_4KPZt9DWek)
- Most common: “U-shaped + turned” shape made by bending a single plate (described later)
- Improved workability: The edges are made stiffer with "edge folds" (the board is less likely to wave)
- Water stop material for joints
- Butyl tape (strong against overlapping sheet metal parts)
- Modified silicone/polyurethane sealing (used to protect nail heads and ends from rain)
- Fixing fastener (If you are skimpy here, red rust is likely to occur in the future)
- Stainless steel screws/screws are used, but care must be taken to avoid electrolytic corrosion (galvanic corrosion) due to contact with dissimilar metals. Steel sheet manufacturers warn that ``corrosion can occur even if it comes into contact with stainless steel, so insulation (rubber, caulking, etc.) is recommended.''niscs.nipponsteel.com.jisf.or.jp.
As a countermeasure,- Use "screws with packing (EPDM, etc.)"
- If possible, choose a fastener that claims to be ``anti-electrical corrosion'' (for example, a type that uses surface treatment to inhibit corrosion).jpf-net.co.jp
- If you are unsure, insulate the contact area with a butyl/rubber sheet.
is the real solution.
- Base material (depending on condition)
- Decayed: Replacement material for gable boards (cedar/Japanese pine, etc.) or structural plywood/reinforcing material
- The surface is wobbly: Create a surface where the sheet metal looks straight using a rim (e.g. 18x45, etc.)
- Care of edges and cut parts
- Touch-up paint (protection of cut ends of color galva)
- Brush for cleaning chips (chips left unattended can easily cause rust)
Press with “quantity”: Sheet metal expands with temperature
Metal expands and contracts with changes in temperature. The guideline for the coefficient of linear expansion of steel plates is approximately 12×10^-6/℃, and the elongation is
"ΔL=L×a×10^-6×ΔT"
You can get an estimate.JFE steel pipe
Example: If the length of each gable is 3.64 m, and the surface temperature difference in summer and winter is ΔT = 50°C.
ΔL ≒ 3640mm × 12×10^-6 × 50 ≒ 2.18mm
In other words, if the fittings and butts are ``exactly dimensioned'', they may cause ``waving'' or floating depending on the season. We prepare "clearance" during ordering and construction.
Construction sequence (“accident-free flow” common to all construction methods)
0. Check the current situation (only takes 5 minutes, so be sure to do so)
- Is the gable board rotten (dented when pushed with fingers/screws do not work → replacement route)
- Condition of the verge drainer, roofing material edges, and waterproof paper (if these are collapsed, leaks will occur even if the gable is clean)
- Straightness of the gable (tighten the thread: the center protrudes/retracts → adjust with the rim)
1. Remove existing accessories (the order of removal is directly related to rain closure)
- Existing sheet metal (if available) → Parting material around the existing gable board → Accessories on the verge side as necessary
*Remove from "what is covered". When putting it back together, the golden rule is to stack it from the bottom to the top.
2. Repair the base (if you skip this step, the sheet metal will become wavy and ruined)
- The basic idea is to “renew the entire material” instead of replacing or filling the rotten parts.
- If the surface does not come out, create a “sheet metal surface” using the rim.
3. Preparation for waterproofing and water-stopping (layering of sheet metal and nail heads)
- Joint part: Butyl tape
- Nail heads/screw heads: Sealing (only where necessary. Applying too much can easily stain)
4. Install the sheet metal (gable wrapping)
- Temporary fitting → Final fixing → Joint processing → End processing → Final inspection
There are multiple construction methods: write them all down and how to choose
Construction method A: "Sheet metal wrapping (cover construction method)" on the existing gable board
- Suitable for: Trees are still healthy/Want to reduce painting maintenance/Want to finish in the shortest possible time
- Note: If the base is wavy, it will show as it is.
Method B: “Sheet metal wrapping” after replacing and reinforcing the gable board
- Suitable for: Decayed or warped / Nails don't work / There are signs of flapping in strong winds
- Note: After replacement, “level out” the surface before attaching it to the sheet metal (this will determine the finish)
Method C: Deliver with roofing material system “keraba wrapping/accessories” (according to roof manufacturer)
- Suitable for: If the roof material is metal and manufacturer accessories are available.
- Example of proof: Manufacturer's construction manual specifically indicates accessories such as "Keraba Wrap", base dimensions, and fixings.niscs.nipponsteel.com.
- Note: Because it depends on the roofing material system, it may be difficult to use it at sites where only the gables are to be replaced.
How to order (DIY's biggest challenge) - "What" and "How to communicate"
Which of the following is a realistic place to order for DIY?
- Nearby sheet metal processing shop (so-called “sheet metal shop”)
- A building materials store that handles roofing and exterior materials (also handles processing of accessories)
- Bend it yourself (a bender is required. It is difficult to do it on-site DIY. It requires a lot of power)
Information required for ordering (just pass this as is)
- Material: 55% Al-Zn plated steel sheet equivalent to JIS G 3321, painted product (color galvanization, etc.)Standard workshop.
- Plate thickness: 0.35 to 0.5 mm is realistic (the thicker the plate, the less likely it will be wavy, but the processability and price will increase)
- Color: Compatibility with exterior walls, roofs, and rain gutters (glossy/matte also available)
- Shape: Cross section (hand-drawn OK)
- size:
- “Mitsuke width” (width visible from the outside) of the gable
- “Thickness” of the gable (thickness of the board)
- Dimensions of “turnback/water return” entering the roof side
- “Overlay” dimensions on the outer wall side
- Length and number:
- Maximum length of one piece (3.6m or 4m tends to be the limit due to transportation reasons)
- Joint position (place in an inconspicuous place)
- Fitting specifications:
- Overlap allowance: Ensure at least 60 to 100 mm, and design to include butyl within the overlap (the construction guidelines for roof accessories also show the idea of securing overlapping allowance to stop water).Yamachi Corporation Building Materials Division.
- Edge: Specified by folding the edge (folding the tip to reduce sharpness and wobble)
Recommended cross-sectional shapes (easy to order and easy to install)
The basic rule when covering a gable board over a wooden base is a "U-shape + return."
- Exterior wall side: Cover the exterior wall by several tens of mm (rain does not go to the back)
- Lower surface: Wrap the lower surface of the gable board (hide the end)
- Roof side: Attach a 10 to 20 mm "water return" (capillary tubes make it difficult for water to enter)
- Tip: Increased rigidity by folding the edges (5 to 10 mm)
The quickest way is to hand-draw this as a sketch with dimensions.
Construction method (step by step)
Below, we will focus on "Method A (wrap around existing material)" and write in a way that allows you to branch out to Method B as needed.
施工前の準備(材料の数量を“計算で”出す)
1) Number of sheet metal pieces
- Measure the total length of the gable (e.g. 7.28m on one side and 14.56m on both sides)
- If you want to order one length of 3.64m (2 lengths)
14.56 ÷ 3.64 = 4 pieces (3 joints) - If the overlap of the joints is 100mm, an additional 100mm is required for each joint.
→ 3 locations × 100mm = 300mm worth is absorbed by some number of wires (e.g., make one end a little longer)
2) Number of screws (nails)
Fixed pitch has a wide range of materials. For example, the guidelines for ventilation base roof construction methods state that sheet metal accessories should be fixed with stainless steel screws at intervals of 500 mm or less.National Institute for Land and Infrastructure Management, Ministry of Land, Infrastructure, Transport and Tourism.
In addition, the standard specifications for public buildings stipulate that the spacing between keraba wrappers to be installed on the base is approximately 1 m, and that joints should be overlapped.Ministry of Land, Infrastructure, Transport and Tourism
For DIY projects, it is safe to set gables that are susceptible to wind to a size of 500 mm or less (tighten the corners even more).
- Example: Hit one ball at 3.64m with a pitch of 450mm
3640 ÷ 450 ≒ 8.1 → 9 points/piece
If there are 4 pieces, 9×4 = 36 pieces
``1.3 times'' to allow for additional hammering of joints and ends → Approx. 47 pieces
One box of 50 bottles, including fractions, fits comfortably.
Step 1: Expose the existing state without destroying it too much
- Cut the old caulking around the gable board with a cutter
- If there is existing sheet metal, remove the rivets and nails and remove it.
- Check for nail holes, chips, and rot.
- Nails are sparse: Branch to method B (substrate replacement)
- No problem: Continue construction method A
Step 2: Base adjustment (process that determines the finish)
- If there is a warp, create a “straight surface” with the torso edge.
- If there is a step at the top of the gable (roof side), remove the step with battens.
- Wood chips + screws are more reliable than putty for wood edges and chipped areas (the surface pressure of the sheet metal is stable)
Step 3: Temporary alignment (80% is decided here)
- Apply a gable wrapper,
- Is the water return on the roof side working?
- Is the cover on the outer wall removed?
- Isn't there a tension somewhere?
check
- Decide on the joint position (avoid eye level or a position visible from the front)
Step 4: Stopping the joint from water (butyl comes into play)
- Ensure overlap (e.g. 100mm)
- Insert butyl tape on the inside of the stack in two lines (do not put it too close to the edge)
- Cover and crimp
(The construction guidelines for roofs also indicate the idea of creating an overlap at joints to stop water.)Yamachi Corporation Building Materials Division.
Step 5: Fixed (the pitch is “fine as it gets closer to the outer circumference”)
- Fix from the edges and finally align the center (to prevent sheet metal from waving)
- Fixtures are placed on the basis of "500mm or less" (corners should be further packed)Ministry of Land, Infrastructure, Transport and Tourism, National Institute for Land and Infrastructure Management.Ministry of Land, Infrastructure, Transport and Tourism, National Institute for Land and Infrastructure Management.
- In the case of screws with gaskets, if you tighten them too much, the gasket will collapse and it will be more likely to leak.
Stop when the packing is crushed evenly and does not protrude too much.
Step 6: Treatment of nail heads and ends (to the minimum necessary)
- Attach sealing to the nail head (screw head)
- Apply a small amount of sealant to the tip of the fitting (the side that tends to roll up in the wind)
- Touch up if the cut end is visible.
Step 7: Final inspection (Is the “water path” established?)
- Does the shape allow water to escape from the top to the bottom?
- Is there a pocket where water accumulates? (Accumulation causes corrosion and dirt)
- Are dissimilar metals in direct contact (to prevent electrolytic corrosion)?niscs.nipponsteel.com.jisf.or.jp.
Product examples (in a way that explains how to choose)
*This is an example of specifications, not an invitation to purchase a specific product.
- Sheet metal: Color galvanic equivalent to JIS G 3321 (for outdoor building materials)Standard workshop.
- Accessories: The shape of the ``keraba wrapper/gable accessories'' in the roofing material manufacturer's construction manual can be used as a reference for fitting (the diagram is specific).niscs.nipponsteel.com.
- Fixation: Stainless steel fasteners are common, but it is important to consider the risk of electrolytic corrosion and take countermeasures (insulation).niscs.nipponsteel.com.jisf.or.jp.
- Modified silicone caulking
- "Touch-up paint Galva"
Construction method (Method B: Branching when gable board replacement is required)
When should I replace it?
- Press with your finger to dent it
- Nails and screws spin idly
- The gable board is warped and the sheet metal does not fit tightly.
In this case, even if you hide it with sheet metal, the rot will progress inside, making it difficult to secure it and making it prone to flapping.
Procedure (excerpt only the main points)
- Remove existing gables (remove in order to avoid damaging surrounding buildings)
- Install a new gable board and create a street with thread tension
- If necessary, adjust the surface with the torso edge.
- After that, it will be merged into method A, “temporary fitting → water stop → fixing → end treatment”
Checklist of points to consider (before designing and ordering)
- Checked for rot on the gable board (no dents/idling)
- I checked the gable (straight line) with a thread.
- I drew "Mitsuke width, thickness, water return, outer wall cover, and selvedge" in the order sketch.
- Decided on joint position and overlap (60 to 100 mm or more)Yamachi Corporation Building Materials Division.
- Fixed pitch was considered based on 500mm or less.Ministry of Land, Infrastructure, Transport and Tourism, National Institute for Land and Infrastructure Management.Ministry of Land, Infrastructure, Transport and Tourism, National Institute for Land and Infrastructure Management.
- Measures against contact with dissimilar metals (electrolytic corrosion) were incorporated into the design.niscs.nipponsteel.com.jisf.or.jp.
- In anticipation of temperature elongation (several mm), we decided not to make the abutment too hard.JFE steel pipe
Construction checklist (same-day procedure management)
- Removed after cutting the existing caulking (do not forcefully remove it and break the wood)
- Corrected the looseness of the base using the torso and battens.
- The floating and tension were destroyed by temporary fitting.
- I added butyl to the joint and crimped it.
- Fixing was done in the order of ends → center (to prevent waviness)
- I sealed only the nail heads (screw heads) and the necessary areas.
- Cleaned the chips (chips left unattended can easily cause rust)
material checklist
- Gable wrapping sheet metal (required number + spare)
- Butyl tape for fittings
- Sealing (modified silicon, etc.)
- Touch-up paint (for cut edges)
- [ ] (if necessary) Surroundings, battens, and replacement gables
- [ ] (To prevent electrolytic corrosion) Screws with packing, insulating material (rubber, butyl, etc.)niscs.nipponsteel.com.jisf.or.jp.
tools checklist
- impact/drill
- Sheet metal scissors (straight/curved)/nibbler (easy to have)
- caulking gun
- Scale, insert, ink pot, thread
- Hammer (for screw nails)
- Cleaning brush (for chips)
- Minimum safety equipment required for working at heights (do not omit this)
Q&A Corner (Frequently asked questions about DIY galvanized gable wrapping)
Q1. First of all, what is the “gable width”? Where should you measure?
A. "Mitsuke width" is the "front width" of the gable board (or gable wrapping sheet metal) as seen from the outside.
The measurement method is simple: Measure from the outer wall surface (or finished surface of the outer wall) to the outer edge of the gable board when looking from the gable side.
- If the outer wall has an uneven surface due to mortar or siding, use the outermost surface as the standard.
- If rain gutters or metal fittings are interfering, measure at a position that avoids the interfering objects and determine the ``surface through which the sheet metal will pass.''
Q2. What is the correct way to determine the gable board width (width)? Is it better to “cover more”?
A. Basically, it is determined by the width of the existing gable board + the amount you want to cover the outside wall. Bigger isn't necessarily better, but deciding on a balance between the following three points is the best option in the field.
- Make sure to hide the end of the gable (end of the gable board)
- Exposed wood is more likely to absorb water and deteriorate, so dimensions that completely hide the end of the wood are essential.
- Do not remove too much “cover” on the outside wall side.
- If it is placed too close to the exterior wall, the unevenness of the exterior wall will cause the sheet metal to float, and the area that needs sealing will increase, making it more likely to get dirty.
- As a guideline, it will be easier to settle if the cover on the outside wall side is about 10 to 30 mm (the amount will be higher or lower depending on the finished shape of the outside wall).
- Ensure “water return” on the roof side
- Adding a 10 to 20 mm backsplash on the roof will prevent water from entering through capillary tubes.
Q3. How do you decide the "thickness" of the gable board? The existing tree is distorted...
A. The thickness of the gable board (thickness of the wood) is extremely important when it comes to the dimensions of the gable wrapping sheet metal. Basically, we measure the thickness of the existing gable board and place an order accordingly.
However, if the thickness is not constant due to distortion or decay, you will be less likely to make a mistake if you decide in the following order.
- First, measure the "thickest point" (if it doesn't fit here, the sheet metal won't fit)
- Next, check the “difference from thin areas”
- If the difference is large (e.g. 2-3mm or more)
- First, prepare the surface with the rim or batten to make it ``shape that the sheet metal will fit in''.
- Then confirm the sheet metal dimensions.
``Making the sheet metal first and pushing it into the wood while it is still rough'' tends to cause waving, floating, and gaps.
Q4. Which sheet metal thickness (0.35mm or 0.4mm) is suitable for DIY?
A. If in doubt, use 0.35 to 0.4 mm as the standard for a good balance.
- 0.35mm: Easy to process, lightweight, and low cost. However, if the base is rough, the ripples will be more noticeable.
- 0.4-0.5mm: Resistant to waving and provides rigidity. However, machining is a little harder and costs tend to increase.
If you can prepare the base carefully, you can get a beautiful finish even if it is thin. The rougher the groundwork, the more advantageous it will be to increase the board thickness.
Q5. How much overlap (joint) is required for gable wrapping sheet metal?
A. If you are doing DIY, it is safe to use 60-100mm as a guide.
If the overlap is too short, it will easily "turn over" in the wind and the effectiveness of the waterproof material will be weakened.
- Put “butyl tape” inside the layer and crimp it.
- Stack them so that the windward side is on the bottom and the leeward side is on top (the basic direction is "water flows from top to bottom")
Q6. Where should I make the joint?
A. In terms of both appearance and durability, the following are realistic.
- Avoid facing the front at eye level (this tends to create an unnatural appearance)
- If possible, place it ``slightly inward from the edge of the gable'' (to avoid concentration of wind pressure)
- Aligning the positions on the left and right will improve the appearance (it will be noticeable if only one side is odd)
Q7. What is the appropriate fixed pitch (screw spacing)?
A. If in doubt, it is safe to use ``500 mm or less'' as a standard, and add more space around the edges and joints.
- Edges: Strong against flapping when packed to about 200 to 300 mm
- Around the joint: Increase the number of fixing points before and after the joint.
- Middle: about 400-500mm
The key is to secure it thickly in the areas where it flaps the most in the wind (edges, corners, joints).
Q8. Can I use stainless steel screws? I'm scared of electric corrosion...
A. This is a bit of a problem, but here's how I think about it.
- Although stainless steel is strong, "corrosion due to contact with dissimilar metals" can occur depending on the combination or environment.
- Countermeasures include ``screws with packing,'' ``insulating materials,'' and ``avoiding excessive water puddles.''
- Don't overtighten the screw head (packing will be crushed = easy to leak)
In other words, it is better for DIY to win with ``fitting, insulation, and drainage'' than ``solving with materials alone.''
Q9. Wouldn't it be more beautiful if the sheet metal was made to exact dimensions? Don't need clearance?
A. Metal expands and contracts depending on the temperature, so if it's too snug, it will easily warp or float depending on the season.
"Escape" is especially necessary in the length direction.
- If it is long (more than 3m), expansion and contraction of a few mm will normally occur.
- Make a joint, leave some room in the butt, and don't overtighten.
These three points will prevent you from going wild.
Q10. If the gable is just a little rotten, is it OK to hide it with sheet metal?
A. The criterion for judgment is whether the fixation is effective or not.
- The screws work well and the wood is solid → Construction method A (cover) is also easy to establish.
- Dents with fingers, screws spinning, powder coming out → Construction method B (replacement/reinforcement) recommended
Sheet metal is just an ``exterior,'' so if the base is weak, it will become an ``exterior that cannot be fixed,'' causing flapping and gaps.
Q11. Is it possible to bend the sheet metal and make it myself? Is DIY realistic?
A. It's not impossible, but a "bender" is almost essential to ensure a stable finish.
It is more difficult to fold a long piece straight using only hand tools.
The most difficult way to do DIY is to make a dimensional sketch, order it to a sheet metal processing shop for accessory processing, and then concentrate on installation on site.
Q12. When placing an order, what should I give to the sheet metal shop to speed up the process?
A. If you have the following four points, you will be able to get through in one shot.
- Cross-sectional sketch (hand-drawn OK, dimensions included)
- Length list (number of pieces, maximum length, joint overlap policy)
- Material, plate thickness, color (e.g. color galva, 0.4mm, color name)
- End specifications (with/without edge folding, return dimensions)
If you have a photo + sketch + dimensions, they will often make suggestions that include on-site errors.
Q13. How should I choose the color of the gables to avoid mistakes?
A. You will be less confused if you prioritize whether to match it with the roof, gutters, or exterior walls.
- The roof is dark colored → the gables are also dark colored and tightened
- The outer wall is bright → If the gable is made of a neutral color, it will not float easily
- Same color as the rain gutter → accessories look unified
I like the way it looks, but if you group all accessories (gables, fascia, rain gutters) in similar colors, it's easy to create a professional-looking cohesive look even in DIY projects.
Q14. What are the typical mistakes that tend to cause "wavy" or "wobble"?
A. These five are common.
- Cover the base with a rough surface
- Fixing from the center instead of from the edges causes distortion.
- Omit water stop on fittings (no butyl)
- If you tighten the screw too much, the gasket will collapse.
- Do not clean the chips (chip rust appears in spots)
Even if you just fix this area, the level of completion of your DIY will go up a notch.
Q.15 Is metal gable board (galvanized) secured with nails? bis? —Why it's not a mistake even if the video is a nail and how to choose DIY
In conclusion, both nails and screws are used for metal gable panels (=gable wrapping in which wooden gable panels are "wrapped" with sheet metal such as galvanized steel). Therefore, the craftsman driving the nail in the video is not immediately ``wrong''. At the site, we use different types depending on the purpose and fit.
- Reasons why “nails are commonly used” (= common practice)
In some examples of construction of end fittings for metal roofs (keraba wrapping, etc.), there are cases where the fittings that fit into the gable side are clearly stated to be ``fixed with screw nails.'' This is not the roofing material itself, but the fixation of the sheet metal accessories at the edges, and the idea is the same as that of gable wrapping.ie-shuri.com
In other words, we live in a world where the act of fixing sheet metal to woodwork itself is based on the premise of nails. - Reasons why “screws are used” (=standard for repairs and retightening)
Some company websites explain that if a nail is floating or coming off on the end sheet metal, ``drive in more screws to secure it firmly.''Yane shop
This doesn't mean nails are bad, it's just that screws are more reasonable depending on the situation.
So why are there so many nails in the video? (limited to metal gables)
The reason why there are so many nails in metal gable panels (gable wrapping) is as follows.
- Speeds up construction (nail gun + coil nails)
- The nail head is relatively small, making it less likely to look noisy.
- If you use a "screw nail (ring nail type)", it will be pushed in a direction that is more difficult to pull out than a regular nail (there are examples of end sheet metal being "fixed with screw nails")ie-shuri.com
In other words, rather than ``nails = cutting corners,'' there are many cases where ``nails are made with a nail type and fit that provides performance.''
“Practical standards” for separating nails and screws in metal gables (clarified for DIY)
From here on, we will focus on metal gable panels (gable wrapping) rather than roofing materials, and summarize the criteria for judgment.
- Conditions for orientation of nails (especially screw nails)
- The underlying wood is healthy and the nails work well (do not spin idly).
- There is a large amount of construction work, so speed is a priority
- I want to keep the nail head small (emphasis on appearance)
- I would like to bring this to a point where "screw nail fixation" is commonly used in end sheet metal work. ie-shuri.com
- Conditions for which screws should be oriented (DIY tends to be closer here)
- Only impact (= general DIY equipment)
- The gable board is old and I'm worried about the future of floating nails (there were floating nails in the past, etc.)
- I want to make fine adjustments while holding the sheet metal (screws are easy to control the amount of tightening)
- Purpose of "retightening/repairing" areas where nails are floating or coming off (adding screws is explained as a standard)Yane shop
The answer to “Are they wrong?” (just this one straight)
"Using nails is not a mistake."
However, videos that do not meet any of the following conditions may be ``ok in the field, but are likely to fail when imitated by DIYers.''
- It is unclear whether the nail is a "normal nail" or a "screw nail" (resistance to pulling out changes)
- The base is rotten/thin but nails are used (it tends to lack holding power)
- Even though the fixed spacing is rough, the wind pressure at the end is underestimated (flapping and floating)
- Poor water-stopping treatment for nail heads and joints (flooding → trigger for base deterioration)
``What is the normal fixed interval after all?'' with metal gable panels (general range thinking)
Although it is difficult to come up with a nationwide one-line rule for metal gable boards, there is a general description in the official specifications that the nailing interval for wooden construction materials should be ``approximately 300 to 450 mm spacing from the edge away'' (this is a general value for woodworking, but it can be used as a reference for the nailing pitch of outer peripheral members).Ministry of Land, Infrastructure, Transport and Tourism
This "300 to 450 mm class" is often close to the on-site feeling even for edge sheet metal.
At DIY sites, if you are unsure, you can avoid accidents by doing this (limited to metal gables):
- Basic pitch: ``450mm or less'' in the range of 300 to 450mm
- Ends/front and back of joints: Pack more than the basics (edges and seams are most prone to flapping)
Finally: A simple rule that lets you decide whether to go with nails or screws in one go
- The gable board (wooden base) is sound, and emphasis is placed on construction speed and appearance → “Screw nails” are preferred.
- The base is questionable/I want to tighten while adjusting/I'm also looking at repairs → I lean toward "sheet metal screws" (there is also a standard way of thinking to prevent nails from floating)Yane shop
1) "How many in general?" ⇔ "How many are recommended for DIY?" Quick reference chart
*Premise: The values here are based on the actual examples of "overlapping allowance, fixed pitch, and backsplash dimensions" clearly written in "Roof edge accessories (keraba drainer/keraba wrapper/ridge wrapper, etc.)". Gable wrapping (wrapping gable boards with galvanizers) is also an "end accessory", so it can be used as a basis for DIY decisions.
A. Joint overlap (wrap)
| item | General (description of specifications/procedures) | DIY recommended (reason) |
|---|---|---|
| overlap allowance | 60mm or more(Example of public standard specifications) PVC Pipes and Fittings Association / 50~100mm(Example of Rippei manual) Inuiko. / 100mm or more(Example of yakubutsu joint) [Sanshu Kawara] Tsuruya Co., Ltd., a disaster prevention tile manufacturer. | Basic 100mm(If in doubt) + Butyl/waterproof tape or sealing inside the layer. “100mm or more” is commonly used in many residential guidelines, so it is easier to take accountability when DIY is done. [Sanshu Kawara] Tsuruya Co., Ltd., a disaster prevention tile manufacturer. |
B. Fixed pitch (distance between screws and nails)
| item | General (description of specifications/procedures) | DIY recommended (reason) |
|---|---|---|
| Fixed pitch of end parts | Within 455mm(Single type) Shinto Co., Ltd. / Within 480mm(Example of fixing accessories) 〖Sanshu tiles〗Tsuruya Co., Ltd., Disaster prevention tiles / @450mm(Example of hangers, etc.) Yamachi Corporation Building Materials Division | Flat field: ~450mm,Edge/corner/joint front and back: 200-300mm. If you stick to the standard value (450-480mm) and fill only the ends, it will be resistant to "flapping and floating" and the amount of additional material will be minimal. The general value used as the basis is 450 to 480 mm as described above. Yamachi Corporation Building Materials Division.〖Sanshu Kawara〗Tsuruya Co., Ltd., a manufacturer of disaster prevention tiles. |
C. Water return (rise dimension)
| item | General (description of specifications/procedures) | DIY recommended (reason) |
|---|---|---|
| Rise of Mizukaeshi | 10mm or 15mm(Example of accessory with water return) Yamachi Corporation Building Materials Division | Basic 15mm(If you don't interfere). This is because there is more room than 10mm for "blowing up" during wind and rain. Reduce to 10mm only if there is interference (roofing material or fitting). Yamachi Corporation Building Materials Division |
2) What is the ideal width when creating a new gable board? Conclusion: It changes depending on the conditions (however, the method of determination can be fixed)
How to think about the conclusion
The width of the newly installed gable board (height) is determined by the “preference for appearance”.Determine the “height to cover (necessary dimensions)” by actual measurementis the most reliable. This is because even in Japanese two-story wooden buildings, the structure of the roof (field thickness, ventilation layer, roofing material, and finishing position of the eaves) differs from house to house.
On top of that, in reality, there is a range of sizes that are commonly distributed in the market, for example, as ready-made sizes for gables. 150/180/210/240 is normally available in the lineup (= this area can be considered as a ``general width range''). Nichiha
Even for wooden gables and fascia 150/180/210/240/270/300 There is a wide range in circulation. Miura sawmill.
3) “How to decide” the width of a new gable board: Actual measurement → standard selection without hesitation during DIY
Step 1: Measure the required “cover height” on site
Measure the following on the wife's side (keraba side).
- Dimensions to measure:
A = Height from “lower end of finished surface of eave ceiling” to “reference point on roof sheath board (or upper end of rafters) side”
*The key is "the height you want to hide with the gable board".
Next, add the margin.
- room:
B=10~20mm(Construction errors, warpage of wood, escape of future slight deformation)
→ Required gable plate width (estimate) = A + B
Step 2: “Round up” to the market standard range
Round up the resulting number to the next standard (e.g. 164mm to 180mm).
- Common standard range examples: 150/180/210/240 (+270/300 also available) Nichiha.
4) Specific examples for each condition: “What is the ideal mm for this kind of house?” (All examples will be given according to “How to decide”)
Example 1: A house with a simple roof and a small covering height A
- Actual measurement: A=135mm
- Margin: B=15mm → A+B=150mm
- Selection:150mm is ideal (= minimum class)
This 150 is the standard size that is generally available. Nichiha.
Example 2: A house with a medium A rating due to ventilation layers and finishing (common)
- Actual measurement: A=165mm
- Margin: B=15mm → 180mm
- Selection:180mm is ideal (if you're lost, this is the place to go)
180 is also commonly available as a standard lineup. Nichiha.
Example 3: The roof is thick (A is large due to ventilation base, thick field, and storage)
- Actual measurement: A=195mm
- Margin: B=15mm → 210mm
- Selection:210mm is ideal(The most dangerous thing is that there is not enough wood and the end comes out.)
210 is also a standard range. Nichiha.
Example 4: I want the design to look deeper/I want more space because there is a lot of competition.
- Actual measurement: A=220mm
- Margin: B=20mm → 240mm
- Selection:240mm is ideal(Easy to avoid “insufficient coverage”)
240 also falls into the standard range. Nichiha.
5) Summary of “general values ⇔ DIY recommendations” when considering gable wrapping (galvan) dimension design
- joint stack
- General: Ranges from 60mm or more to 100mm or more PVC Pipes and Fittings Association.〖Sanshu Kawara〗Tsuruya Co., Ltd., a manufacturer of disaster prevention tiles.
- DIY:100mm standard(Easy to take accountability)
- fixed pitch
- General:Within 450-480mmThere are many examples of Yamachi Corporation Building Materials Division.〖Sanshu Kawara〗Tsuruya Co., Ltd., a manufacturer of disaster prevention tiles.
- DIY: Flat area ~450mm, edge 200~300mm
- water return
- General: 10 or 15mm Yamachi Corporation Building Materials Division
- DIY: 15mm without interference
If you're wondering "How much renovation or remodeling can I actually do on my own home?" or "Where should I even start?", please visit this page. If you're looking to learn more about specific renovation processes or construction details, don't miss this page as well!
Information on updates to this website will be delivered to you once a month.NewsletterIf you are interested, please register.
References and Videos
- JIS G 3321:2019 (hot-dip 55% aluminum-zinc alloy coated steel sheets and steel strips)Standard workshop
- “What is galvalume steel plate?” (with reference to JIS standards)kobe mug
- JFE Steel Sheet Building Materials Catalog (Example of linear expansion coefficient and elongation calculation formula)JFE steel pipe
- NILIM: Design and construction guidelines for ventilation base roof construction method (draft)—Fixed spacing of sheet metal accessories (500 mm or less)National Institute for Land and Infrastructure Management, Ministry of Land, Infrastructure, Transport and Tourism.
- Ministry of Land, Infrastructure, Transport and Tourism: Standard Specifications for Public Building Works (Architectural Works Edition) - Concept of installation spacing and joints for keraba wrappersMinistry of Land, Infrastructure, Transport and Tourism
- Nippon Steel: Precautions for plated/painted steel sheets (electrolytic corrosion due to contact with dissimilar metals, insulation recommended)niscs.nipponsteel.com
- Japan Iron and Steel Federation: Dissimilar metal contact rust prevention method for painted/zinc-based plated steel sheets (electrolytic corrosion countermeasures)jisf.or.jp
- Construction image video (gable board sheet metal wrapping)
- How to wrap the gable board with sheet metal (YouTube)YouTube
Leave a Reply
You must be logged in to post a comment.