
When constructing hipped or square roofs, many DIYers tend to stumble on corner blocks. Machining is more complex than ordinary rafters, and it is difficult to imagine just by looking at the drawings, as the angle of the plane, the angle of rise, the cutting of the top edge, and the fitting of the joints are involved all at once.
Moreover, corner wood is not just a matter of inserting wood diagonally. If the precision of the corner timbers is poor, the rafters will not sit properly, the roof boards and plywood will wave, the lines of the corner ridge will be out of order, and the roofing and roofing materials will not fit properly, all of which will affect subsequent processes.
In this article, based on the assumption that Japanese wooden houses can be up to 2 stories high, we will summarize as much as possible in a practical manner, including ``What is a corner wood?'' ``How do you calculate it?'' ``How do you mark it and attach it?'' ``If the angle doesn't match and a part of it is floating, how do you actually fix it?'' ``If you've cut too much, how far can you repair it, and where should you start deciding whether to replace it?''
Please note that work on the roof is work at height. The Ministry of Health, Labor and Welfare's roof work materials strongly urge the appropriate use of safety helmets, non-slip safety shoes, full harness-type fall arrest equipment, etc. In addition, for pitched roofs, the quality of the under-thatching, the overlap dimensions, and the waterproofing of the ridges and valleys are important, and the Ministry of Land, Infrastructure, Transport and Tourism's design and construction standards also provide specific standards. Be sure to prepare safety equipment and waterproofing plans first before starting construction.
What is Sumiki?
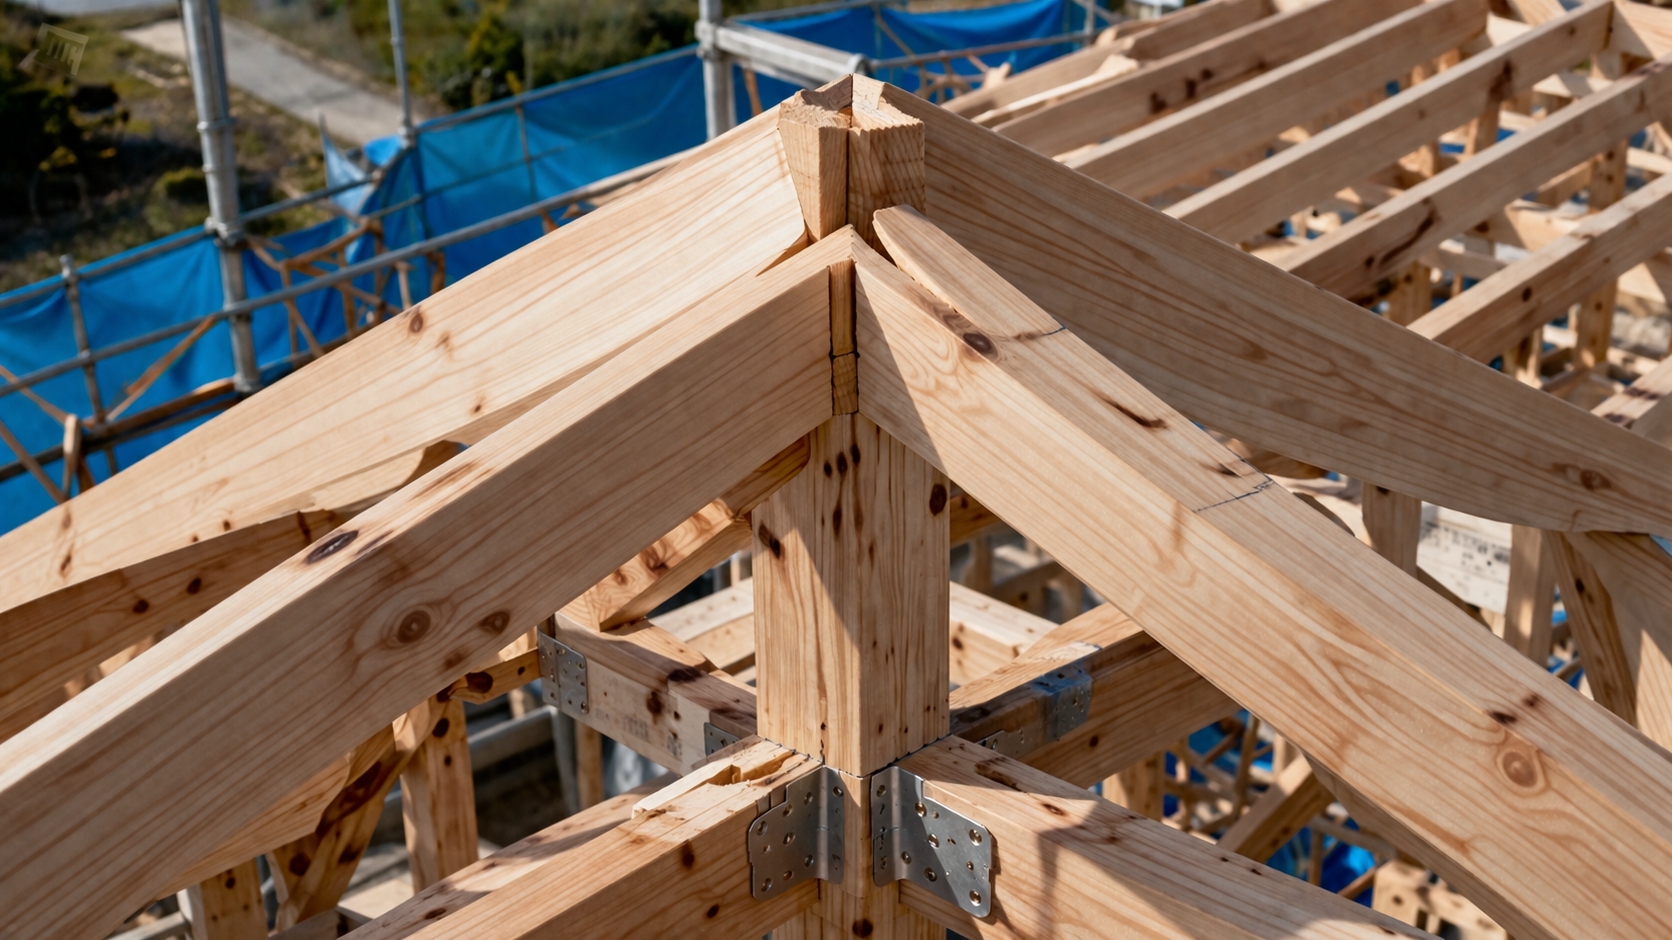
Corner wood is a member that extends diagonally from the ``corner'' of a hipped roof toward the ``ridge''. When viewed from above, the diagonal timbers run from the corner of the building to the ridge, and rafters hang from the left and right.
In other words, the corner wood is not just a decoration, but also a ``receiving material for the rafters'' and a ``reference line for the roof surface.'' The Ministry of Land, Infrastructure, Transport and Tourism's notification states that hipped and square roofs have more 3D truss resistance due to corner beams than gable roofs. This means that the corner beam is an important component that is involved in the three-dimensional cohesion of the entire roof.
First of all, if you are a beginner, please understand that ``a single corner tree is not enough.'' When the corner beams are installed correctly, the rafters that connect to them will align naturally. On the other hand, if the angle or cutting of the corner beams is incorrect, you will have to forcefully adjust each rafter one by one, and the entire roof surface will end up being riddled with unevenness.
Three precisions required for corner wood
There are three main types of accuracy to be aware of when constructing corner wood:
- The streets on the plane are aligned
- The height should match
- The top and side cuts match the rafters it will hang on to.
Of these, number 3 is particularly difficult. If you just hang the timbers diagonally, it may look that way, but in reality, if the top surface of the corner timbers is not processed to match the roof surface, the rafters hanging from the left and right sides will hit unevenly.
In other words, corner wood is not just a component that only needs to match the length, but a component that can be made up to the surface.
Things to decide before construction
Before making the corner wood, be sure to determine the following criteria:
- Building grid or reference line used on site
- Standard height of eaves
- Standard height of ridge
- Roof Slope
- Should the thickness of the field be included or should it be based on the top edge of the structural material?
- Is the existing building really a right angle?
When doing DIY or renovations, it is not uncommon for the angle at the site to be slightly off-center, even if the drawing is 90 degrees. If you cut based on only the dimensions of the drawing, the corner pieces will always be misaligned on site.
First, measure the diagonal dimensions and check how far the corners of the building are offset. If the plane is misaligned, the corner angle will also change slightly from the theoretical value.
How to calculate corner wood
The length of the corner tree is calculated from the "plane distance" and "height difference". The plane distance here refers to the distance when viewed from directly above, not the diagonal length of the roof surface.
Calculation flow
- Calculate the plane distance from the corner of the eaves to the ridge meeting point
- Calculate the height difference from the roof slope
- Calculate the actual length of the corner tree as a right triangle
例
For example, suppose that the distance from the corner of the eaves to the ridge meeting point on the plane is 1500 mm in the X direction and 1500 mm in the Y direction.
At this time, the plane distance P is
P = √(1500² + 1500²)
P ≒ 2121mm
Next, if the roof slope is 4 inch slope, the height difference H will be 400 mm when moving 1000 mm horizontally.
H = 2121 × 0.4
H ≒ 848mm
The actual length L of the corner tree is
L = √(2121² + 848²)
L ≒ 2284mm
This 2284mm is the theoretical length. In reality, it is safer to take the material with at least 200 to 300 mm of excess material on both ends, considering the allowance for end processing and on-site adjustments.
Common mistakes in calculations
- Mistaking a 4 inch slope as 4 degrees
- Use the roof distance as is instead of the plane distance
- I am confused as to whether the ridge height is based on the top edge of the structural material or the finished surface.
- Adding field thickness, roofing material thickness, and spare dimensions later causes misalignment.
If the calculations are correct but the results do not match on site, it is better to suspect that the reference planes are mixed up rather than looking at the mathematical formula.
Construction order
1. 基準線を出す
Create eave lines, ridge lines, building corners, and slope standards without cutting the timber first. If you start machining without knowing this point, you will not be able to understand the reason why the corner wood does not fit properly.
2. Take out the core of the corner wood
Rather than finding the corner wood, first think in terms of the core. If the hipped building is close to a square and the right angles are clearly visible, the corner wood core will be oriented approximately 45 degrees on the plane. However, since there will be deviations when renovating an existing location, be sure to give priority to actual measurements on site.
3. Add ink to the wood
Please put all the ink first. At least the following ink is required.
- Lower end hook position
- Upper end meeting position
- core ink
- Reference line to start cutting
- Left and right rafter line
Many people who fail with corner wood think while cutting. It's the opposite. Think first, cut later.
4. Cut the edges shallowly
Don't cut it all the way to just the right spot; use a circular saw to cut it in shallowly, and then use the saw and chisel to drive it in at the end. It is difficult to restore the joints at the ends once they have been blown away, so it is best to start with just as much as possible.
5. Stop cutting the top surface at 70%
Don't go all the way to the finished surface from the beginning, stop at about 70%. Temporarily place it in that state, hang a trial rafter, see if it hits, and then push it in.
6. Temporarily fix and hang trial rafters
Temporarily hang at least one rafter on each side of the eaves and ridge. If possible, look at 2 or 3 pieces, including the middle one, to see if the corner wood is twisted or unevenly hit.
7. Temporarily cover the field
Finally, temporarily attach the field board or field plywood and check the roof surface. This is because even if the corner blocks appear to fit together, local peaks and valleys may appear when viewed from the surface.
Specific example: What to do when the angle is not right and a part of the corner wood is floating
This is quite important in practice. Even though we say ``the corner wood floats,'' there are actually several patterns. Even if the float is the same, there will be a difference in whether it is necessary to cut it and repair it, reconsider the hook, or replace the material.
First thing to do
- identify where it's floating
- Consider separately where it floats: the bottom, middle, and top.
- Check whether only one side floats or both rafters on both sides float.
- Check if the corner wood itself is twisted or if the angle of the end is different.
- Don't cut it blindly until you determine the cause.
The worst thing to do is to "just cut off the part that is floating because it's floating." If you do this, you may end up ruining the entire top surface, even though the angle at which it hangs at the bottom edge is just different.
Pattern A: The bottom edge sits, but only the middle part floats.
In this case, there is a high possibility that the corner wood itself is ``twisted'' or ``warped.''
The specific confirmation steps are as follows.
- Remove the corner wood once
- Place a straight ruler or ink thread on the side of the wood
- Check to see if the wood is twisted or only the center is bent.
- If the twist is strong, don't force the material.
- If the warp is slight, correct the contact surface little by little and temporarily place it again.
In practical terms, materials that float only in the middle are quite difficult to handle. If you force it into place, you will force distortion on the rafters and field later. If the warpage is strong, it will be quicker to replace it.
Pattern B: Bottom edge floats
This is often due to the ``angle of the bottom edge'' or ``face on the receiving material side'' not matching.
The steps to take are as follows:
- Apply a thin layer of pencil or chalk to the contact area at the bottom edge of the corner wood.
- Try it out and see where it hits and where it floats.
- Check whether the receiving material side is protruding or whether the cut on the corner wood side is too strong.
- Rather than cutting the support material, first fine-tune the contact on the corner wood side.
- Don't remove 2mm or 3mm at a time, but in 0.5-1mm increments.
The important thing here is to "apply the contact surface to the surface." If it hits only one corner and is floating, it may sit down if you lightly release the one spot that hit it hard. On the other hand, if the whole part is misaligned on a wide surface, the cutting angle itself is different, so you should re-angle the end instead of making local corrections.
Pattern C: Top edge floats
If the top end floats, it is most likely because the angle of engagement with the ridge is wrong, or the length is slightly too long.
- First, check that it is not too long and stretched.
- If it's too tight, narrow it down a little in the length direction.
- If the length is correct but it floats, check the contact angle of the top edge.
- Check the contact surface on the ridge side and make a small amount of correction only on the side that is strongly hit.
- Temporarily place it again and check if the entire street of Sumiki has changed.
Even if you shave just 1mm off the top end, the tip position will move surprisingly. Even if you only match the tips, you may disrupt the alignment at the bottom, so be sure to check the whole thing each time.
Pattern D: The ends sit, but when you hang the left and right rafters, only one side floats.
This is a case where the ``top side'' of the corner wood is insufficiently removed, or the direction of the removal is incorrect.
- Hang short trial rafters on both the left and right sides.
- Check which side floats
- Look at which line the rafters on the floating side are touching.
- Gradually drive in the side where the top surface of the corner block is not sharpened enough.
- Be sure to double check the other side as well.
The most dangerous thing here is that if you put one side together, the other side will float. Therefore, be sure to rehook both left and right rafters every time you cut one side.
Judgment guideline for each amount of float
In practice, the way to deal with it depends on the extent of the lift.
- Less than 1mm: Adjustment can often be made with a plane, paper, or by making minor adjustments to the contact surface.
- Approximately 1 to 3 mm: Local contact, readjustment of top surface scraping, and review of end angle are required.
- More than 3mm: Reconfirm the cause. I suspect that the material is twisted, the cutting angle is wrong, or the length is wrong.
- 5mm or more: It is safer and faster to rework or remanufacture than to cheat and use.
In particular, if there is a large amount of floating in the hanging part of the structural material, we do not recommend ``just pulling it with screws to make it stick''. If you tighten it too much, the force that tries to return later may remain, causing the rafters and field streets to collapse.
Actual repair method: Example of work procedure
Here, we will write specific steps for a fairly common case where ``the bottom and top edges almost match, but there is a 2-3mm lift in the middle, and the rafter on one side also lifts a little.''
- Check the corner wood in the temporarily fixed state and mark the floating position with a pencil.
- Place the left and right test rafters and mark the floating side as well.
- Remove the corner wood once
- Look at the side streets and check if the wood is twisted too much.
- If the twist is slight, cut the top surface by 0.5 to 1 mm only around the floating position.
- Do not touch the contact surfaces of the bottom and top edges too much.
- Temporarily place it again and first check the seating of the Sumiki body.
- Next, hang the left and right test rafters and see if the uneven contact has decreased.
- If it still floats, check again to see if the end angle is the cause.
- If the problem does not improve even after pushing 2 or 3 times, suspect that the wood itself is twisted or the reference ink is incorrect, and stop.
This ``stop if it doesn't improve'' is important. The more you cut the wood while misdiagnosing the cause of the problem, the more you will not be able to restore the wood to its original state.
What to do when you cut too much
Corner wood is processed many times, so anyone can experience ``shaving a little too much.'' However, not all mistakes have the same weight.
Cases where you should not use it as is
- There was insufficient hooking at the bottom and top edges.
- The cross-sectional defect was large and it became clearly thinner.
- There is a crack
- The important contact surface that receives the rafter load was largely lost.
- The fit with the ridge and roof surface will collapse, and the waterproof line will be adversely affected.
In such cases, replacement should be your first choice rather than persisting with repairs. Corner wood is not a component that should be hidden from view.
Cases that are relatively easy to repair
- I scratched the surface a little too much.
- A shallow chip appeared on the seating surface of the rafter.
- Only the visible side was slightly chipped.
A realistic approach to repair
The easiest way to think about repairs is to ``readjust the surface including the surrounding area'' rather than ``fill in the local area.''
In other words, if only one spot has become too deep, the area around it should be gently lowered so that the rafters and field sit flat.
On the other hand, it is safer to avoid filling deep defects with putty or filler alone and thinking that the structure has been restored. Wood is not stable for long periods on critical bearing surfaces due to compression, drying shrinkage, and movement due to moisture.
Can I fix it with a splint?
A splint may be used as a "settling aid." For example, you might want to add a local support to a rafter to compensate for a slight lack of support.
However, we do not recommend using a small batten to solve the problem of insufficient cross-section of the corner wood itself or insufficient connection of the joint. It's not a repair, it's easy to cheat.
How to determine the quantity of materials needed
The quantity of corner timbers themselves is simple and usually depends on the number of corners on the roof. However, when ordering, you need to consider not only the number of pieces, but also the length that takes into account the extra dimensions.
corner wood
Required length = theoretical actual length + end machining + on-site adjustment
If you order it exactly, the slightest error will make it unusable. When it comes to DIY, it's actually cheaper to leave room for it.
Quantity of field/roofing/roofing materials
The quantity of roofing materials is considered based on the construction area including the slope, not the planar area. The Ministry of Land, Infrastructure, Transport and Tourism's Chubu Regional Development Bureau's cost estimation guidelines state that the roof construction area is calculated by "roof area x roof slope elongation rate." For example, a 3/10 slope is 1.044, a 4/10 slope is 1.077, and a 5/10 slope is 1.118.
In other words, even if the roof appears to be 20 square meters on a flat surface, the actual construction area will be a little more. In a hipped building, there will be machining loss around the corners, so it is safer to allow a little extra margin when it comes to roofing and roofing materials.
How to choose products
Since the article theme is Sumiki, I will not list the product names here, but will focus on how to choose one that is unlikely to fail.
wood
- Dry material with little twist
- Wood with few large dead knots and cracks
- Material that is easy to adjust on-site with a plane or saw
- A cross section that is not extremely unbalanced with the existing roof frame
underlayment material
The Ministry of Land, Infrastructure, Transport and Tourism's design and construction standards call for asphalt roofing 940 or equivalent or higher waterproof under-roofing materials, and an overlap of at least 100mm on the top and bottom, 200mm or more on the left and right sides, and an overlap of at least 250mm in ridges and valleys. When installing, be sure to check the roofing material manufacturer's specifications.
Roofing materials and accessories
In the corner ridge, the difference is not so much in the roof material itself, but in how it accommodates the accessories. Manufacturer's construction instructions provide detailed information on corner ridge wraps, ridge tops, and the position of waste sealing, so if you always read the manual for the roofing material you are using first, you will reduce the chance of mistakes.
Construction checklist
- Confirmed the right angles of the building using diagonal dimensions.
- Standardized eave height, ridge height, and slope standards
- I put in all the Sumiki ink before I cut it.
- The edges were machined shallowly so that they could be driven in on site.
- After temporary placement, the left and right trial rafters were hung.
- I tentatively placed Noji and checked the street.
- When a bulge appeared, I identified the cause and then removed it.
- Insufficient hooks and large cross-sectional defects could not be repaired.
- The roofing was stacked and the ridges and valleys were confirmed to be waterproof.
- The safety equipment on the roof was set up first.
material checklist
- corner wood
- rafters
- Field board or field plywood
- Roofing
- Nails, screws, and necessary joints
- Building/corner building accessories
- Sealing materials, airtight and waterproof tapes
- Ink pot, chalk, pencil
tools checklist
- convex
- Deposit
- gradient ruler
- inkpot
- circular saw
- hand saw
- chisel
- 鉋
- Impact driver
- clamp
- long straightedge or ink thread
- stepladder or scaffolding
- hard hat
- non-slip safety shoes
- Full harness type fall arrest device
Summary
The most important thing when constructing corner wood is not to try to cut out the finished shape all of a sudden.
The length is determined by theory. But in the end, we will match the actual item. And be sure to scrape little by little. This is the method that is least likely to fail.
Also, when a corner piece is lifted, it is important not to ``cut it because it is floating'', but to ``think about where and why it is floating''.
Is it at the bottom, top, or in the middle? Is it just the rafters on one side, or is it the corner wood itself? Just by cutting it apart, you can greatly reduce the chance of cutting too much wood unnecessarily.
In addition, in the case of insufficient engagement or large cross-sectional defects, it is safer to replace than repair. Even if it feels like a waste, the roof is a place that is difficult to redo later. Making the first one carefully is a shortcut to neatly fitting the entire roof.
References
- Ministry of Health, Labor and Welfare “Key points to prevent falls when working on roofs where it is difficult to install scaffolding”
- Ministry of Health, Labor and Welfare “Measures to prevent falls from roofs”
- Ministry of Land, Infrastructure, Transport and Tourism “Housing Defect Liability Insurance Design and Construction Standards”
- Ministry of Land, Infrastructure, Transport and Tourism Chubu Regional Development Bureau “Wooden Building Survey Estimation Guidelines”
- Ministry of Land, Infrastructure, Transport and Tourism notification (materials including ideas regarding hipped roofs and square roofs)
- IG Industry “IG Roof Construction Manual”
Wood work-[Hatanaka Kobo] ●Carpenter ●Mr. Hatanaka [Explanation of Sumiki] Now you can understand the rationale behind the semi-gradient slope of Sumiki. How to engrave. Japanese carpenter’s square Vol.3
Leave a Reply
You must be logged in to post a comment.