
Hello everyone, this is DIY Renova.
When setting up scaffolding for DIY exterior walls and roofs, it's easy to think, ``I'll just have to reach this surface,'' or ``I'll be safe if I just build it all around the house.'' However, what really matters is where to build it. Scaffolding is not only work equipment, but also on-site infrastructure that influences everything from inspection, evacuation, loading, consideration to neighbors, and compliance with laws and regulations.
Particularly in self-renovation, since there is no professional on-site supervisor, it is very important to avoid areas that will cause problems later. In fact, in order to prevent accidents with scaffolding, it is important not only to consider technical standards such as the width and gaps of the work floor, handrails, floor plates, and wall connections, but also to avoid forcibly setting up scaffolding in dangerous positions or in locations with many obstacles (Ministry of Health, Labor and Welfare, Regulations under the Industrial Safety and Health Law regarding scaffolding/Guidelines for advance scaffolding construction methods).
In this article, we will focus on ``where to erect scaffolding'' and ``where to avoid'' rather than ``how to erect scaffolding'' itself, and will organize it so that it is easy for even beginners to make decisions. Although it is based on Japanese home DIY projects, the ideas of ``not blocking inspection equipment,'' ``not encroaching on public spaces,'' and ``not stopping evacuation and maintenance'' are quite common in home renovations overseas.
Furthermore, when working at a height of 2m or more, fall prevention measures are required, and there are legal guidelines for the installation standards for scaffolding. From April 2024, it has been clarified that "main scaffolding" should be used in areas where a width of 1m or more can be secured, making it difficult to easily decide to use scaffolding on one side just because it is narrow (Tohoku Regional Development Bureau data).
If you're wondering "How much renovation or remodeling can I actually do on my own home?" or "Where should I even start?", please visit this page. If you're looking to learn more about specific renovation processes or construction details, don't miss this page as well!
Information on updates to this website will be delivered to you once a month.NewsletterIf you are interested, please register.
Please note that this document is not necessarily accurate, and should be used as reference information only.
So, here you go.
The first thing to consider is not ``ease of work'' but ``areas that should not be blocked.''
The first thing to look at when planning scaffolding is not ``areas where people can stand'' but ``areas that should not be blocked by scaffolding''. If you think about it the other way around, you won't have to rearrange or dismantle it later.
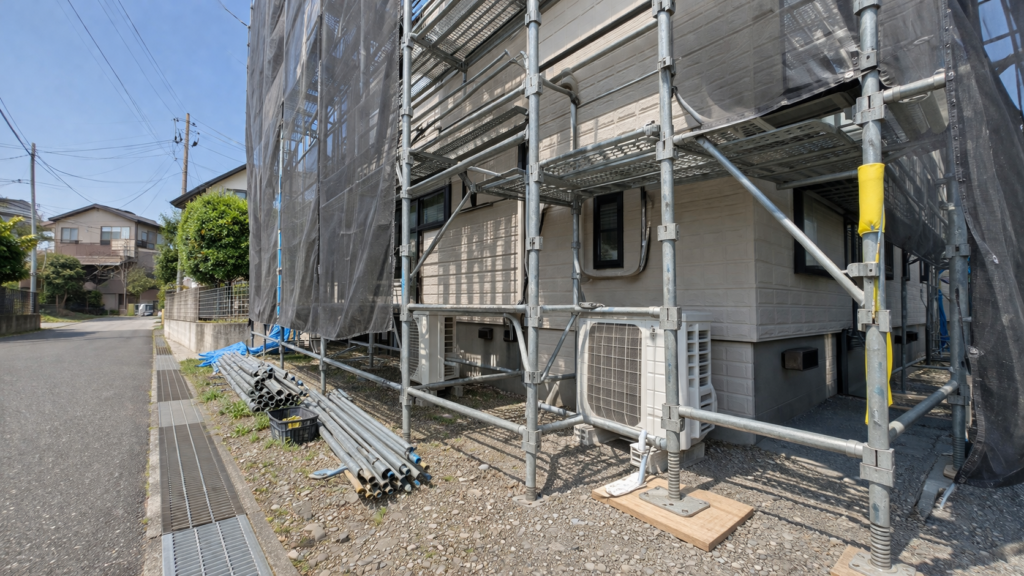
When doing DIY, you will want to rotate the scaffolding all the way along the exterior wall surface. However, there are many facilities at the site, such as water meters, gas meters, electricity meters, inspection ports, drainage basins, outdoor air conditioner units, back doors, evacuation routes, and passageways to neighboring properties, which are usually small but would be troublesome to shut down. If you place the scaffolding first, the inconvenience will continue not only during the work, but also during the construction work and while you are away.
Scaffolding doesn't end once it's erected. Since it will remain there throughout the construction period, the trick is to choose a location based on the assumption that it will be in operation for several weeks to several months, rather than for short-term assembly work.DIY Renova scaffolding planning articleHowever, I think it is important to draw the scaffolding plan on paper and identify any interference first.
Plan around the water meter and water meter so that nothing is placed on top.
This is quite important. Local governments ask users to not leave cars or objects on the water meter box, to ensure a clear path, and to keep the surrounding area clean. In fact, cities such as Kasukabe City, Shibata City, Moriya City, and Shizuoka City have issued guidance not to place anything on top of the meter box, to maintain a condition where the meter can be read, and to relocate the meter box if the meter box is to be installed indoors or under the floor.
It is safe to assume that "things" here include not only flower pots and cars, but also scaffolding supports, jack bases, floorboards, tread extensions, and material storage at DIY sites. Situations where meter readers cannot open the lid, change the meter, or shut off the water in an emergency should be avoided.
Therefore, if you think about the water meter as follows, you will be less likely to make a mistake.
- Do not erect a support directly above the meter box.
- Do not cover the treads or braces in the opening/closing direction of the box.
- At least leave enough space for someone to squat down and open the lid.
- Instead of saying "it's usually fine," make it so that meter readers and water department personnel can see it for the first time.
- Leave access to the water stop valve in consideration of future water leaks.
``I can see it but it won't open'' is no good... The key is to make sure that you can bring it close, open it, and read it. This is quite effective in practice. Parts of it will be dismantled later to accommodate meters, but it will really wear out.
Do not block the area around gas meters, electricity meters, and alarms.
The same goes for gas. At the very least, your gas company will advise you not to place objects around the alarm or block the area around the equipment. Regarding electricity, safety surveys are commissioned by general power transmission and distribution companies based on laws and regulations, and it may be necessary to check outdoor meters and lead-in areas.
When planning scaffolding, consider that the following equipment requires "space for inspection."
- gas meter
- electricity meter
- Inspection wires around the distribution board
- Front space of water heater
- outdoor alarm
- Service space for EcoCute and pump equipment
In particular, if scaffolding supports are erected in front of water heaters and outdoor units, not only will the flow line during work be lost, but the front work space for repairers will also be lost. The longer the construction takes, the more important it is to coexist with equipment maintenance.
Leave back exits, evacuation routes, and daily flow lines
At sites where scaffolding is erected and people continue to live there, it is not enough to simply allow people to pass through. You need to check whether you can leave quickly in an emergency, whether you can carry your belongings, and whether you won't get lost even at night. The Ministry of Land, Infrastructure, Transport and Tourism's construction safety confirmation table also includes management items such as evacuation equipment, public disaster countermeasures, traffic regulations, and safety inspections.
The following cases are actually problematic when DIYing a house.
- There is a brace in front of the back door, making it difficult to open and close.
- Create a material span next to the entrance to block delivery and entry/exit
- Nets and sheets reduce visibility at night, making it dangerous to pass.
- All that remains is the conductor, which slips in the mud on a rainy day.
- Directions for escape are limited in the event of a fire or earthquake.
Therefore, when deciding where to erect scaffolding, consider not only the ``work area'' but also the ``line of daily life'' and ``line of movement in an emergency.'' At the very least, you should make sure that there is an escape route separate from the usual entrance and exit, and that you can pass even if the footing is rough.
If you end up on the road, “thinking about it later” is dangerous.
When doing residential DIY on a narrow site, you may want to place the scaffolding slightly on the side of the road. However, if the road protrudes onto a public road, procedures related to road occupancy and road use may be required, and the effective width of pedestrians and vehicles and conditions for temporary fencing are determined by each local government. Nagoya City has established standards such as securing an effective width of 1.5m or more for sidewalks and 3.5m or more for driveways, and Sumida Ward has also announced height requirements for hanging scaffolding.
The important thing here is not to judge yourself by thinking, ``It's okay because it's just a little bit.'' In Japan, both the road administrator and the police may be involved, so it becomes a systemic problem before it becomes a neighborhood problem. When considering a plan to move it closer to the road, you may want to check the following.
- Do you cross the border?
- Shouldn't sidewalks and school routes be narrowed?
- Will it interfere with car mirrors or bicycle traffic lines?
- Are the sheets and nets blown out towards the road by the wind?
- Can visibility be ensured at night?
The trick is to look not at "whether it can be built," but at "how it will affect the public space once it is built."
If you are near power lines, it's not okay if you can't reach them.
This is something to be really careful about. Kansai Electric Power Transmission and Distribution has advised that when assembling scaffolding or handling long objects near power lines, it is necessary to maintain a distance according to the voltage. For example, recommended safety distances are indicated even at low voltages, and handling changes depending on whether insulation protection is provided or not.
When doing DIY, you may get close to the electric wires the moment you erect the struts, single pipes, long treads, rims, and sheet metal materials. It is necessary to look at dangers not only in the position of the scaffold after completion, but also in the ``track during assembly.''
Points to look at are:
- Is there a service line above the eaves?
- Is there room to stand up long items during transport?
- Is the scaffolding sheet not swollen toward the power lines due to the wind?
- Is it possible to plan to avoid assembling or disassembling the upper layer directly under the power lines?
- Should I consult the electric power company in advance if necessary?
Work sites that are close to power lines are not just ``difficult to work''; they are places where there is a risk of electric shock or contact accidents. The most important thing here is to not overdo it.
Be sure to avoid places with weak ground, on top of drainage basins or water meters, and in muddy places.
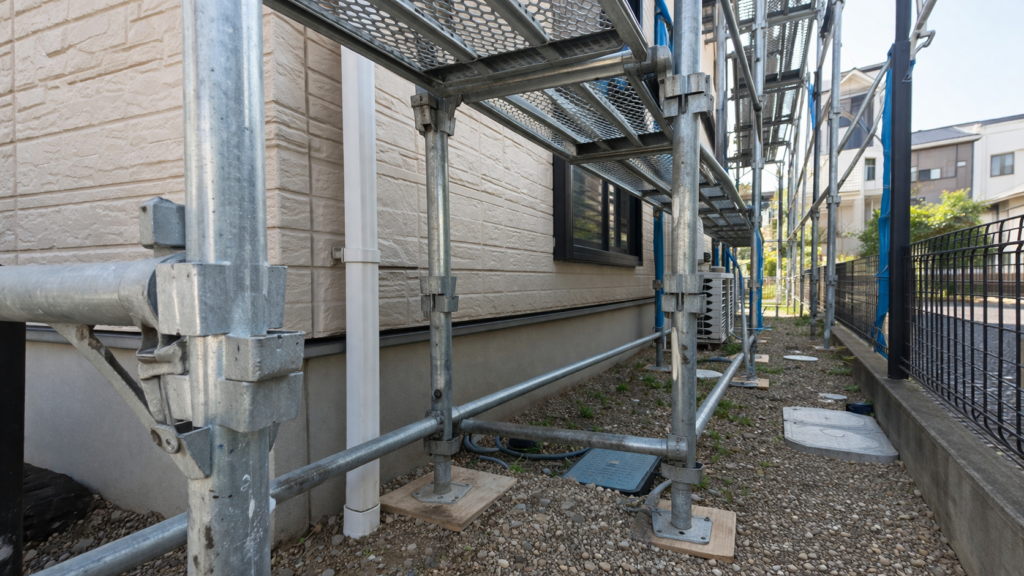
Scaffolding legs need to be prevented from settling, and the Ministry of Health, Labor and Welfare's guidelines also indicate the use of floor plates or bedboards, and the need to make adjustments if there is uneven settlement. The concept of the size of the footbed is even touched on, and the stability of the legs is the most basic of all basics.
However, the important thing here is not to say, ``If you put a floor plate in it, it's fine anywhere.'' Avoid the following locations as much as possible from the beginning.
- Place where rain gutter drainage is concentrated
- Inubashiri side where the soil is soft
- On the lid of a drainage basin or sewage basin
- Shallow location of buried piping
- Places where crushed stone is thin and easily sinks
- North passage that tends to get muddy due to rain
Scaffolding is subject to point loads. The technical term for ``localized subsidence'' is when only the bottom of the leg sinks and the entire leg becomes twisted. To put it in another way for beginners, it's a phenomenon in which ``a sinking of a few millimeters in one area results in a deviation of several centimeters at the top.'' That's why it's safer to shift the leg position from the beginning, rather than dealing with weak spots later with a footboard.
When it comes to boundaries with neighboring properties, it is better not to touch them than to be able to build them.
Scaffolding right on the edge of a neighboring property's border is likely to cause not only physical contact but also psychological trouble. Things that tend to be overlooked when DIY are the bulges of the flame retardant net, the scattering of fallen leaves and dust, the impact on sunlight, and line-of-sight issues.Related articles for DIY RenovaHowever, we believe that flameproof netting is important not only to prevent scattering, but also to be considerate of the neighborhood.
Things to be careful about on the border side are as follows.
- Nets and sheets do not cross borders
- Jacks and braces do not cross boundaries.
- Do not block the meter, water heater, or outdoor unit of your neighbor.
- Consider the direction in which rainwater and demolition debris will fall.
- Avoid scaffolding arrangements that appear to be used as a cover-up
Self-renovation tends to take a long time. That is why it is important to position the scaffolding to reduce stress in the neighborhood.
Consider the location of material storage and scaffolding together.
If you only think about the scaffolding first, you will always end up getting stuck on where to put the materials. Educational materials from the Ministry of Health, Labor and Welfare state that materials should not be placed on scaffolding and that loading guidelines should be observed. There are also precautions such as one span not exceeding 400 kg, and the idea is not to use the work floor like a warehouse.
Therefore, when deciding where to build, consider the ``unloading line'' and ``temporary storage space'' as a set.DIY Renova article on scaffolding in tight spacesHowever, ideas have been introduced, such as separating spans with people from spans with materials, and securing unloading lines first.
in particular,
- Make the widest side the unloading side
- Do not leave materials in front of the entrance
- Avoid plans where materials can only be transported through scaffolding
- Separate storage areas for demolition materials and new materials
- Decide in advance where to temporarily store materials that are sensitive to rain.
If you keep this idea in mind, the position of the scaffolding will be automatically organized.
When in doubt, look at the scene using “four ways of seeing”
Finally, we will summarize checking methods that are easy to implement even for beginners. Once you have found a candidate location for scaffolding, please review the location from the following four ways.
1 How people look
Is it safe for families, craftsmen, meter readers, delivery workers, and neighbors to pass through it?
2 How “equipment” looks
Are water meters, gas, electricity, water heaters, drainage basins, and inspection ports usable?
3 How “Laws and Public” are viewed
Does it protrude into the road? Does it impede evacuation or maintenance? Is it too close to power lines?
4 How “operation” looks
Will it be possible to move around without any inconvenience during construction? Can you imagine bringing in materials, rainy days, nights, and emergencies?
The location where there are fewer problems based on these four criteria is the location where scaffolding should be erected. On the other hand, if the solution is delivered but there are problems in operation, it will usually have to be redone later.
Convenient things to have when checking on-site
Although this is a lightweight tool, tools that improve the accuracy of on-site confirmation are quite effective.
- Measure over 5.5m
- laser distance meter
- Warning notice for curing
- waterproof memo pad
In particular, measuring tapes and laser rangefinders reduce the feeling of "I can't seem to place them." Just looking at the numbers, such as the open space in front of the water meter, the opening of the back door, and the effective road width, will make your decision much more stable.
Summary
It is safer not to decide where to erect scaffolding based solely on whether it can reach the wall.
What really matters is the following order:
First, check the equipment that should not be blocked.
Next, leave ``people's paths and evacuation routes.''
Then, remove risks from "roads, power lines, adjacent land, and ground."
Finally, consider "workability and material delivery."
If you think about things in this order, it will be much easier to organize your worksite. When it comes to DIY scaffolding, more than building it properly, you can improve the quality of your scaffolding by avoiding troublesome areas first.
If you would like to sort out the selection and quantity of scaffolding materials first, please also check out the related articles on DIY Renova.
- Things to consider when calculating scaffolds [First step in DIY exterior wall and roof construction]
- Things to prepare when installing scaffolding [DIY]
- Procedures and preparations for returning scaffolding rentals [How to clean up without making mistakes with DIY renovations]
If you're wondering "How much renovation or remodeling can I actually do on my own home?" or "Where should I even start?", please visit this page. If you're looking to learn more about specific renovation processes or construction details, don't miss this page as well!
Information on updates to this website will be delivered to you once a month.NewsletterIf you are interested, please register.
Please note that this document is not necessarily accurate, and should be used as reference information only.
Well then!
References/Reference materials
- Ministry of Health, Labor and Welfare. Regarding provisions under the Industrial Safety and Health Act regarding scaffolding. https://jsite.mhlw.go.jp/shiga-roudoukyoku/content/contents/001495778.pdf
- Ministry of Health, Labor and Welfare. Guidelines for scaffolding construction methods. https://www.mhlw.go.jp/content/11200000/000525018.pdf
- Ministry of Health, Labor and Welfare. Guideline reference materials regarding handrail advance construction methods, etc. https://www.mhlw.go.jp/content/11300000/000960795.pdf
- Ministry of Health, Labor and Welfare. Key points for safety and health in roofing operations: ``Installing scaffolding (work floor)''. https://www.mhlw.go.jp/content/11200000/02_roofing2_scaffold_jp.pdf
- 東北地方整備局ほか. 本足場の定義について. https://www.thr.mlit.go.jp/bumon/b06111/kenseibup/kensetsu_gekkan/r6shiryo/miyagi_kasetsu.pdf
- Ministry of Land, Infrastructure, Transport and Tourism. Confirmation table of safety and health measures in housing construction. https://www.mlit.go.jp/tochi_fudousan_kensetsugyo/const/content/001979169.pdf
- Kasukabe City. Water meter reading and water leakage check. https://www.city.kasukabe.lg.jp/soshikikarasagasu/suidobugyomuka/gyomuannai/4/1/1/5204.html
- Shibata City. Request from a meter reader. https://www.city.shibata.lg.jp/kurashi/suido/josuido/ryokin/1001353.html
- Moriya City. Please cooperate with meter reading. https://www.city.moriya.ibaraki.jp/kurashi_tetsuzuki/suido/1002264/1002276.html
- Shizuoka City. Water meters and meter reading work. https://www.city.shizuoka.lg.jp/s9267/s013037.html
- Kansai Electric Power Transmission and Distribution. Crane work and scaffolding near power distribution lines (utility poles). https://www.kansai-td.co.jp/supply/accident-prevention/distribution-line/index.html
- Nagoya City. Road occupancy permit for construction facilities. https://www.city.nagoya.jp/jigyou/douro/1026324/1011707/1011708.html
- Sumida Ward. Application for road occupancy permission (scaffold board fence, falling object protection facilities, etc.). https://www.city.sumida.lg.jp/matizukuri/douro/sinsei/dourosenyouasiba.html
- DIY Renova. Things to consider when calculating scaffolding [The first step in DIY exterior wall and roof construction]. https://self-renova.com/scaffolding-howtoplan/
- DIY Renova. Things to prepare when installing scaffolding [DIY]. https://self-renova.com/scaffolding-thingsuneed/
- DIY Renova. How to set up scaffolding in narrow and narrow spaces and things to be careful about [Renovation]. https://self-renova.com/scaffolding-narrowarea/
- DIY Renova. Procedures and preparation for returning scaffolding rental [cleaning techniques to avoid mistakes during DIY renovation]. https://self-renova.com/scaffolding-howtoreturn/
Leave a Reply
You must be logged in to post a comment.